课程 25 - 绘制模式与笔刷
在 课程 14 - 画布模式 中我们介绍了手型和选择模式,在本节课中我们将介绍绘制模式:包括矩形、椭圆和箭头,以及更加自由的笔刷模式。
矩形绘制模式
首先增加以下模式,绘制椭圆的实现几乎一致,就不重复介绍了:
export enum Pen {
    HAND = 'hand',
    SELECT = 'select',
    DRAW_RECT = 'draw-rect',
    DRAW_Ellipse = 'draw-ellipse',
}
在 课程 18 - 使用 ECS 重构 中我们介绍了 ECS 架构,这里创建一个 DrawRect 的 System,一旦进入该模式,就将鼠标样式设置为 crosshair:
import { System } from '@lastolivegames/becsy';

export class DrawRect extends System {
    execute() {
        if (pen !== Pen.DRAW_RECT) {
            return;
        }

        const input = canvas.write(Input);
        const cursor = canvas.write(Cursor);

        cursor.value = 'crosshair';
        //...
    }
}
然后随着鼠标拖拽,在目标区域不断重绘矩形,类似选择模式中的框选效果。当鼠标抬起完成矩形的创建,从绘制矩形模式切换到选择模式:
export class DrawRect extends System {
    execute() {
        //...
        // 拖拽,绘制辅助 UI
        this.handleBrushing(api, x, y);

        if (input.pointerUpTrigger) {
            // 鼠标抬起,创建矩形
            const node: RectSerializedNode = {
                id: uuidv4(),
                type: 'rect', // 椭圆绘制模式下改成 'ellipse' 即可
                x,
                y,
                width,
                height,
            };
            api.setAppState({ penbarSelected: Pen.SELECT }); // 模式切换
            api.updateNode(node);
            api.record(); // 保存历史记录
        }
    }
}
接下来我们来看在拖拽过程中发生了什么。
重绘辅助矩形
和框选类似,为了避免拖拽一小段距离就开始绘制,我们需要设置一段阈值,在 Viewport 坐标系下计算:
handleBrushing(api: API, viewportX: number, viewportY: number) {
    const camera = api.getCamera();
    const {
        pointerDownViewportX,
        pointerDownViewportY,
    } = camera.read(ComputedCameraControl);

    // Use a threshold to avoid showing the selection brush when the pointer is moved a little.
    const shouldShowSelectionBrush =
        distanceBetweenPoints(
            viewportX,
            viewportY,
            pointerDownViewportX,
            pointerDownViewportY,
        ) > 10;
}
辅助矩形的位置坐标 x/y 就是 pointerdown 触发时的位置,接下来也需要将 pointermove 事件对象的坐标转换到 Canvas 坐标系下计算此时的宽高:
const { x: cx, y: cy } = api.viewport2Canvas({
    x: viewportX,
    y: viewportY,
});

let x = pointerDownCanvasX;
let y = pointerDownCanvasY;
let width = cx - x;
let height = cy - y;

api.updateNode(
    selection.brush,
    {
        visibility: 'visible',
        x,
        y,
        width,
        height,
    },
    false,
);
值得一提的是需要考虑反向拖拽的场景,此时计算出的 width/height 可能为负数,相应的 x/y 就不再是 pointerdown 时的位置,需要重新计算。Figma 也是这么做的:
if (width < 0) {
    x += width;
    width = -width;
}
if (height < 0) {
    y += height;
    height = -height;
}
绘制尺寸标签
我们希望在绘制过程中实时展示矩形的尺寸,就像 Figma 这样:
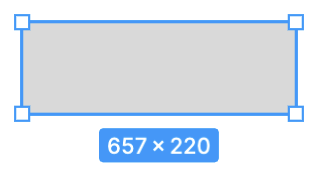
同样,这类视口空间的标注图形放在 SVG 容器中很合适,正如下文会介绍的激光笔和橡皮擦。矩形标签使用 CSS 样式设置背景颜色、padding、居中等等,文本内容使用包围盒的宽高:
label.style.visibility = 'visible';
label.style.top = `${y + height}px`;
label.style.left = `${x + width / 2}px`;
label.innerText = `${Math.round(width)} × ${Math.round(height)}`;
如果绘制的是直线,标签可以沿着直线方向旋转,但需要让文本始终正向展示,你可以在下一节的箭头例子中体验:
label.style.top = `${y + height / 2}px`;
const rad = Math.atan2(height, width);
let deg = rad * (180 / Math.PI);
if (deg >= 90 && deg <= 180) {
    deg = deg - 180;
} else if (deg <= -90 && deg >= -180) {
    deg = deg + 180;
}
label.style.transform = `translate(-50%, -50%) rotate(${deg}deg)`;
按住 Shift 绘制正方形
最后,按住 Shift 可以以相同的宽高绘制正方形(正圆),此时使用宽高绝对值的最小值作为正方形的边长。
if (isSquare) {
    if (Math.abs(width) > Math.abs(height)) {
        width = Math.sign(width) * Math.abs(height);
    } else {
        height = Math.sign(height) * Math.abs(width);
    }
}
绘制箭头
除了矩形、椭圆、折线等基础图形,箭头这样的复合图形也很常用。我们暂时不涉及箭头的绑定关系(被箭头首尾关联的图形发生移动,箭头的朝向也跟着改变),后面放到单独的一章中介绍,这里仅关注箭头的绘制方式。
在 SVG 中首先使用 <marker> 声明箭头,通常是一个 <path>,然后通过目标图形的 marker-start 和 marker-end 属性关联箭头:
<defs>
    <!-- arrowhead marker definition -->
    <marker
        id="arrow"
        viewBox="0 0 10 10"
        refX="5"
        refY="5"
        markerWidth="6"
        markerHeight="6"
        orient="auto-start-reverse"
    >
        <path d="M 0 0 L 10 5 L 0 10 z" />
    </marker>
</defs>
<!-- Coordinate axes with a arrowhead in both direction -->
<polyline
    points="10,10 10,90 90,90"
    fill="none"
    stroke="black"
    marker-start="url(#arrow)"
    marker-end="url(#arrow)"
/>
这种将箭头端点与主体分离的方式十分灵活。但在图形编辑器场景下,只需要提供一些预设的常见样式即可。例如 Figma 中的箭头就是通过附加在 Path 的两个端点(start/end point)上实现的,包括 line/triangle/diamond 等若干种预设样式,详见:How to Curve an Arrow in Figma
再比如在 drawio 中也提供了一系列开箱即用的箭头字面量作为配置:
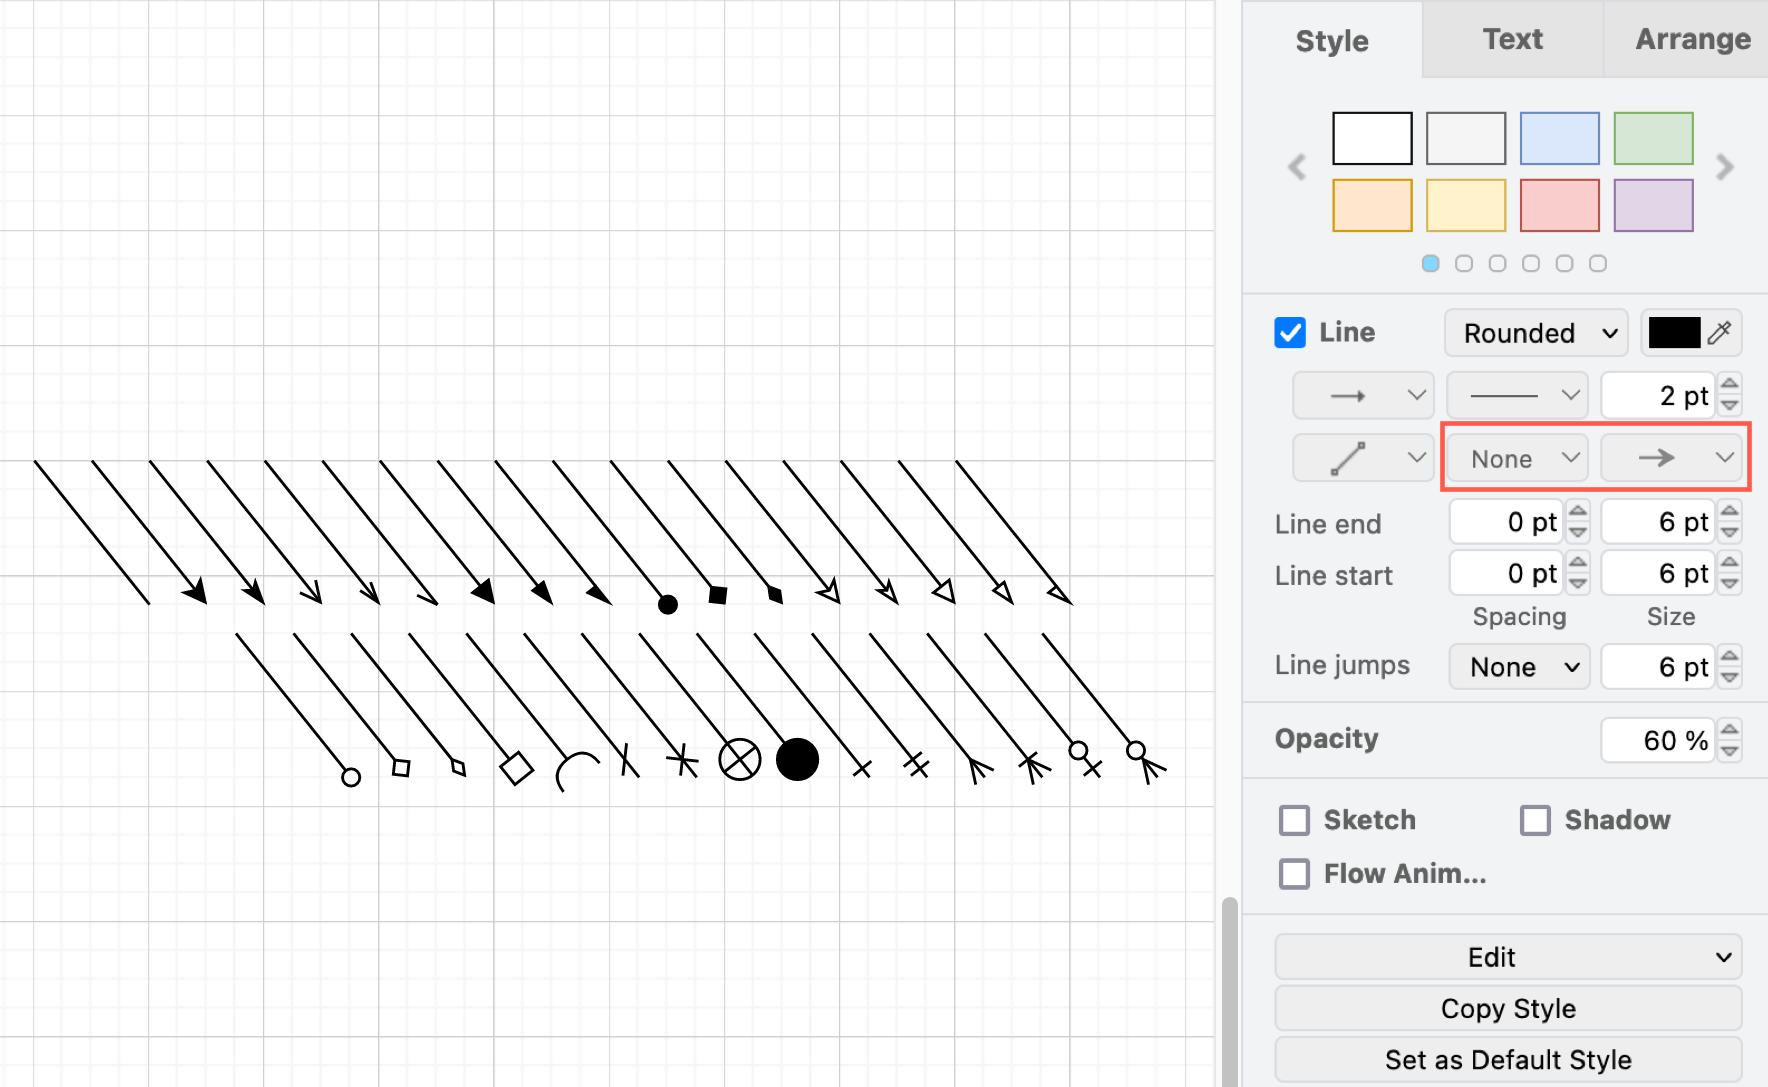
因此在声明式用法中,我们完全可以牺牲自定义箭头样式这一特性,提供一系列内置的箭头样式字面量,在构建 Polyline / Path 时将箭头端点和主体一并生成。这种思路在使用 SVG 渲染的 plot - arrow 中也可以看到,它并没有使用 <marker>,而是一个完整的 <path> 定义。
export interface MarkerAttributes {
    markerStart: Marker['start'];
    markerEnd: Marker['end'];
}
接下来我们来看具体的构建 geometry 过程。
起始点和终点
首先需要找到箭头的起始点和终点。但朝向需要手动计算,计算方式并不复杂,沿切线即可。
导出 SVG
SVG 中可以通过 orient 属性调整 <marker> 的朝向,但需要注意该属性的字面量只有 'auto' 和 'auto-start-reverse' 两个值
if (isEnd) {
    $marker.setAttribute('orient', 'auto');
} else {
    $marker.setAttribute('orient', 'auto-start-reverse');
}
然后根据 marker 的类型创建 <path>,让它继承目标图形的 stroke 等属性。你可以在 export arrow 测试用例中查看导出结果:
if (marker === 'line') {
    const points = lineArrow(0, 0, arrowRadius, Math.PI);
    const $path = createSVGElement('path');
    $path.setAttribute('fill', 'none');
    $path.setAttribute('stroke', stroke);
    $path.setAttribute('stroke-width', `${strokeWidth}`);
    $marker.appendChild($path);
}
与之相对的,导出的 SVG 也要支持再导入画布。
绘制多边形
给定一个矩形包围盒,程序化生成多边形路径:
function regularPolygonPathInRect(
    sides: number,
    width: number,
    height: number,
    rotation = -Math.PI / 2,
): string {
    if (sides < 3 || width <= 0 || height <= 0) {
        return '';
    }

    const cx = width / 2;
    const cy = height / 2;
    const rx = width / 2;
    const ry = height / 2;
    const step = (Math.PI * 2) / sides;
    const points: [number, number][] = [];

    for (let i = 0; i < sides; i++) {
        const angle = rotation + i * step;
        points.push([
            formatNumber(cx + Math.cos(angle) * rx),
            formatNumber(cy + Math.sin(angle) * ry),
        ]);
    }

    return points
        .map(([x, y], index) => `${index === 0 ? 'M' : 'L'} ${x} ${y}`)
        .join(' ')
        .concat(' Z');
}
铅笔工具
首先我们先来看最简单的一种实现,使用折线展示,在 Figma 中称作 Pencil。
为了尽可能减少拖拽过程中产生的顶点,尤其是大量重复的、或者距离较近的顶点,我们使用 课程 12 - 简化折线的顶点 中介绍的方法对折线进行简化,选择simplify-js 实现。值得注意的是 tolerance 这个参数的定义,它会影响简化程度:
Affects the amount of simplification (in the same metric as the point coordinates).
我们希望根据当前的相机缩放等级设置不同的 tolerance,否则在高缩放等级下过度简化造成的抖动会被很容易看出来:
import simplify from 'simplify-js';

export class DrawPencil extends System {
    private handleBrushing() {
        // choose tolerance based on the camera zoom level
        const tolerance = 1 / zoom;
        selection.points = simplify(selection.pointsBeforeSimplify, tolerance);
    }
}
Perfect freehand
由于线宽是固定的,显得不够“灵动”。为了营造一些手写感,可以让线条跟随压力变化。为此我们可以使用 perfect-freehand,值得一提的是在 Excalidraw 中还未接入,详见:Perfect Freehand Drawing Issue。
由于线宽可变,最终绘制出来的图形不再是 Polyline 而是 Path:
import { getStroke } from 'perfect-freehand';

const outlinePoints = getStroke(points);
const d = getSvgPathFromStroke(outlinePoints); // 'M 0 0 L...'
默认情况下 perfect-freehand 是通过相邻点的距离计算可变的线宽,来模拟笔触的快慢。在带有压力感应的输入设备(pen or stylus)场景下,可以将事件自带的 pressure 映射上去:
export class Input {
    @field.float32 declare pressure: number;
}
此时就可以关闭默认的模拟行为:
const outlinePoints = getStroke(inputPoints, {
    simulatePressure: false,
});
笔刷模式
在 Photoshop Web 中进入 Paint 模式后可以选择这个子工具,通过连续拖拽绘制笔迹:

在 Figma 中称作 Draw with illustration tools。
如果我们仔细观察这类笔迹,可以看出它是由一组连续的圆点组成,如果这些圆点具有不同的半径,就能呈现粗细可变的效果。在实现时可以将画笔的压力映射到半径上:
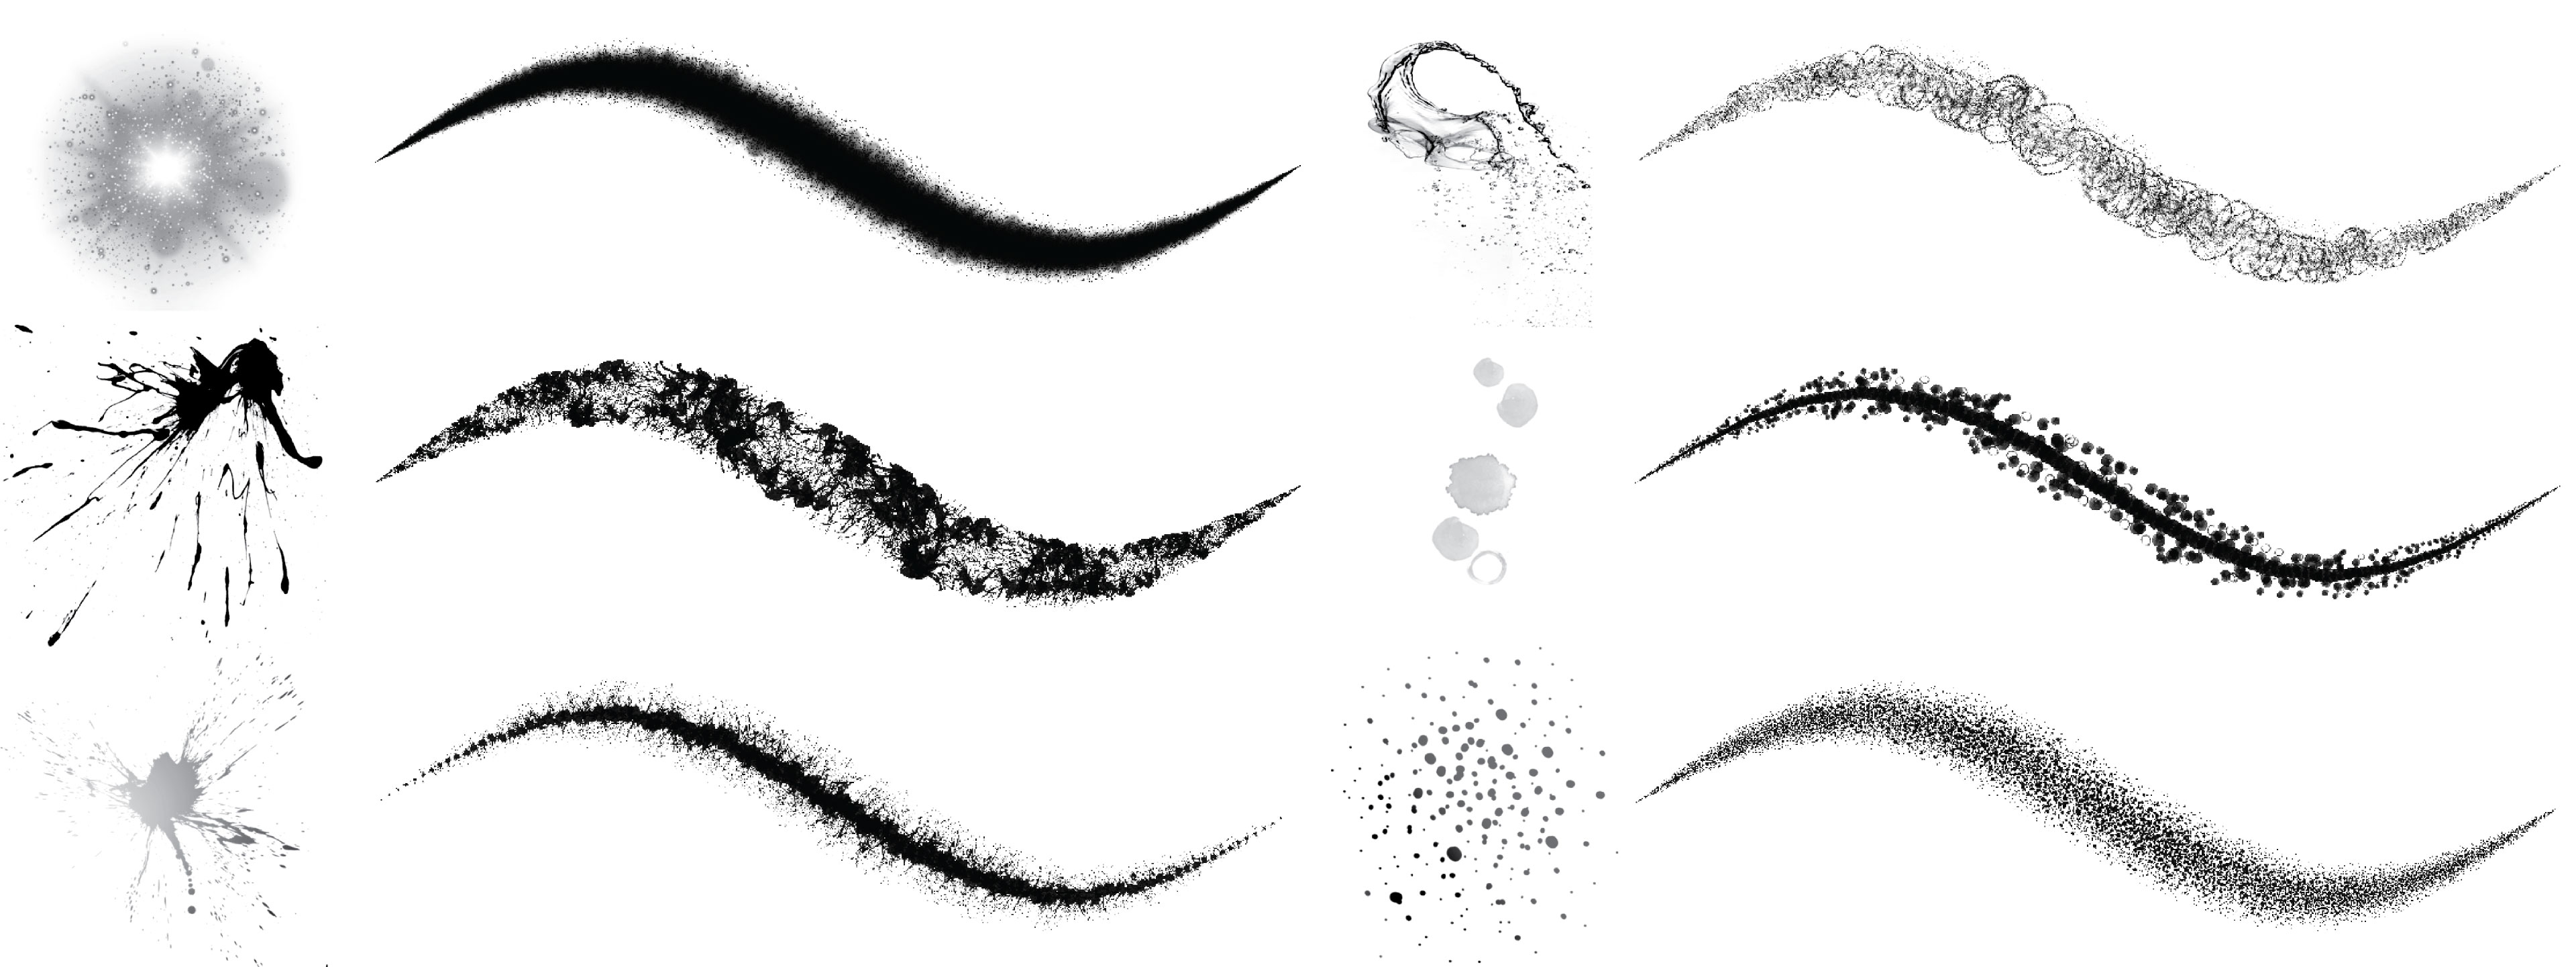
下面我们参考 Brush Rendering Tutorial 来实现这一效果,作者介绍了一种不依赖顶点密度、沿折线均匀放置圆点(贴图)的方法。

基础实现
基础数据结构如下,序列化后形成 points: 'x1,y1,r1 x2,y2,r2...' 这样的三元组列表:
interface BrushPoint {
    x: number;
    y: number;
    radius: number;
}
折线的
renderPass.drawIndexed(6, points.length - 1); // indices: [0, 1, 2, 0, 2, 3]我们在 课程 12 - 线段主体拉伸 中介绍过,可以将 a_VertexNum 传入 Vertex Shader。如果不考虑 WebGL 1 的兼容性,也可以像 Brush Rendering Tutorial 这样,直接使用 gl_VertexID:
layout(location = ${Location.POINTA}) in vec3 a_PointA;
layout(location = ${Location.POINTB}) in vec3 a_PointB;
layout(location = ${Location.VERTEX_NUM}) in float a_VertexNum; // [0, 1, 2, 3]
顺便介绍下其他 attributes,a_PointA 和 a_PointB 除了存储顶点位置坐标,还存储了可变半径。同样我们使用了 vertexBufferOffsets 复用同一块 Buffer,a_PointB 从 4 * 3 的偏移量后开始读取。这样有了顶点序号就可以在 Vertex Shader 中进行拉伸了:
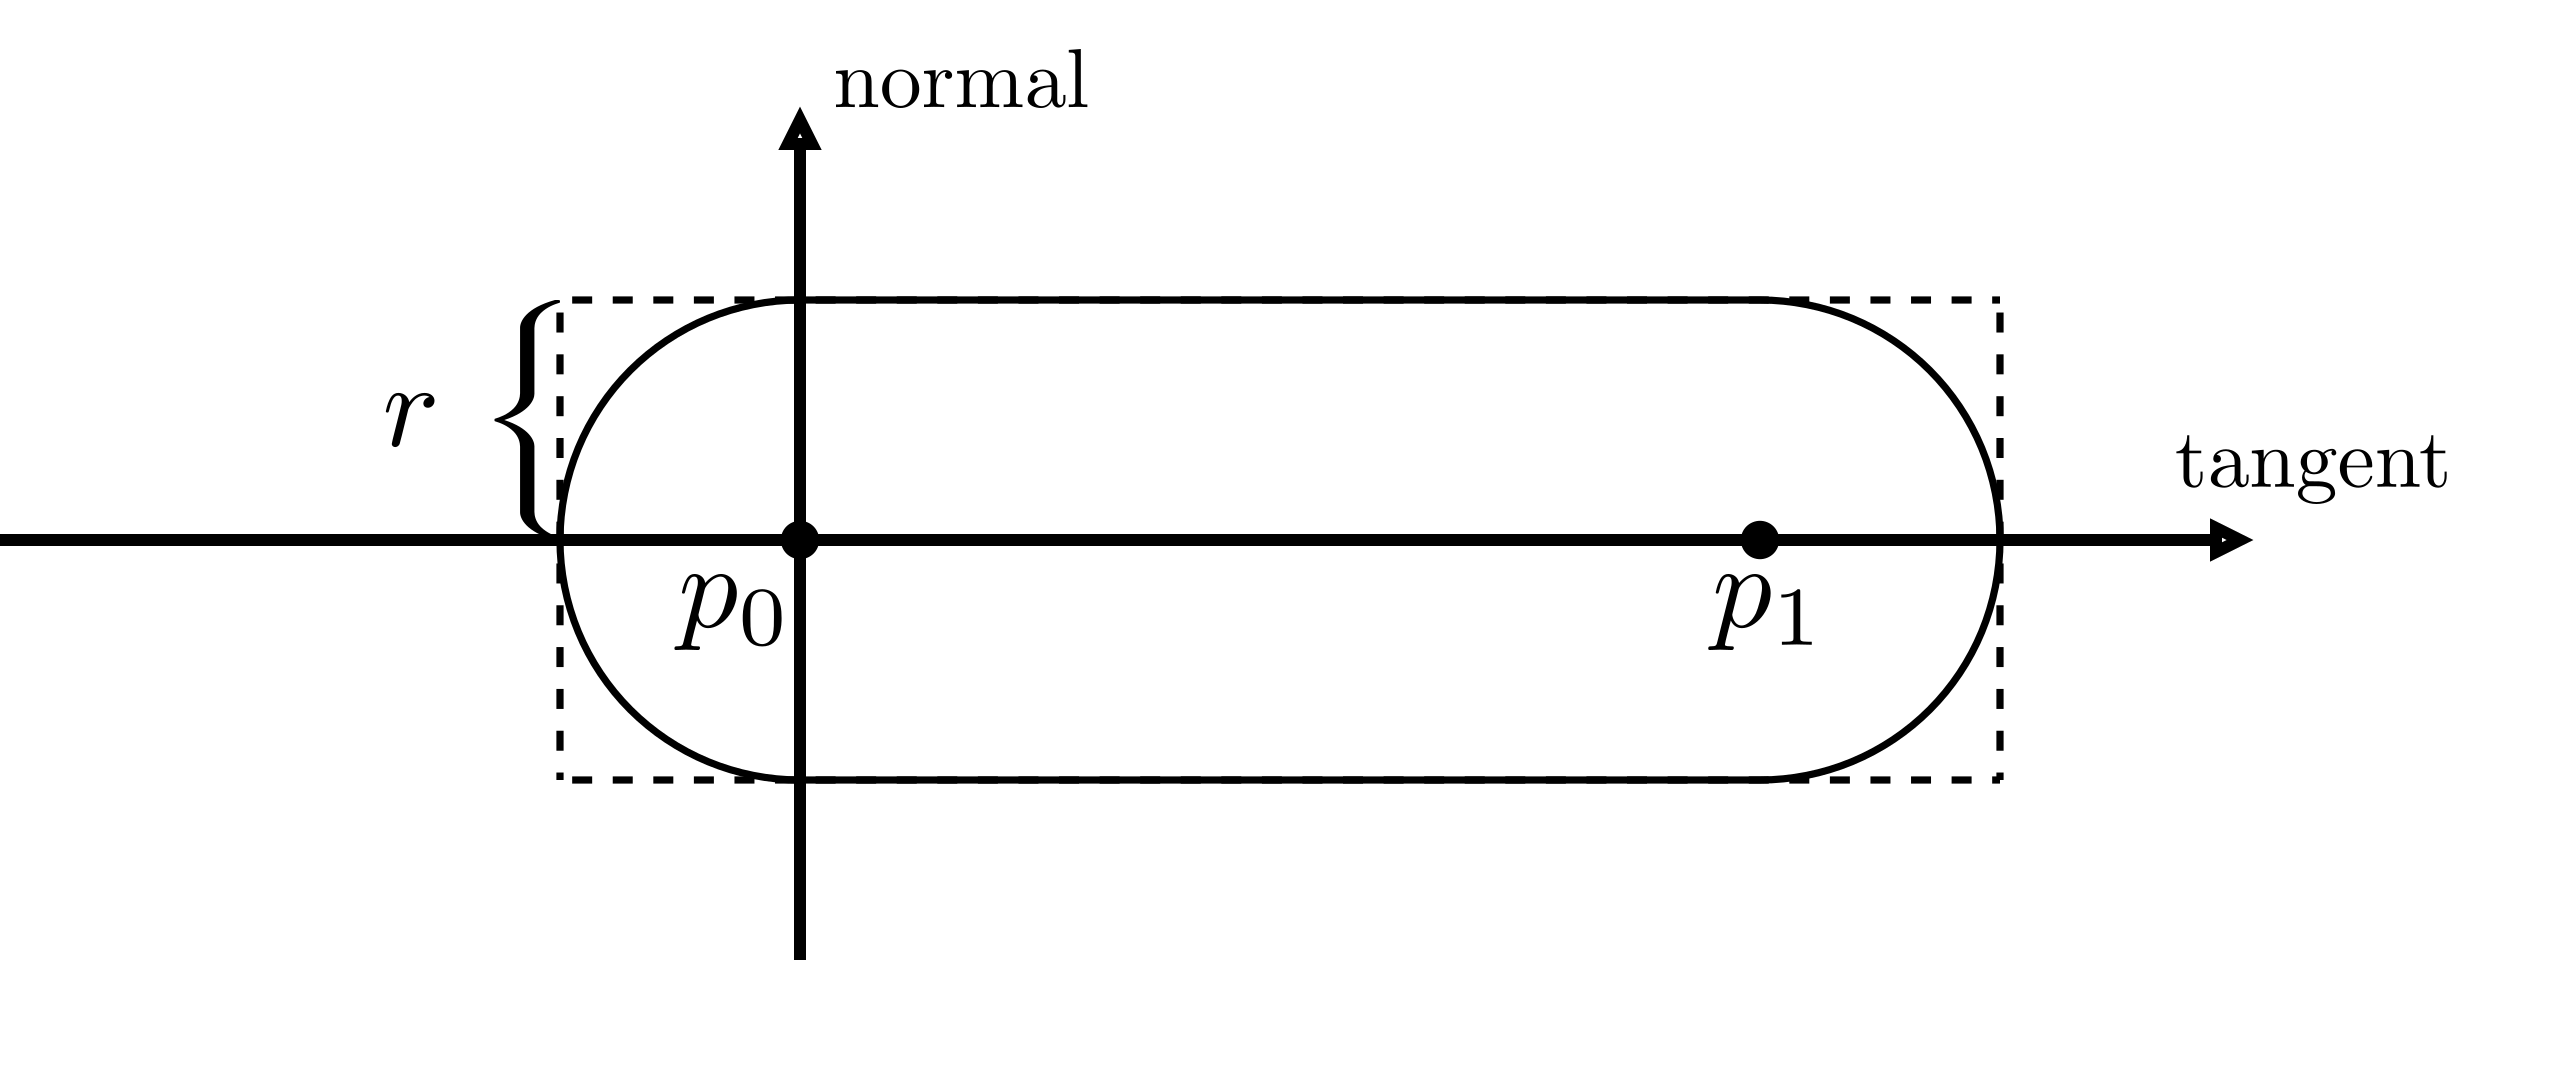
vec2 position;
vec2 offsetSign;
float r;
if (vertexNum < 0.5) {
    position = p0;
    r = r0;
    offsetSign = vec2(-1.0, -1.0);
} else if (vertexNum < 1.5) {
    position = p0;
    r = r0;
    offsetSign = vec2(-1.0, 1.0);
}
为了支持可变宽度,拉伸的距离并不总是等于当前点的半径,而是需要根据线段的斜率计算:
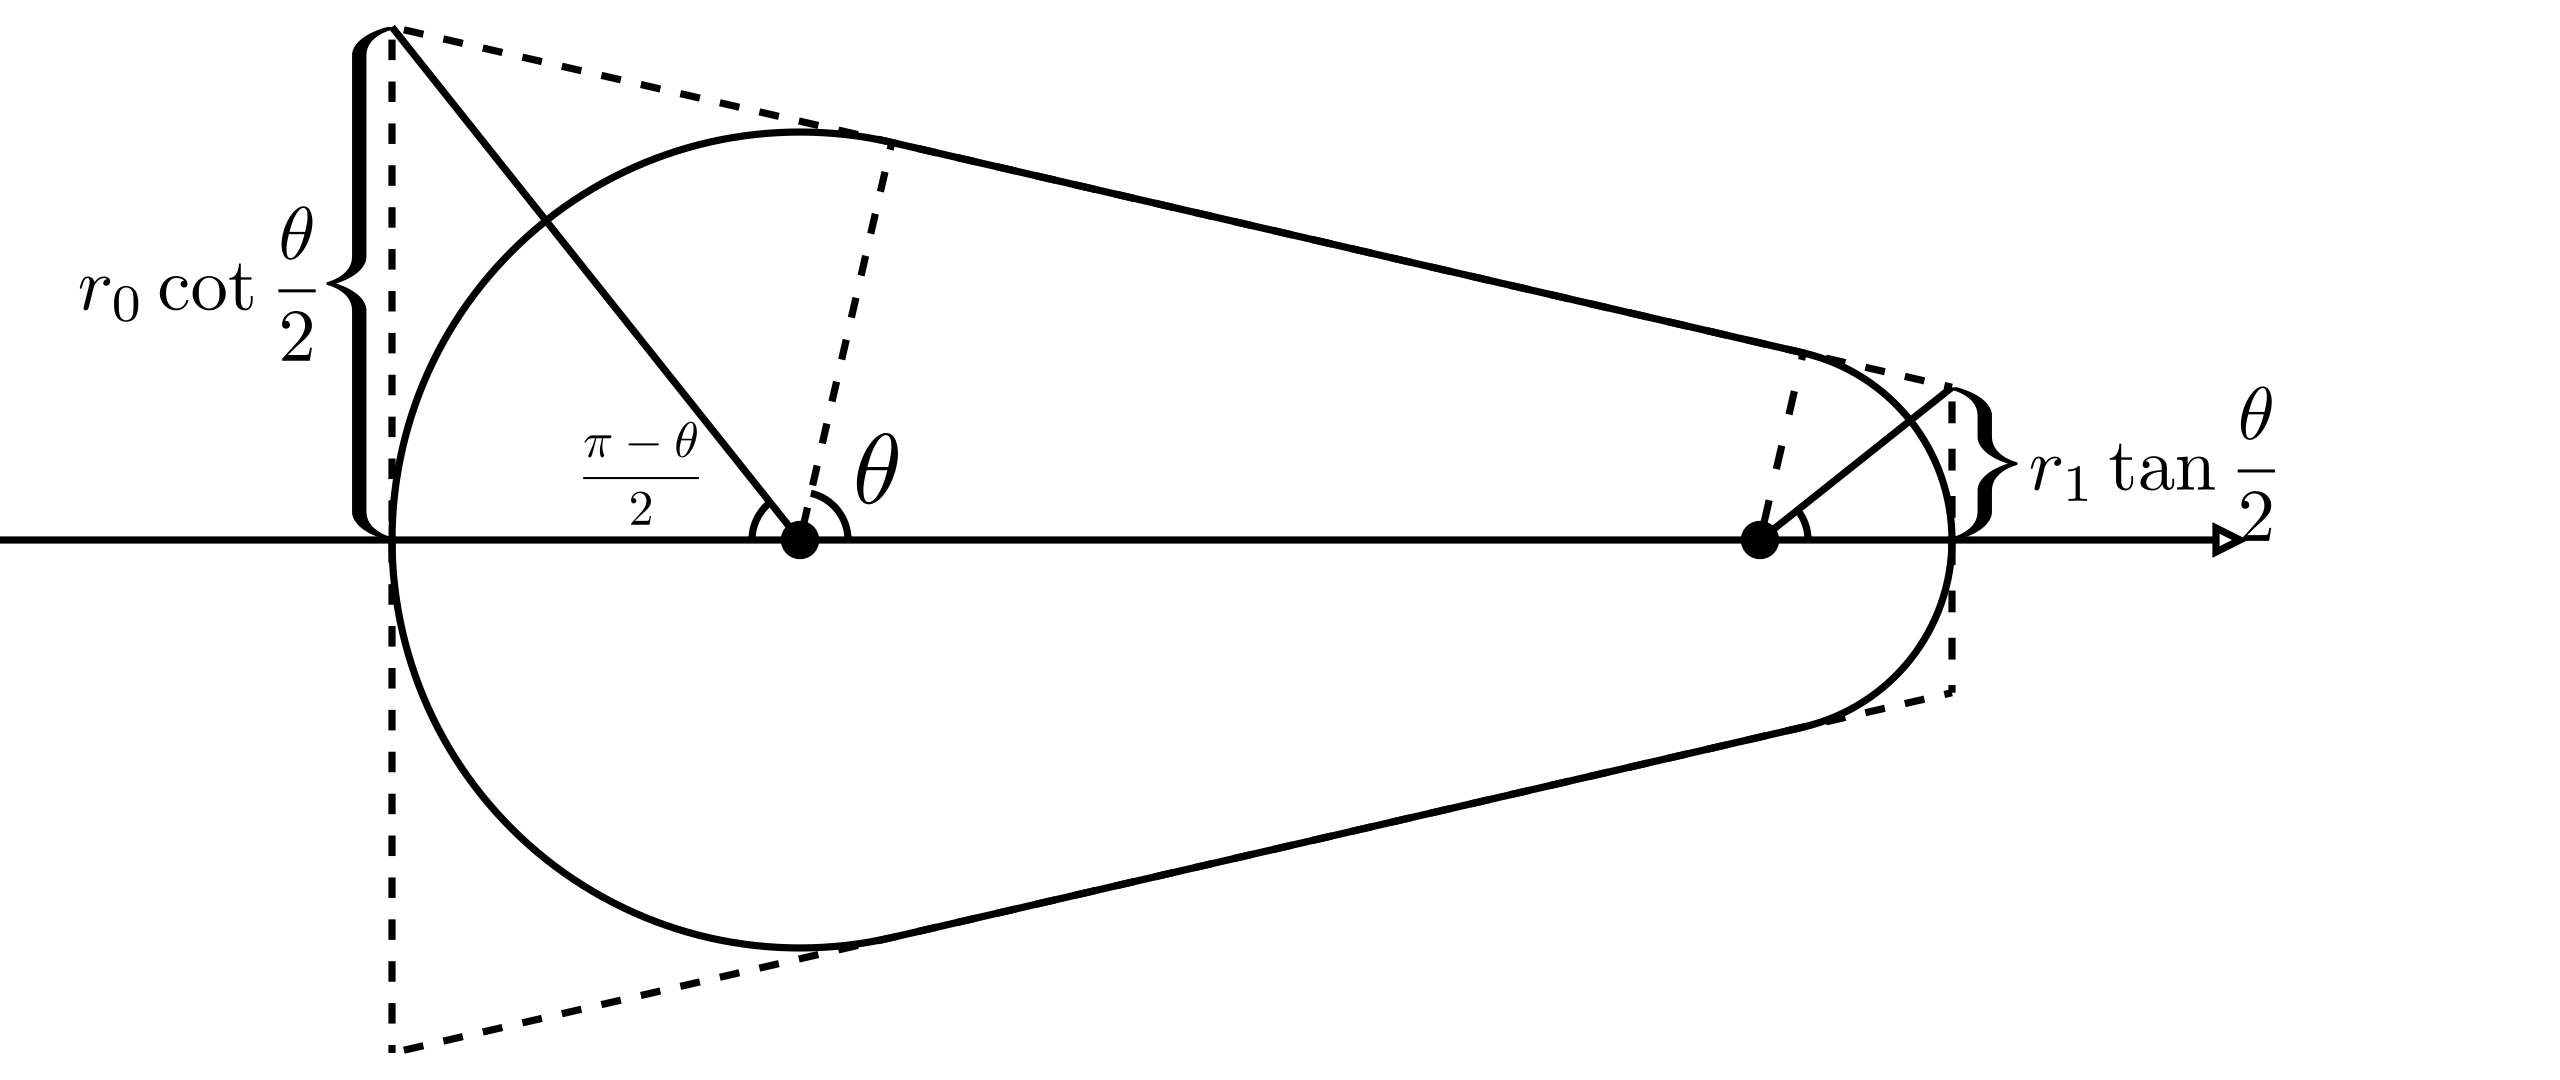
int MAX_i = 128; float currIndex = startIndex;
float A = 0.0;
for(int i = 0; i < MAX_i; i++){
    // Blend opacity
    A = A * (1.0-opacity) + opacity;
}
效果如下:
贴图
这样的效果还不太像真实的笔触,我们新增 brushStamp 属性表示贴图链接,它仅提供透明度的来源,笔刷颜色仍通过 stroke 控制:
api.updateNodes([
    {
        id: '1',
        type: 'brush',
        brushType: BrushType.STAMP,
        brushStamp: '/stamp.png',
        points: position.map(([x, y], i) => `${x},${y},${radius[i]}`).join(' '),
        stroke: 'grey',
    },
]);
目前贴图的方向都是固定的,我们可以为贴图添加随机旋转角度:
float angle = rotationFactor*radians(360.0*fract(sin(currIndex)*1.0));
pToCurrStamp *= rotate(angle);
还可以在混合透明度时使用噪音影响因子:
float opacityNoise = noiseFactor*fbm(textureCoordinate*50.0);[WIP] 导出 SVG
Figma 是可以将 Brush 导出 SVG 的。
激光笔
在画布中进行演示功能时,激光笔是一个必备的功能。Excalidraw 支持这一功能,详见:laser pointer,我们可以直接使用它封装好的 @excalidraw/laser-pointer,根据传入的一组点坐标生成轨迹路径,底层使用的也是 perfect-freehand。
这一特性与之前在画布上绘制的图形不同:
- 绘制激光笔的轨迹发生在视口坐标系下,和当前画布缩放等级无关,因此可以在一个独立的 HTML 容器中完成,详见:课程 29 - HTML 容器
- 轨迹在一定时间后自动消失
- 考虑多人协同场景,详见:课程 20 - Awareness 和 Presence
橡皮擦
Excalidraw 支持 freedraw eraser,选中橡皮擦工具后,按下鼠标后经过的图形会“虚化”,表示即将被删除,抬起鼠标完成擦除。
在实现中,我们使用上一节介绍过的 Perfect freehand 绘制拖动的轨迹,但仅保存最近的 4 个点。同时实时检测经过的图形,设置它们的透明度(但记得保存原有的透明度,以备取消时回复),在鼠标抬起时删除选中的图形:
export class DrawEraser extends System {
    execute() {
        if (input.pointerUpTrigger) {
            api.runAtNextTick(() => {
                api.updateNode(brush, { visibility: 'hidden' }, false);
                api.setAppState({
                    penbarSelected: Pen.SELECT,
                });
                api.deleteNodesById(
                    Array.from(selected).map((e) => api.getNodeByEntity(e)?.id),
                );
                api.record();
            });
        }
    }
}
非原子化
以整个图形为单位擦除在大多数场景下都足够使用了,但在手绘类场景中非原子化的擦除更实用,例如将一条直线从中间断开。Excalidraw 暂时没有支持这一特性,详见:non-atomic erasing for linear & freedraw shapes,FigJam 也是这样。如果画布是基于 Canvas 或者 SVG 渲染的,确实无法实现这种像素级擦除效果。
由于我们的画布是基于 WebGL / WebGPU 实现的,最适合的技术就是 stencil buffer。首先将橡皮擦的路径绘制在 stencil buffer 中,然后以它作为 mask 重绘场景。以 OpenGL 为例(WebGL 完全类似):
// 1. Disable color/depth writes, enable stencil, and draw the eraser shape:
//    This writes “1” into the stencil where the eraser stamp is drawn.
glColorMask(false,false,false,false);
glDepthMask(false);
glEnable(GL_STENCIL_TEST);
glStencilFunc(GL_ALWAYS, 1, 0xFF);
glStencilOp(GL_REPLACE, GL_REPLACE, GL_REPLACE);
// draw eraser brush geometry here (e.g. a textured quad or circle)

glColorMask(true,true,true,true);
glDepthMask(true);
// 2. Now render the shapes with stencil test=EQUAL, so only pixels where stencil==1 pass:
glStencilFunc(GL_EQUAL, 1, 0xFF);
glStencilOp(GL_KEEP, GL_KEEP, GL_KEEP);
// draw all scene objects (they will only appear where eraser just wrote 1)
这部分我们放在 课程 34 - Frame 与裁切 中介绍。