课程 15 - 绘制文本
文本渲染是一个非常复杂的过程,State of Text Rendering 2024 中给出了非常详细的介绍,强烈推荐你阅读这篇综述文章。
在这节课中你将学习到以下内容:
- 什么是 TextMetrics,如何在服务端和浏览器端获取
- 什么是 Shaping
- 分段与自动换行、BiDi 和复合字符
- 如何生成 SDF atlas 并使用它绘制
- 如何处理 emoji
对于习惯了使用浏览器提供的 Canvas 2D Drawing text 或 SVG 的开发者来说,文本渲染的复杂性可能超出了你的想象。下图来自 Modern text rendering with Linux: Overview,它展示了文本渲染的数据流,从文本到字形,再到光栅化,最后绘制到屏幕上。其中涉及到的 HarfBuzz、FreeType、Bidi 我们后续会简单介绍,而 OpenType 是目前最流行的字体格式,有趣的是 HarfBuzz 就是 "open type" 的波斯语名。

基于我之前在 Web 端可视化项目中的经验,Text rendering in mapbox 可能更具有实操层面的指导意义,毕竟我们不会直接接触上述工具链中的绝大部分。但尽可能多了解上述流程,有助于你理解文本渲染的本质。
Shaping
首先来看我们的输入,给定一段文本和字体,这个字体以 fontstack 形式给出,因此是一个数组:
{
    "text-field": "Hey",
    "text-font": ["Open Sans Semibold", "Arial Unicode MS Bold"]
}
fontstack
A fontstack is an ordered list consisting of a primary font and optional fallback font(s). https://docs.mapbox.com/help/troubleshooting/manage-fontstacks/
什么是 Shaping 呢?下图来自 Text rendering in mapbox,简而言之就是依次放置一个个字符的位置,当然过程中需要考虑很多情况,例如遇到换行符等:

下图来自 Modern text rendering with Linux: Overview

要想正确放置字符的位置,我们就需要获取 TextMetrics,就算采用最简单的并排放置,也至少得知道每个字符的宽度。下面我们主要关注在浏览器端如何获取。
TextMetrics
HTML 规范给出了 TextMetrics 的定义,分成水平和垂直两组:
// @see https://html.spec.whatwg.org/multipage/canvas.html#textmetrics
interface TextMetrics {
  // x-direction
  readonly attribute double width; // advance width
  readonly attribute double actualBoundingBoxLeft;
  readonly attribute double actualBoundingBoxRight;

  // y-direction
  readonly attribute double fontBoundingBoxAscent;
  readonly attribute double fontBoundingBoxDescent;
  readonly attribute double actualBoundingBoxAscent;
  readonly attribute double actualBoundingBoxDescent;
  readonly attribute double emHeightAscent;
  readonly attribute double emHeightDescent;
  readonly attribute double hangingBaseline;
  readonly attribute double alphabeticBaseline;
  readonly attribute double ideographicBaseline;
};
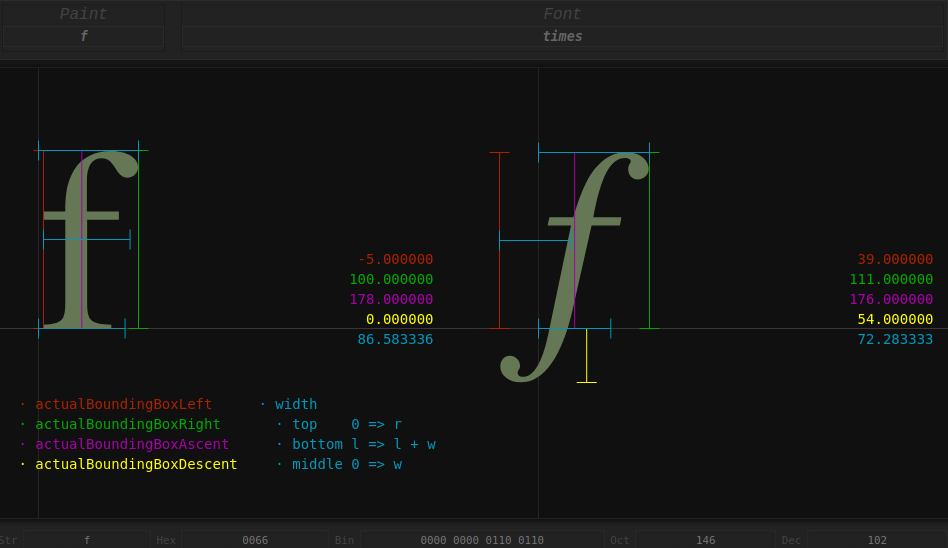
我们先关注水平方向上的三个属性。下图来自 Differences between width and actualBoundingBoxLeft(Right),可以看到 width 和 actualBoundingBoxLeft/Right 的差异,简而言之后者代表了字符的最大边界(在垂直方向上 actualBoundingBoxAscent/Descent 同理),而前者(蓝色)完全有可能小于后者之和(红色+绿色),例如下图中右侧的斜体 f,考虑到 font-kerning,假如下一个字符仍是 f,那么这两个 f 可以并排穿插在一起。
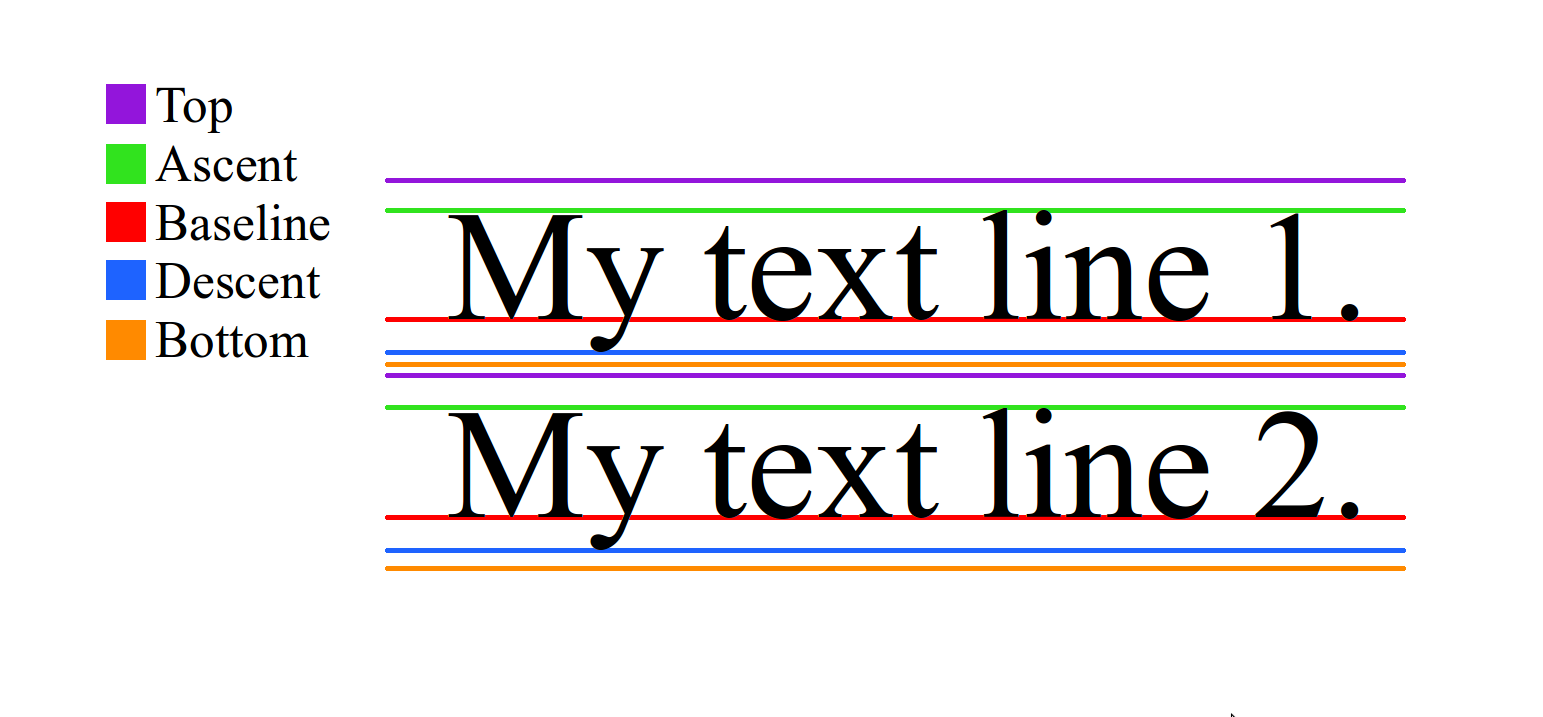
再来看垂直方向的属性。下图来自 Meaning of top, ascent, baseline, descent, bottom, and leading in Android's FontMetrics。首先找到 text-baseline,Ascent/Descent 结尾的属性都是以它为基准的:
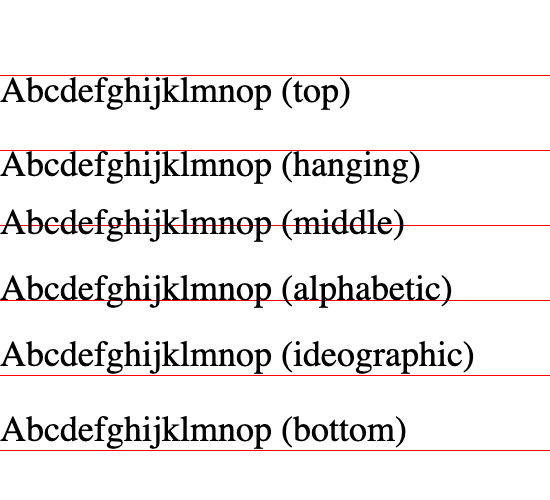
text-baseline 的取值可以参考 text-baseline,如下图所示。例如取 hanging 值时,hangingBaseline 的值就是 0,alphabeticBaseline 的值就是 alphabetic 到 hanging 的距离。
最后 fontBoundingBoxAscent/Descent 是字体本身的最大边界,actualBoundingBoxAscent/Descent 是实际绘制时字体的最大边界,因此前者适合用来绘制一致的文本的背景,不会随内容变化而显得高低不平。
measureText
如何获取 TextMetrics 呢?Canvas 2D API 提供了 measureText,但实际使用时需要考虑到只有 width 可用的情况。以 PIXI.TextMetrics 为例,在实现时就考虑到了这一点,如果 actualBoundingBoxLeft/Right 都为 0,则使用 width:
let textMetrics = PIXI.TextMetrics.measureText('Your text', style);

// @see https://github.com/pixijs/pixijs/blob/dev/src/scene/text/canvas/CanvasTextMetrics.ts#L334
const metrics = context.measureText(text);
let metricWidth = metrics.width;
const actualBoundingBoxLeft = -metrics.actualBoundingBoxLeft;
const actualBoundingBoxRight = metrics.actualBoundingBoxRight;
let boundsWidth = actualBoundingBoxRight - actualBoundingBoxLeft;
return Math.max(metricWidth, boundsWidth);
而对于字体相关的属性,选取了几个具有代表性的字符,确保能度量到 Ascent/Descent,实在获取不到则使用用户手动传入的 fontSize 值。
// @see https://github.com/pixijs/pixijs/blob/dev/src/scene/text/canvas/CanvasTextMetrics.ts#L779
context.font = font;
const metrics = context.measureText(
    CanvasTextMetrics.METRICS_STRING + // |ÉqÅ
        CanvasTextMetrics.BASELINE_SYMBOL, // M
);

const properties = {
    ascent: metrics.actualBoundingBoxAscent,
    descent: metrics.actualBoundingBoxDescent,
    fontSize:
        metrics.actualBoundingBoxAscent + metrics.actualBoundingBoxDescent,
};

if (fontProperties.fontSize === 0) {
    fontProperties.fontSize = style.fontSize as number;
    fontProperties.ascent = style.fontSize as number;
}
除了使用 Canvas 2D API,在浏览器端还有以下选择:
- opentype.js
- use-gpu 使用的是基于 ab-glyph 封装的 use-gpu-text
- 越来越多的应用使用 harfbuzzjs,详见:State of Text Rendering 2024
Using HarfBuzz on the web has been on the rise, first transpiled to JavaScript, and more recently cross-compiled to WebAssembly, through harfbuzzjs. Apps like Photopea, an online photo editor, use it that way. Crowbar by Simon Cozens is an OpenType shaping debugger web-app built using the HarfBuzz buffer-messaging API. Sploot is another web-app by Simon, a font inspector. Prezi and Figma also use HarfBuzz in their web-apps.
正如 What HarfBuzz doesn't do 中所说,仅仅解决单个字符的度量问题还远远不够,接下来我们先考虑 letterSpacing。
HarfBuzz can tell you how wide a shaped piece of text is, which is useful input to a justification algorithm, but it knows nothing about paragraphs, lines or line lengths. Nor will it adjust the space between words to fit them proportionally into a line.
letterSpacing
Canvas 2D API 提供了 letterSpacing,可以用来调整字符之间的间距。在度量文本前我们设置它:
measureText(
    text: string,
    letterSpacing: number,
    context: ICanvasRenderingContext2D
) {
    context.letterSpacing = `${letterSpacing}px`;
    // 省略度量过程
}
后续在安排每个字符的位置时也需要考虑,我们将在 Generate quads 中介绍。
Paragraph layout
单个字符组合在一起形成了句子,句子又组成了段落。下图来自 Text layout is a loose hierarchy of segmentation,自底向上展示了文本布局的层次结构。
Canvas 2D API 在文本绘制上并没有提供 paragraph 相关的能力,只有最基础的 Drawing text 功能。基于 Skia 实现的 CanvasKit 在此基础上进行了扩展,额外提供了 drawParagraph 方法,详见:CanvasKit Text Shaping
One of the biggest features that CanvasKit offers over the HTML Canvas API is paragraph shaping.
const paragraph = builder.build();
paragraph.layout(290); // width in pixels to use when wrapping text
canvas.drawParagraph(paragraph, 10, 10);
我们先从分段开始实现。
分段
最简单的分段依据就是显式换行符。
const newlines: number[] = [
    0x000a, // line feed
    0x000d, // carriage return
];另外也需要考虑自动换行的情况。同时让每一行尽可能保持接近的长度,详见:Beautifying map labels with better line breaking
const breakingSpaces: number[] = [
    0x0009, // character tabulation
    0x0020, // space
    0x2000, // en quad
    0x2001, // em quad
    0x2002, // en space
    0x2003, // em space
    0x2004, // three-per-em space
    0x2005, // four-per-em space
    0x2006, // six-per-em space
    0x2008, // punctuation space
    0x2009, // thin space
    0x200a, // hair space
    0x205f, // medium mathematical space
    0x3000, // ideographic space
];
在 CJK 中部分字符不能出现在行首,部分不能出现在行尾。例如在中文里大部分标点符号不能出现在行首,具体规则详见:Line breaking rules in East Asian languages。pixi-cjk 处理了这些情况:

BiDi
HarfBuzz 也不会处理 BiDi,详见 What HarfBuzz doesn't do:
HarfBuzz won't help you with bidirectionality.
BiDi
support for handling text containing a mixture of left to right (English) and right to left (Arabic or Hebrew) data.
比如这段 LTR 和 RTL 混排的内容 ABCאבגDEF,需要手动改变 RTL 的顺序才能展示正确的效果:
'ABCאבגDEF'.split(''); // ['A', 'B', 'C', 'ג' ,'ב' ,'א', 'D', 'E', 'F']在浏览器端这个问题并不容易解决,例如 Pixi.js 至今也没有解决,详见:BiDi in Pixi.js。mapbox-gl-rtl-text 和 rtl-text 通过 WASM 将 International Components for Unicode (ICU) 移植到浏览器环境,但会显著增加 JS 包大小。目前我们可以使用 bidi-js,遇到 RTL 字符时,需要手动反转:
import bidiFactory from 'bidi-js';

this.#bidi = bidiFactory();
const embeddingLevels = this.#bidi.getEmbeddingLevels(text);
let bidiChars = '';
for (const segment of segmentStack[0]!) {
    const { text, direction } = segment;
    bidiChars += direction === 'ltr' ? text : text.split('').reverse().join('');
}
另外在阿拉伯语中,同一个字符在不同情况下会有多个变体。例如 meem (U+0645) 就有以下四种,需要根据前后的字符做出调整,详见:Improving Arabic and Hebrew text in map labels:

我们选择使用 JavaScript-Arabic-Reshaper,相比基于 ICU 的方案要轻量很多。
import ArabicReshaper from 'arabic-reshaper';

if (direction === 'ltr') {
    bidiChars += text;
} else {
    bidiChars += ArabicReshaper.convertArabic(text)
        .split('')
        .reverse()
        .join('');
}
解决了 BiDi,下面还需要解决复合字符的问题。下面的例子来自 cosmic-text,一个用 Rust 实现的多行文本处理库。
for line in BidiParagraphs::new(&text) {
    for grapheme in line.graphemes(true) {
        for c in grapheme.chars() {}
    }
}
复合字符
并不是所有字符都是由单一字符组成,clusters 是 HarfBuzz 中用于处理复合字符的术语
In text shaping, a cluster is a sequence of characters that needs to be treated as a single, indivisible unit.
例如 emoji 就是,如果我们按照单一字符处理(例如使用 split('')),无论是度量还是稍后的绘制都会出现错误截断的情况:
'🌹'.length; // 2
'🌹'[0]; // '\uD83C'
'🌹'[1]; //'\uDF39'
在浏览器端我们可以使用 grapheme-splitter 这样的库,用法如下:
var splitter = new GraphemeSplitter();
// plain latin alphabet - nothing spectacular
splitter.splitGraphemes('abcd'); // returns ["a", "b", "c", "d"]
// two-char emojis and six-char combined emoji
splitter.splitGraphemes('🌷🎁💩😜👍🏳️🌈'); // returns ["🌷","🎁","💩","😜","👍","🏳️🌈"]但它的大小(压缩后仍有 22kB)不可忽视,详见 BundlePhobia grapheme-splitter。因此在 Pixi.js 中默认使用浏览器自带的 Intl.Segmenter 来处理复合字符,该特性大部分现代浏览器都已经支持:
// @see https://github.com/pixijs/pixijs/blob/dev/src/scene/text/canvas/CanvasTextMetrics.ts#L121C19-L131C10
const splitGraphemes: (s: string) => string[] = (() => {
    if (typeof (Intl as IIntl)?.Segmenter === 'function') {
        const segmenter = new (Intl as IIntl).Segmenter();

        return (s: string) => [...segmenter.segment(s)].map((x) => x.segment);
    }

    return (s: string) => [...s];
})();
我们也采用这种方案,在后续为字符生成 SDF 时会用到。
text-align
实现 text-align 很简单:

let offsetX = 0;
if (textAlign === 'center') {
    offsetX -= width / 2;
} else if (textAlign === 'right' || textAlign === 'end') {
    offsetX -= width;
}但想实现垂直对齐就没这么简单了,text-baseline 仅针对单行文本,很多场景下我们希望整个段落居中。后续当我们讨论 flex layout 时会介绍。
绘制
下图是 FreeType 字体渲染引擎在流程中的位置:

让我们聚焦到具体的文本绘制技术。对于拉丁文字这种字符集有限的情况,完全可以离线生成一个 glyph atlas,运行时上传到 GPU 上,freetype-gl 就是这么实现的。
The glyph atlas is a single image that will be uploaded as a texture to the GPU along with the rest of the data for the tile. Here’s a visual representation of a glyph atlas:
下图来自:Drawing Text with Signed Distance Fields in Mapbox GL

但这种非矢量方式的问题是放大后字符会很模糊,下图来自 Distance field fonts
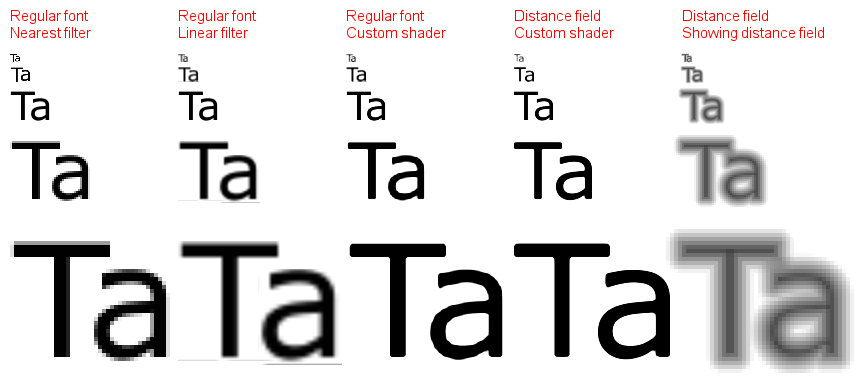
目前主流基于 SDF 方案的思路来自 Valve 的论文 Improved Alpha-Tested Magnification for Vector Textures and Special Effects,该方案优点包括:
- 在缩放后依然保持清晰
- 很容易实现反走样、Halo、阴影等特性
但存在的问题是边缘处不够锐利,不过在可视化场景下容忍度较高,并且也可以通过 msdf 等方法进行一些优化。另外 SDF 也无法支持 font hinting。
先来看单个字符的 SDF 生成情况。
SDF 生成
下图来自 msdf-atlas-gen,我们重点关注 SDF 和 MSDF 这两种 atlas:
| Hard mask | Soft mask | SDF | PSDF | MSDF | MTSDF | |
|---|---|---|---|---|---|---|
 |  |  |  |  |  | |
| Channels: | 1 (1-bit) | 1 | 1 | 1 | 3 | 4 |
| Anti-aliasing: | - | Yes | Yes | Yes | Yes | Yes |
| Scalability: | - | - | Yes | Yes | Yes | Yes |
| Sharp corners: | - | - | - | - | Yes | Yes |
| Soft effects: | - | - | Yes | - | - | Yes |
| Hard effects: | - | - | - | Yes | Yes | Yes |
如果允许离线生成,可以使用 msdf-atlas-gen 或者 node-fontnik(mapbox 使用它在服务端生成 protocol buffer 编码后的 SDF)。但考虑到 CJK 字符,在运行时生成可以用 tiny-sdf ,使用方式如下,将字体相关的属性传入后得到像素数据。
const tinySdf = new TinySDF({
    fontSize: 24,
    fontFamily: 'sans-serif',
});
const glyph = tinySdf.draw('泽'); // 包含像素数据、宽高、字符 metrics 等
下面我们简单分析一下它的生成原理。首先它使用浏览器 Canvas2D API getImageData 获取像素数据,但在写入时留有 buffer 的余量,这是考虑到 Halo 的实现。
const size = (this.size = fontSize + buffer * 4);最暴力的遍历方法
对于二维网格,距离场中的“距离”为欧式距离,因此 EDT(Euclidean Distance Transform)定义如下。其中
其中第一部分与
因此我们只需要考虑一维的距离平方:
如果从几何角度来理解上述一维距离平方场计算公式,其实是一组抛物线,每个抛物线最低点为
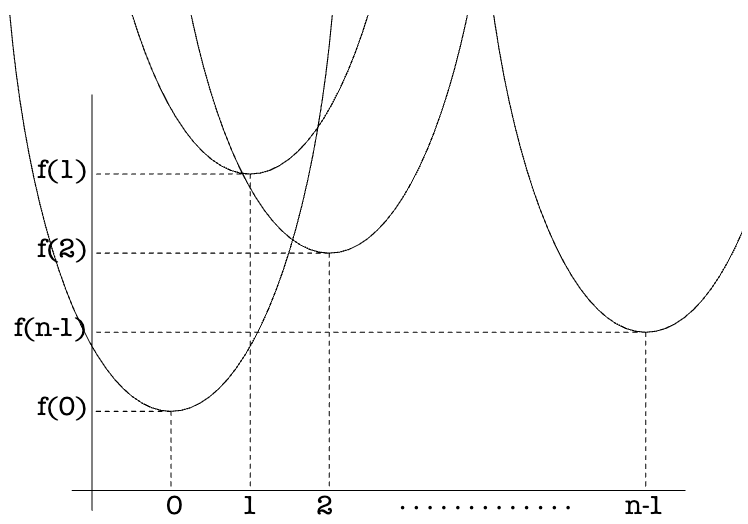
因此这组抛物线的下界,即下图中的实线部分就代表了 EDT 的计算结果:
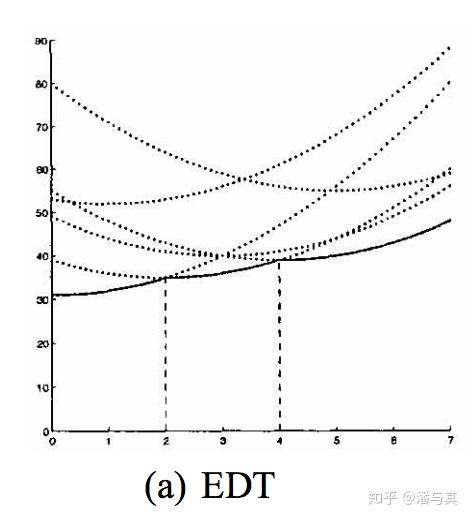
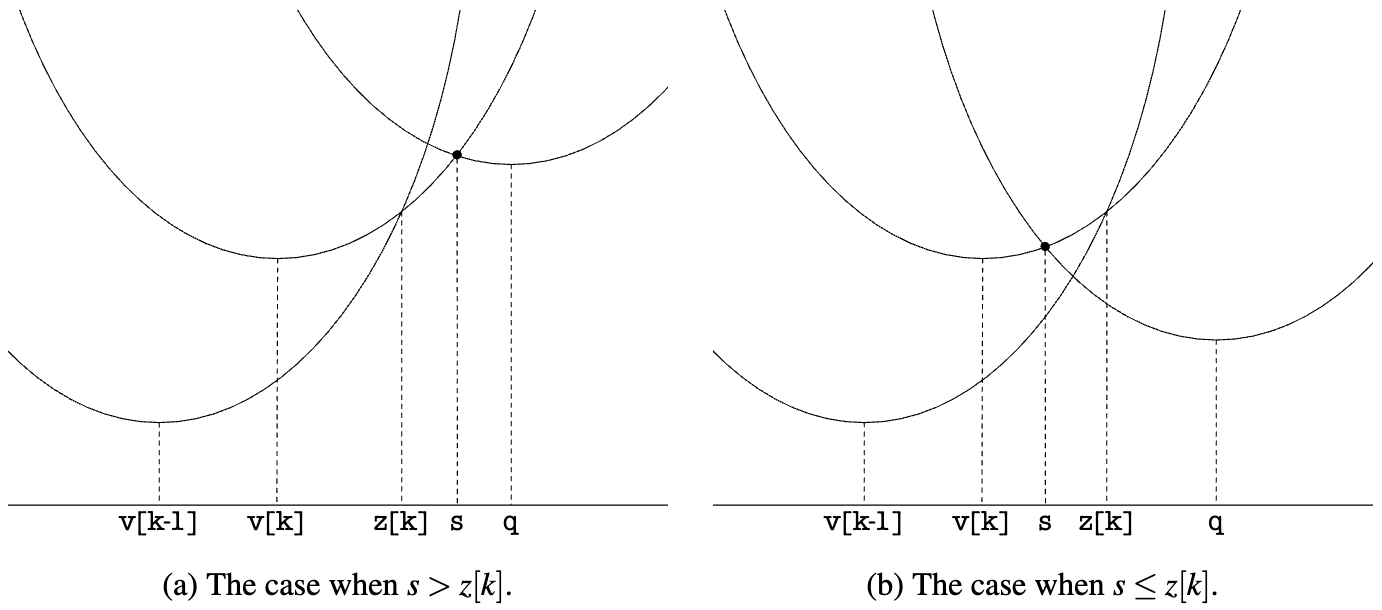
为了找出这个下界,我们需要计算任意两个抛物线的交点横坐标,例如对于
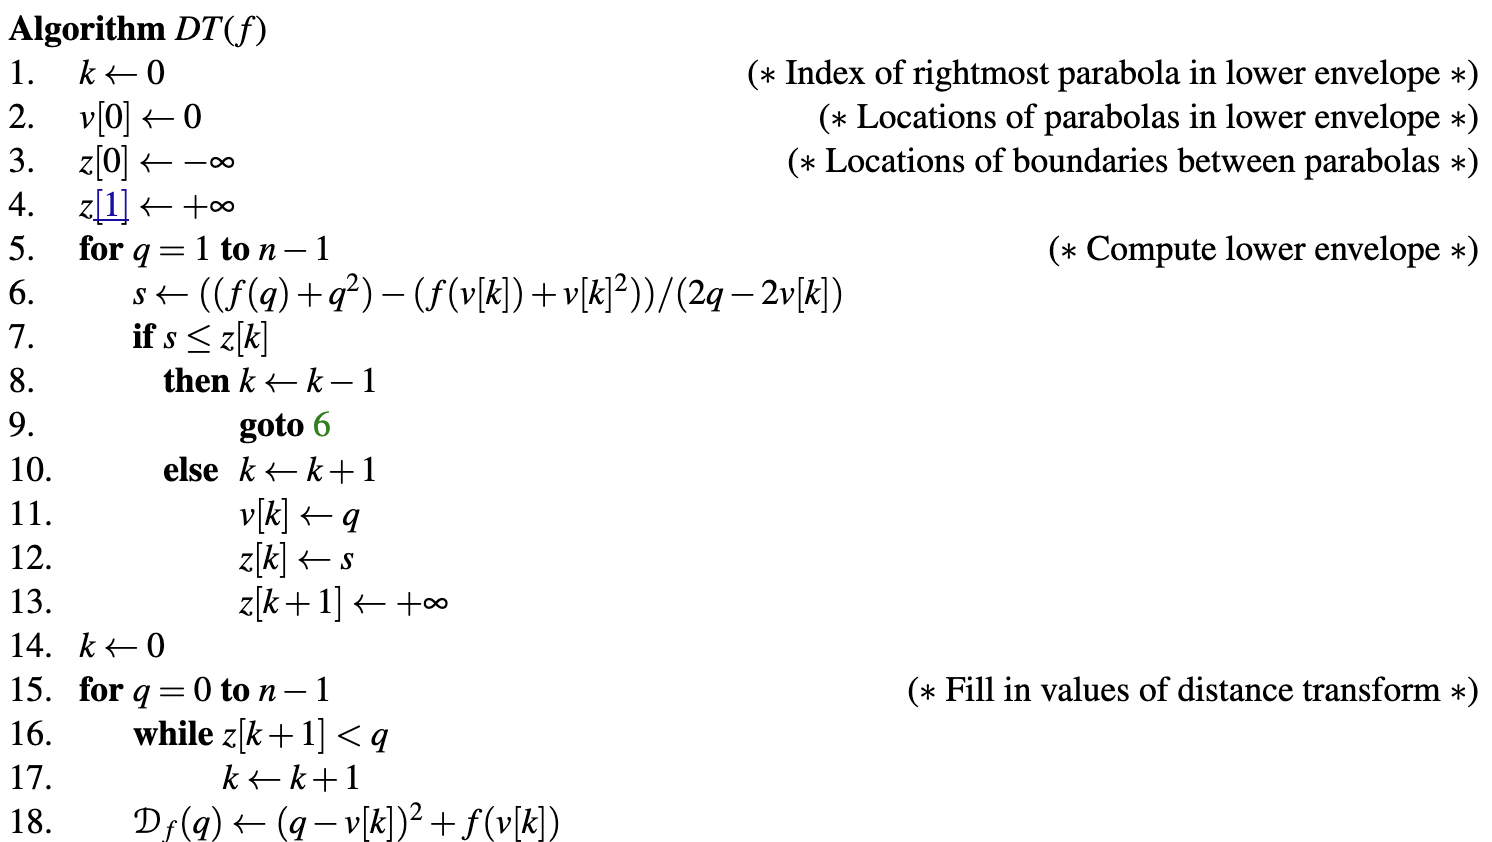
现在我们有了计算 EDT 1D 的预备知识,按照从左往右的顺序,将下界最右侧的抛物线序号保存在
完整算法如下,tiny-sdf 实现了它(EDT 1D),连变量名都是一致的:
Sub-pixel Distance Transform 一文详细介绍了该算法的思路,分别计算内外两个距离场,最后合并:
To make a signed distance field, you do this for both the inside and outside separately, and then combine the two as inside – outside or vice versa.
它从最基础的 1D 开始,先假设我们的输入只有黑白两色,即上面提到的 Hard mask,先计算外距离场:

接着计算内距离场,I 反转下 O:
最后合并,使用外距离场减去内距离场:
在 tiny-sdf 的实现中,以上过程对应当 a 为 1 时的处理逻辑:
// @see https://github.com/mapbox/tiny-sdf/blob/main/index.js#L85
gridOuter.fill(INF, 0, len);
gridInner.fill(0, 0, len);

for (let y = 0; y < glyphHeight; y++) {
    for (let x = 0; x < glyphWidth; x++) {
        if (a === 1) {
            // fully drawn pixels
            gridOuter[j] = 0;
            gridInner[j] = INF;
        } else {
        }
    }
}

edt(outer, 0, 0, wp, hp, wp, this.f, this.z, this.v);
edt(inner, pad, pad, w, h, wp, this.f, this.z, this.v);

for (let i = 0; i < np; i++) {
    const d = Math.sqrt(outer[i]) - Math.sqrt(inner[i]);
    out[i] = Math.max(
        0,
        Math.min(255, Math.round(255 - 255 * (d / this.radius + this.cutoff))),
    );
}
对于 2D EDT 的计算正如我们本节开头介绍的,分解成两趟 1D 距离平方,最后开方得到结果。类似后处理中的高斯模糊效果:
Like a Fourier Transform, you can apply it to 2D images by applying it horizontally on each row X, then vertically on each column Y (or vice versa).
这里也能直接看出对于 height * width 尺寸的网格,复杂度为
// @see https://github.com/mapbox/tiny-sdf/blob/main/index.js#L110
function edt(data, width, height, f, d, v, z) {
    // Pass 1
    for (var x = 0; x < width; x++) {
        for (var y = 0; y < height; y++) {
            f[y] = data[y * width + x];
        }
        // 固定 x 计算 1D 距离平方
        edt1d(f, d, v, z, height);
        for (y = 0; y < height; y++) {
            data[y * width + x] = d[y];
        }
    }
    // Pass 2
    for (y = 0; y < height; y++) {
        for (x = 0; x < width; x++) {
            f[x] = data[y * width + x];
        }
        edt1d(f, d, v, z, width);
        for (x = 0; x < width; x++) {
            // 开方得到欧式距离
            data[y * width + x] = Math.sqrt(d[x]);
        }
    }
}
解决了单个字符的 SDF 生成问题,下一步我们将以合理的布局将所有字符的 SDF 合并成一个大图,后续以纹理形式传入 Shader 中消费。
Glyph atlas
单个 SDF 需要合并成一个大图后续以纹理形式传入,类似 CSS Sprite。这类问题称作:Bin packing problem,将一个个小箱子装入一个大箱子,合理利用空间减少空隙。我们选择 potpack,该算法能尽可能得到近似方形的结果,缺点是生成布局后不许允许修改,只能重新生成。

需要注意,这个 Atlas 包含了场景中使用的所有字体下的所有文本,因此当 fontFamily/Weight 改变、旧文本变更、新文本加入时都需要重新生成,但字号改变不应该重新生成。因此为了避免重新生成过于频繁,对于每一种字体,默认为 32-128 的常用字符生成。
该纹理只需要使用一个通道即可,如果是 WebGL 下可以使用 gl.ALPHA 格式,但是 WebGPU 中并没有对应的格式。因此我们使用 Format.U8_R_NORM 格式,在 WebGL 中为 gl.LUMINANCE,在 WebGPU 中为 r8unorm。
this.glyphAtlasTexture = device.createTexture({
    ...makeTextureDescriptor2D(Format.U8_R_NORM, atlasWidth, atlasHeight, 1),
    pixelStore: {
        unpackFlipY: false,
        unpackAlignment: 1,
    },
});
然后在 Shader 中从 r 通道取得有向距离:
uniform sampler2D u_SDFMap; // glyph atlas
varying vec2 v_UV;

float dist = texture2D(u_SDFMap, v_UV).r;
以上就是 fragment shader 中的绘制逻辑,接下来让我们看看传入 vertex shader 中的单个字符的位置该如何计算。
Generate quads
首先,我们需要将每个矩形字形从字形数据转换为两个三角形(称为“quad”),包含四个顶点:

简化后的字形数据 SymbolQuad 定义如下:
// @see https://github.com/mapbox/mapbox-gl-js/blob/main/src/symbol/quads.ts#L42
export type SymbolQuad = {
    tl: Point; // 局部坐标下四个顶点的坐标
    tr: Point;
    bl: Point;
    br: Point;
    tex: {
        x: number; // 纹理坐标
        y: number;
        w: number;
        h: number;
    };
};
针对每一个字形数据,拆分成四个顶点,其中 uv 和 offset 合并在一个 stride 中,随后在 vertex shader 中通过 a_UvOffset 访问:
glyphQuads.forEach((quad) => {
    charUVOffsetBuffer.push(quad.tex.x, quad.tex.y, quad.tl.x, quad.tl.y);
    charUVOffsetBuffer.push(
        quad.tex.x + quad.tex.w,
        quad.tex.y,
        quad.tr.x,
        quad.tr.y,
    );
    charUVOffsetBuffer.push(
        quad.tex.x + quad.tex.w,
        quad.tex.y + quad.tex.h,
        quad.br.x,
        quad.br.y,
    );
    charUVOffsetBuffer.push(
        quad.tex.x,
        quad.tex.y + quad.tex.h,
        quad.bl.x,
        quad.bl.y,
    );
    charPositionsBuffer.push(x, y, x, y, x, y, x, y);

    indexBuffer.push(0 + i, 2 + i, 1 + i);
    indexBuffer.push(2 + i, 0 + i, 3 + i);
    i += 4;
});
在 vertex shader 中,将 uv 除以纹理尺寸得到纹理坐标传入 fragment shader 中用来对 glyph atlas 采样。同时,将 offset 乘以字体缩放比例,得到相对于锚点的偏移量,最后将位置加上偏移量,得到最终的顶点位置:
v_Uv = a_UvOffset.xy / u_AtlasSize;

vec2 offset = a_UvOffset.zw * fontScale;
gl_Position = vec4((u_ProjectionMatrix
    * u_ViewMatrix
    * u_ModelMatrix
    * vec3(a_Position + offset, 1)).xy, zIndex, 1);
最后我们来看如何计算得到字形数据。在上一节的分段完成后,我们得到了多行的字符串数组 lines,结合 textAlign letterSpacing 和 fontMetrics 计算每个字符相对于锚点的位置信息。
function layout(
    lines: string[], // after paragraph segmentation
    fontStack: string,
    lineHeight: number,
    textAlign: CanvasTextAlign,
    letterSpacing: number,
    fontMetrics: globalThis.TextMetrics & { fontSize: number },
): PositionedGlyph[] {}
这里我们参考 mapbox-gl-js shaping.ts 的实现:
export type PositionedGlyph = {
    glyph: number; // charCode
    x: number;
    y: number;
    scale: number; // 根据缩放等级计算的缩放比例
    fontStack: string;
};lines.forEach((line) => {
const lineStartIndex = positionedGlyphs.length;
canvasTextMetrics.splitGraphemes(line).forEach((char) => {});
});效果改进
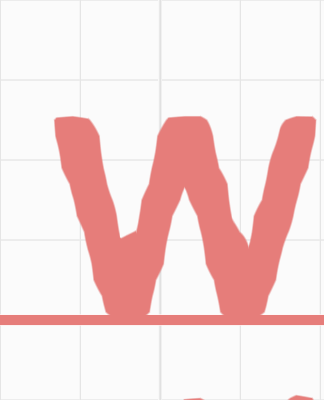
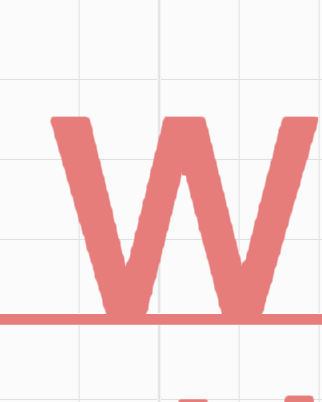
目前渲染的文本在放大时会存在明显的“人工痕迹”,一个很明显的原因是生成 SDF 的分辨率,在 Mapbox 目前的实现中,使用了 SDF_SCALE 来控制它,越高的分辨率生成的 SDF 就越精细,但同时也带来了性能的下降。
https://github.com/mapbox/mapbox-gl-js/blob/main/src/render/glyph_manager.ts#L34
The choice of SDF_SCALE is a trade-off between performance and quality. Glyph generation time grows quadratically with the the scale, while quality improvements drop off rapidly when the scale is higher than the pixel ratio of the device. The scale of 2 buys noticeable improvements on HDPI screens at acceptable cost.
下图展示了 SDF_SCALE 为 1 和 4 时,放大后的对比效果:
| SDF_SCALE = 1 | SDF_SCALE = 4 |
|---|---|
 |  |
但先别急着调整 SDF 的分辨率,目前 tiny-sdf 的实现还存在问题。
Sub-pixel Distance Transform
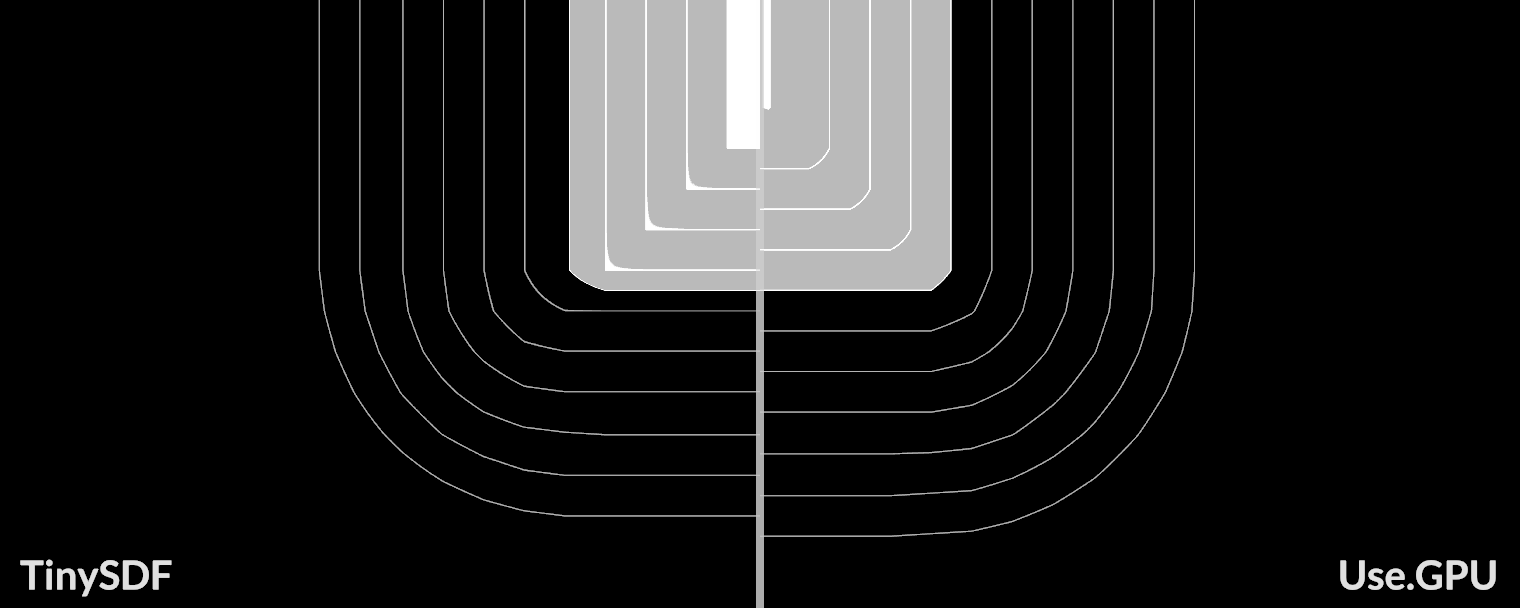
Sub-pixel Distance Transform 一文指出 tiny-sdf 的实现存在问题,并给出了改进后的实现。
首先我们使用 Canvas 生成的不是只有黑白两色的 Hard mask,而是灰度图:

在 tiny-sdf 的实现中,当 a 不为 1 时,它是这么处理的:
// @see https://github.com/mapbox/tiny-sdf/blob/main/index.js#L89
if (a === 1) {
} else {
    const d = 0.5 - a; // aliased pixels
    gridOuter[j] = d > 0 ? d * d : 0;
    gridInner[j] = d < 0 ? d * d : 0;
}
MSDF
在使用低分辨率的距离场重建时,字符的拐角处过于平滑不能保持原有的尖锐效果。现在我们来解决这个问题,正如前文提到的那样,适合预生成字符集的场景。

距离场是可以进行集合运算的。下图来自 Shape Decomposition for Multi-channel Distance Fields,我们将两个距离场分别存储在位图的两个分量(R、G)中,在重建时,虽然这两个距离场转角是平滑的,但是进行求交就能得到锐利的还原效果:

分解算法可以参考原论文 Shape Decomposition for Multi-channel Distance Fields 中 4.4 节:Direct multi-channel distance field construction。在实际使用时,作者提供了 msdfgen,可以看出 MSDF 在低分辨率效果明显更好,甚至优于更高分辨率的 SDF。
在生成工具方面,在线可以使用 MSDF font generator,CLI 工具包括 msdf-bmfont-xml。这些工具在生成 MSDF atlas 的同时,还会生成一个 fnt 或者 json 文件,里面包含了每个字符的布局信息用于后续绘制。pixi-msdf-text 是一个使用 Pixi.js 绘制的完整例子,其中使用了 BitmapFontLoader 来加载 fnt 文件,我们的项目也参考了它的实现。
在 Fragment Shader 中重建时使用 median:
float median(float r, float g, float b) {
  return max(min(r, g), min(max(r, g), b));
}

#ifdef USE_MSDF
    vec3 s = texture(SAMPLER_2D(u_Texture), v_Uv).rgb;
    float dist = median(s.r, s.g, s.b);
#else
在下面的例子中,可以看出字符在放大后边缘依然锐利:
font-kerning
在预生成的 Bitmap font 中可以包含 kernings,它可以调整固定顺序的前后两个字符之间的间距。
以 https://pixijs.com/assets/bitmap-font/desyrel.xml 为例:
<kernings count="1816">
    <kerning first="102" second="102" amount="2" />
    <kerning first="102" second="106" amount="-2" />
</kernings>
在计算包围盒与布局时都需要考虑。下面的例子展示了考虑前后的对比效果:
在运行时如果我们想获取 font-kerning,可以参考 https://github.com/mapbox/tiny-sdf/issues/6#issuecomment-1532395796 给出的方式:
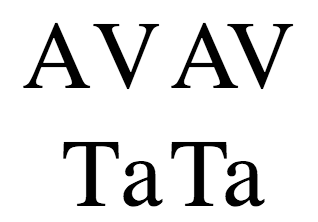
const unkernedWidth =
    tinySdf.ctx.measureText('A').width + tinySdf.ctx.measureText('V').width;
const kernedWidth = tinySdf.ctx.measureText('AV').width;
const kerning = kernedWidth - unkernedWidth; // a negative value indicates you should adjust the SDFs closer together by that much
emoji
在一些绘制 emoji 的实现中,例如 EmojiEngine 采用的是预生成 emoji atlas 的方式,但这样做的问题除了纹理大小,也无法保持不同平台上 emoji 展示各异的效果。因此我们希望和 SDF 一样,在当前平台的运行时按需生成。
这种做法和 SDF 最大的不同是,不能仅仅保留 alpha 通道,而是需要保留 RGB 三个通道,用于后续的距离场重建。
this.glyphAtlasTexture = device.createTexture({
    ...makeTextureDescriptor2D(
        Format.U8_R_NORM,
        Format.U8_RGBA_NORM,
        atlasWidth,
        atlasHeight,
        1,
    ),
});
扩展阅读
- State of Text Rendering 2024
- Signed Distance Field Fonts - basics
- Approaches to robust realtime text rendering in threejs (and WebGL in general)
- Easy Scalable Text Rendering on the GPU
- Text Visualization Browser
- Rive Text Overview
- Texture-less Text Rendering
- Text layout is a loose hierarchy of segmentation
- End-To-End Tour of Text Layout/Rendering
- Text rendering in mapbox
- Rendering Crispy Text On The GPU
- Localization, languages, and listening
- RTL languages in Figma