课程 16 - 文本的高级特性
在上一节课中,我们介绍了基于 SDF 的文本渲染的原理,也尝试使用了 ESDT 和 MSDF 提升渲染质量,另外也提到过 CanvasKit 相比 Canvas 提供的文本高级绘制特性。
在本节课中,我们首先会来看看 SDF 之外的绘制方式,然后将讨论并尝试实现这些特性:装饰线、阴影、文本跟随路径,最后文本不光要能渲染,也要有良好的交互,我们讲讨论输入框、文本选中以及 A11y 这些话题。
首先我们来看看除了 SDF 之外,还有哪些文本渲染方式。
使用贝塞尔曲线渲染文本
使用 Figma 的导出 SVG 功能可以发现,它的文本也是使用 Path 渲染的。如果不考虑渲染性能和 CJK 字符,使用贝塞尔曲线渲染文本确实是不错的选择。为了得到字符的矢量信息,在浏览器环境可以使用:
- opentype.js
- use-gpu 使用的是基于 ab-glyph 封装的 use-gpu-text
- 越来越多的应用使用 harfbuzzjs,详见:State of Text Rendering 2024。例如 font-mesh-pipeline 就是一个简单的示例
下面我们展示使用 opentype.js 和 harfbuzzjs 渲染文本的示例,他们都支持 ttf 格式的字体文件。
opentype.js
opentype.js 提供了 getPath 方法,给定文本内容、位置和字体大小,就可以完成 Shaping 并获取 SVG path-commands,其中包含 M、L、C、Q、Z 命令,我们将它转换为 Path 的 d 属性。
opentype.load('fonts/Roboto-Black.ttf', function (err, font) {
    const path = font.getPath('Hello, World!', 0, 0, 32); // x, y, fontSize
    // convert to svg path definition
});
harfbuzzjs
首先初始化 harfbuzzjs WASM,这里使用 Vite 的 ?init 语法。然后加载字体文件,并创建 font 对象。
import init from 'harfbuzzjs/hb.wasm?init';
import hbjs from 'harfbuzzjs/hbjs.js';

const instance = await init();
hb = hbjs(instance);

const data = await (
    await window.fetch('/fonts/NotoSans-Regular.ttf')
).arrayBuffer();
blob = hb.createBlob(data);
face = hb.createFace(blob, 0);
font = hb.createFont(face);
font.setScale(32, 32); // 设置字体大小
然后创建一个 buffer 对象,并添加文本内容。我们之前提过 harfbuzz 并不处理 BiDi,因此这里需要手动设置文本方向。最后调用 hb.shape 方法进行 Shaping 计算。
buffer = hb.createBuffer();
buffer.addText('Hello, world!');
buffer.guessSegmentProperties();
// TODO: use BiDi
// buffer.setDirection(segment.direction);

hb.shape(font, buffer);
const result = buffer.json(font);
此时我们就得到字形数据了,随后可以使用 Path 绘制
result.forEach(function (x) {
    const d = font.glyphToPath(x.g);
    const path = new Path({
        d,
        fill: '#F67676',
    });
});
TeX math rendering
我们可以使用 MathJax 来渲染 TeX 数学公式,将公式转换为 SVG 后,再使用 Path 渲染。这里我们参考 LaTeX in motion-canvas 的做法,得到 SVGElement:
const JaxDocument = mathjax.document('', {
    InputJax: new TeX({ packages: AllPackages }),
    OutputJax: new SVG({ fontCache: 'local' }),
});

const svg = Adaptor.innerHTML(JaxDocument.convert(formula));
const parser = new DOMParser();
const doc = parser.parseFromString(svg, 'image/svg+xml');
const $svg = doc.documentElement;
再使用 课程 10 - 从 SVGElement 到序列化节点 中介绍的方法将 SVGElement 转换为图形,添加到画布中。
const root = await deserializeNode(fromSVGElement($svg));文本描边
Canvas 中的 strokeText 和 CSS 中的 -webkit-text-stroke 都提供了文本描边效果。好消息是 SDF 天然就很容易实现描边:
if (strokeWidth > 0.0 && strokeColor.a > 0.0) {
    float fillAlpha = smoothstep(buff - gamma_scaled, buff + gamma_scaled, dist);
    float strokeThreshold = buff - strokeWidth / fontSize;
    float strokeAlpha = smoothstep(strokeThreshold - gamma_scaled, strokeThreshold + gamma_scaled, dist);

    vec4 finalColor = mix(strokeColor, fillColor, fillAlpha);
    outputColor = finalColor;
    opacity *= strokeAlpha;
}
下面展示了基于 SDF 和 MSDF 渲染的效果,可以看出 MSDF 在描边时也能保持锐利:
装饰线
在 CSS 中,早期浏览器对于 text-decoration 的实现比较粗糙,以 underline 为例,下图来自:Crafting link underlines on Medium
The perfect underline should be visible, but unobtrusive — allowing people to realize what’s clickable, but without drawing too much attention to itself. It should be positioned at just the right distance from the text, sitting comfortably behind it for when descenders want to occupy the same space:

但目前的浏览器已经完善了这一实现。另外 Canvas 未提供这一特性,而 CanvasKit 做了增强,对应 CSS text-decoration 的一系列属性:
// @see https://developer.mozilla.org/en-US/docs/Web/CSS/text-decoration#constituent_properties
// @see https://skia.org/docs/dev/design/text_shaper/#principles
const paraStyle = new CanvasKit.ParagraphStyle({
    textStyle: {
        decoration: CanvasKit.UnderlineDecoration,
        decorationColor,
        decorationThickness,
        decorationStyle: CanvasKit.DecorationStyle.Solid,
    },
});
另一个有趣的实现 underlineJS 则是基于 Canvas 实现的。
使用 Polyline 绘制
装饰线样式由 decorationStyle 属性控制:
export type TextDecorationStyle =
  | 'solid'
  | 'double'
  | 'dotted'
  | 'dashed'
  | 'wavy';
: TextDecorationStyle;
以最简单的 solid 样式为例,我们将 decorationColor 和 decorationThickness 作为 strokeColor 和 strokeWidth 传入:
if (instance instanceof Text) {
    const {
        decorationColorRGB,
        decorationThickness,
        decorationStyle,
        metrics,
    } = instance;
    u_StrokeColor = [
        decorationColorRGB.r / 255,
        decorationColorRGB.g / 255,
        decorationColorRGB.b / 255,
        fo,
    ];
    u_ZIndexStrokeWidth[1] = decorationThickness;
}
处理特殊样式
Polyline 本身支持 strokeDasharray,因此 dotted 和 dashed 都可以通过它实现。这里我们参考 Skia 的实现设置 dash 和 gap 的比例:
// @see https://github.com/google/skia/blob/main/modules/skparagraph/src/Decorations.cpp#L187
SkScalar scaleFactor = textStyle.getFontSize() / 14.f;
switch (textStyle.getDecorationStyle()) {
    case TextDecorationStyle::kDotted: {
        dashPathEffect.emplace(1.0f * scaleFactor, 1.5f * scaleFactor);
        break;
    }
    case TextDecorationStyle::kDashed: {
        dashPathEffect.emplace(4.0f * scaleFactor, 2.0f * scaleFactor);
        break;
    }
    default: break;
}
wavy 要特殊一点,我们需要计算并采样波浪线,这里我们先生成 SVG Path,再利用 课程 13 - 在曲线上采样 中介绍的方法:
// @see https://github.com/google/skia/blob/main/modules/skparagraph/src/Decorations.cpp#L215
let d = 'M 0 0';
while (x_start + quarterWave * 2 < line.width) {
    d += ` Q ${x_start + quarterWave} ${
        wave_count % 2 != 0 ? quarterWave : -quarterWave
    } ${x_start + quarterWave * 2} 0`;

    x_start += quarterWave * 2;
    ++wave_count;
}
效果如下:
计算位置
位置由属性 decorationLine 控制:
export type TextDecorationLine =
    | 'underline'
    | 'overline'
    | 'line-through'
    | 'none';
我们参考 Skia Decorations::calculatePosition 的实现,以 underline 为例:
void Decorations::calculatePosition(TextDecoration decoration, SkScalar ascent) {
    switch (decoration) {
        case TextDecoration::kUnderline:
            if ((fFontMetrics.fFlags & SkFontMetrics::FontMetricsFlags::kUnderlinePositionIsValid_Flag) &&
                fFontMetrics.fUnderlinePosition > 0) {
                fPosition  = fFontMetrics.fUnderlinePosition;
            } else {
                fPosition = fThickness;
            }
            fPosition -= ascent;
            break;
    }
}
导出 SVG
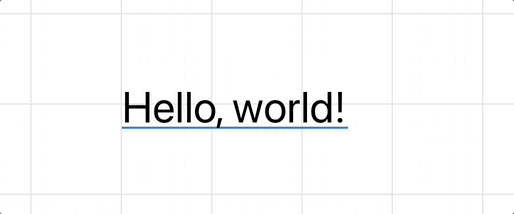
可惜的是,到目前为止(2025.7.9),SVG 并没有完整支持 text-decoration,在下右图中 text-decoration-color 并没有尊重我们设置的蓝色,而是被文本颜色覆盖,text-decoration-style 则完全不支持,详见:Text decoration of a text svg in html。
Apparentrly, text-decoration-color does not apply to SVG text elements
在 Figma 中通过导出成 <path> 回避了这个问题。我们仍希望保留 <text>,因此在导出 SVG 时,只能使用 <foreignObject> 包裹,见下左图:
<foreignObject width="50" height="20">
    <span style="text-decoration: underline; text-decoration-color: blue;">
        Text
    </span>
</foreignObject>阴影
Canvas2D 提供了 shadowBlur 属性,CanvasKit 在增强的段落样式中提供了 shadows 属性。
const paraStyle = new CanvasKit.ParagraphStyle({
    textStyle: {
        shadows: (shadows || []).map(({ color, offset, blurRadius }) => {
            return {
                color: color2CanvaskitColor(CanvasKit, color),
                offset,
                blurRadius,
            };
        }),
    },
});
Pixi.js 提供了 DropShadowFilter 来实现阴影效果,但我们可以不使用后处理手段,而是直接在 SDF 中实现阴影效果。使用 shadowOffset 和 shadowBlurRadius 来控制采样 SDF 纹理的偏移和模糊程度。
float shadowDist = texture(SAMPLER_2D(u_Texture), v_Uv - shadowOffset).a;
dropShadowColor.a *= smoothstep(0.5 - shadowSmoothing, 0.5 + shadowSmoothing, shadowDist);
outputColor = mix(dropShadowColor, outputColor, outputColor.a);
文本跟随路径
在 Figma 社区中,很多用户都在期待这个特性,例如:Make text follow a path or a circle。最近官方支持了这一特性:Type text on a path。
Skia 提供了 MakeOnPath 方法,详见 Draw text along a path:
const textblob = CanvasKit.TextBlob.MakeOnPath(text, skPath, skFont);
canvas.drawTextBlob(textblob, 0, 0, textPaint);
在 Mapbox 中沿道路河流放置 label 是很常见的场景,详见 Map Label Placement in Mapbox GL

Kittl 提供了 Easily Type Text On Any Path 工具,可以方便的将文本放置在路径上。
我们参考来自 Fabricjs 的实现:fabricjs - text on path,在常规 layout 之后增加一个阶段,使用我们介绍过 课程 13 - 在曲线上采样,计算当前字符在路径上的位置:
const centerPosition = positionInPath + positionedGlyph.width / 2;
const ratio = centerPosition / totalPathLength;
const point = path.getPointAt(ratio);
另外在计算包围盒时需要使用 Path 的方式。
调整旋转角度
在 课程 13 - 在曲线上采样 的同时,还需要计算出法线 / 切线方向,传入 shader 中进行文本旋转。
const tangent = path.getTangentAt(ratio);
const rotation = Math.atan2(tangent[1], tangent[0]);
我们可以选择为 a_Position 增加一个分量,用于存储 rotation,随后在 vertex shader 中构建旋转矩阵:
this.vertexBufferDescriptors = [
    {
        arrayStride: 4 * 3,
        arrayStride: 4 * 4,
        stepMode: VertexStepMode.VERTEX,
        attributes: [
            {
                shaderLocation: Location.POSITION, // a_Position
                offset: 0,
                format: Format.F32_RGB,
                format: Format.F32_RGBA,
            },
        ],
    },
];
也可以选择在 CPU 侧完成 Quad 四个顶点的变换。
导出 SVG
在 SVG 中可以通过 textPath 实现,详见:Curved Text Along a Path
<path
    id="MyPath"
    fill="none"
    stroke="red"
    d="M10,90 Q90,90 90,45 Q90,10 50,10 Q10,10 10,40 Q10,70 45,70 Q70,70 75,50"
></path>
<text>
    <textPath href="#MyPath">Quick brown fox jumps over the lazy dog.</textPath>
</text>更友好的交互方式
浏览器原生的 <textarea> 提供了闪烁光标、选区、键盘控制、复制粘贴等等便捷的功能。如果希望从头基于 <canvas> 实现这些功能将是非常繁重的任务,例如:fabricjs - loading custom fonts 和 google docs,因此我们不会选择这个方案。
使用原生输入框
下图来自 Figma,可以看到使用了原生的 <textarea> 元素定位在画布上,当双击 Text 时,会展示输入框:
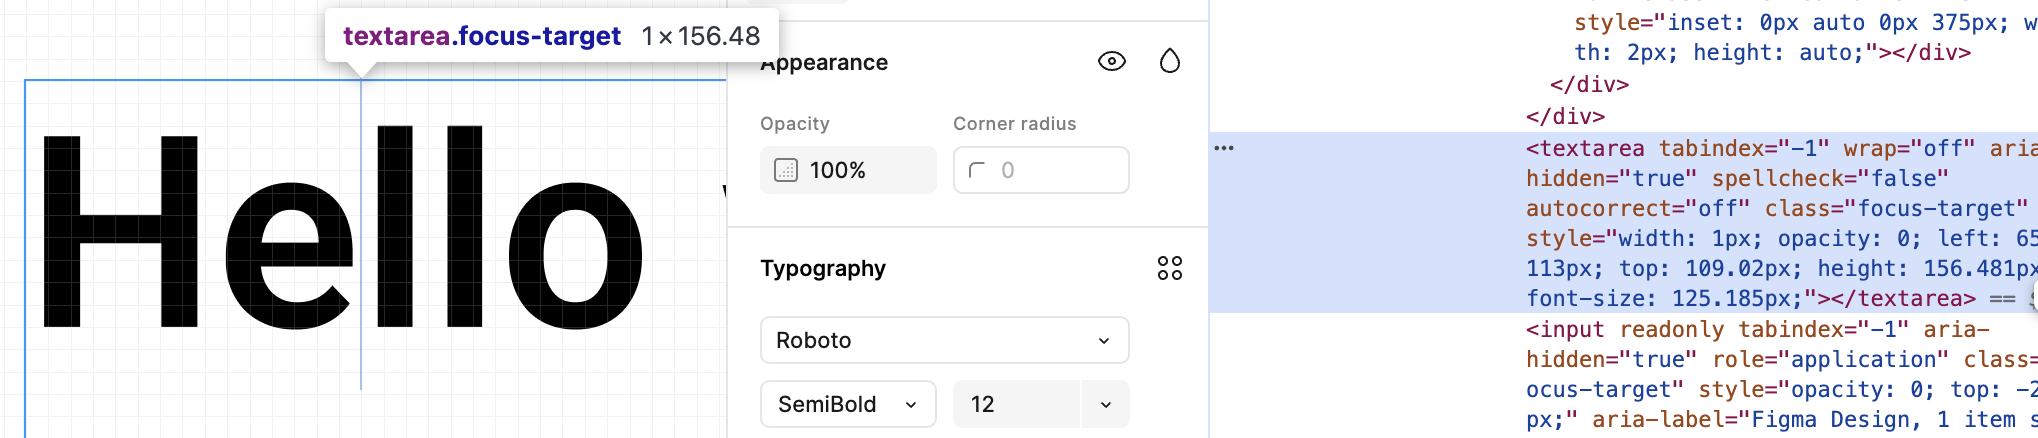
在 excalidraw 中也采用了这种方式:textWysiwyg.tsx。
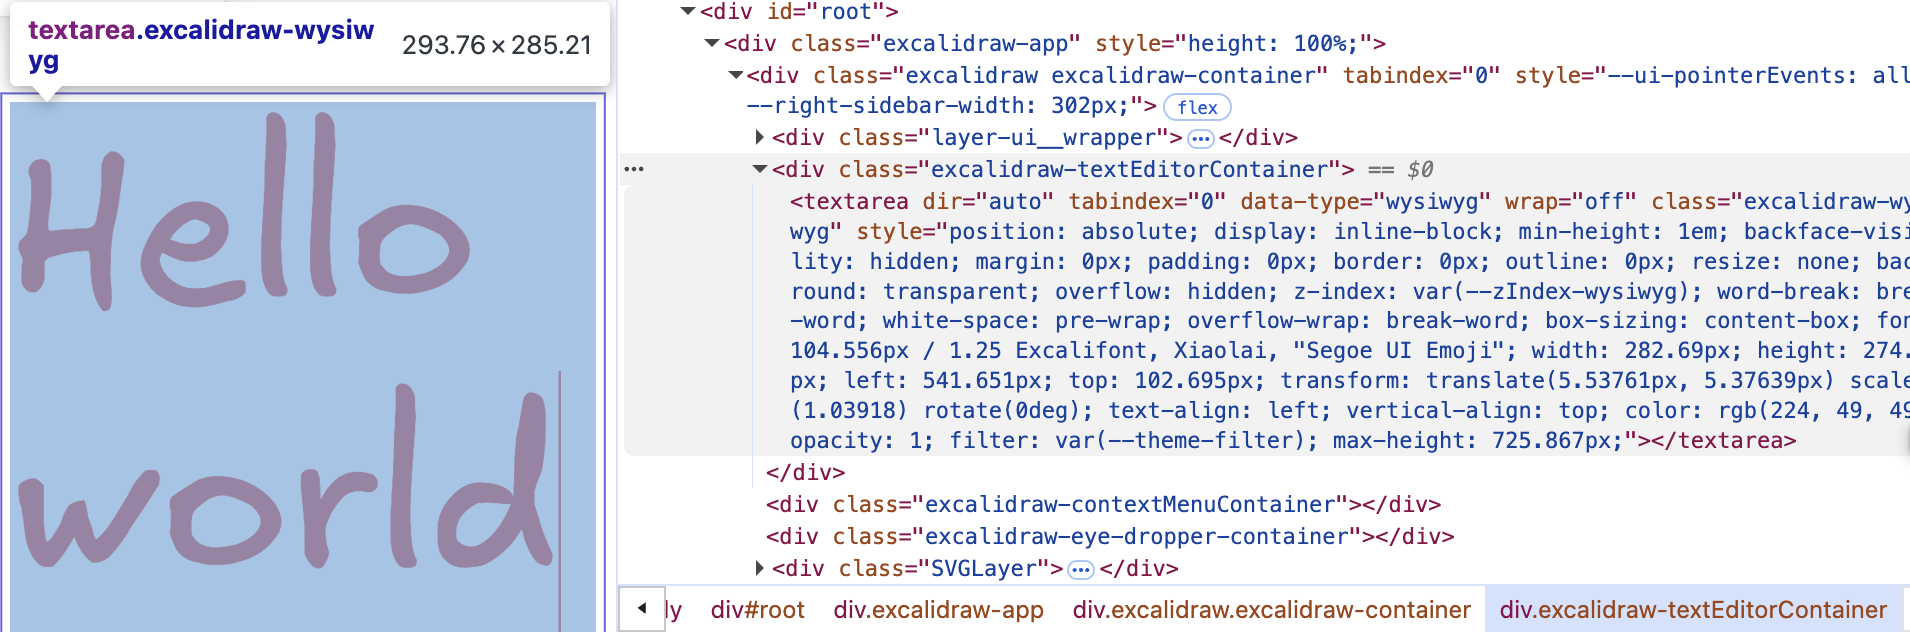
我们也增加一个 <ic-text-editor> 元素,让它尽可能贴合画布中的 Text 渲染效果。对原生 <textarea> 元素进行样式上的重置,例如不展示边框和背景。其中 fontFamily、fontSize、color 等属性都有对应的 CSS 属性,直接设置即可,但使用绝对定位后的位置需要考虑许多因素:
@customElement('ic-text-editor')
export class TextEditor extends LitElement {
    static styles = css`
        :host {
            position: absolute;
        }
        textarea {
            position: absolute;
            display: none;
            margin: 0;
            padding: 0;
            border: 0;
            outline: 0;
            resize: none;
            background: transparent;
        }
    `;

    @query('textarea')
    editable: HTMLTextAreaElement;

    render() {
        return html`<textarea></textarea>`;
    }
}
首先需要将双击时的鼠标事件位置坐标转换到 viewport 坐标系下:
const { x, y } = this.api.canvas2Viewport({
    x: this.node.x,
    y: this.node.y,
});

this.editable.style.left = `${x}px`;
this.editable.style.top = `${y}px`;
然后需要考虑当前相机的缩放等级:
const { zoom } = this.api.getCamera().read(ComputedCamera);
this.editable.style.transform = `scale(${zoom})`;
this.editable.style.transformOrigin = `left top`;
最后我们希望在 <textarea> 元素上进行滚动不会触发浏览器默认行为,而是穿透它在 <canvas> 元素上触发,执行相机平移和缩放操作:
handleWheel = (event: WheelEvent) => {
    event.preventDefault();
    event.stopPropagation();

    const newWheelEvent = new WheelEvent('wheel', {});
    $canvas.dispatchEvent(newWheelEvent);
};
效果如下:
计算宽高
在实时输入以及粘贴文本时,需要重新计算并设置 <textarea> 的宽高。
处理 Tab
在 <textarea> 中按下 Tab 键的默认行为是切换焦点到下一个元素。我们希望和代码编辑器一样。
文本选中
一旦支持了在 Text 覆盖 textarea,实现这个功能就很简单了。
特殊效果
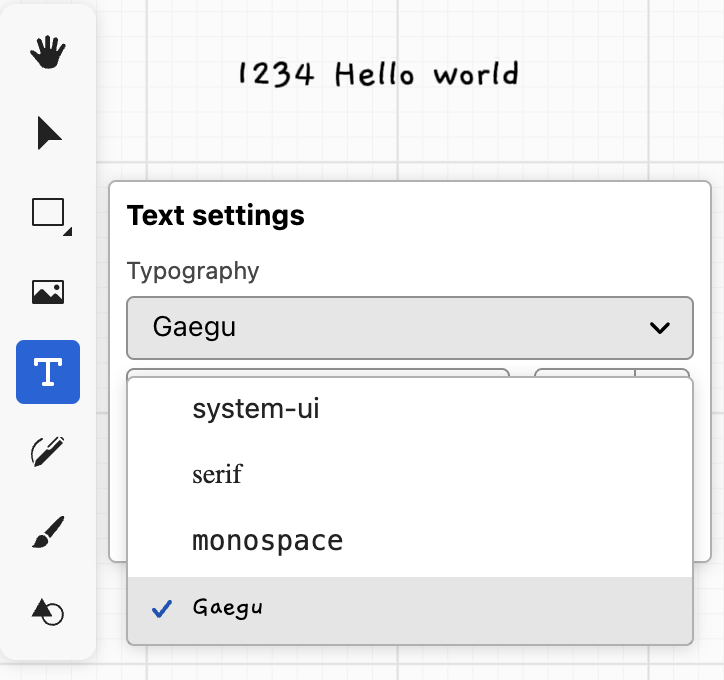
加载 Web 字体
对于使用 Canvas2D API 生成 SDF 的方案,只需要使用 webfontloader 先加载字体,再使用 fontFamily 指定字体即可。
import WebFont from 'webfontloader';
WebFont.load({
    google: {
        families: ['Gaegu'], // 指定字体
    },
    active: () => {
        const text = new Text({
            x: 150,
            y: 150,
            content: 'Hello, world',
            fontFamily: 'Gaegu', // 指定字体
            fontSize: 55,
            fill: '#F67676',
        });
    },
});
你也可以在首页的例子中切换到 Text 模式,选择 Gaegu 这个自定义字体:
Material Design on the GPU
Material Design on the GPU 中介绍了一种基于 SDF 文字的材质效果,使用法线贴图配合光照实现墨迹在纸张表面的晕染效果。我们不用考虑光照,直接使用 simplex noise 来实现,叠加多个吸收效果:
import { simplex_2d } from './simplex-2d';
import { aastep } from './aastep';
export const absorb = /* wgsl */ `
  ${aastep}
  ${simplex_2d}
  float absorb(float sdf, vec2 uv, float scale, float falloff) {
    float distort = sdf + snoise(uv * scale) * falloff;
    return aastep(0.5, distort);
  }
`;