Lesson 22 - VectorNetwork
In this lesson, you will learn about:
- Limitations of SVG Path
- What is VectorNetwork?
- Using the Pen tool to modify Path
- Double-click to enter vector edit mode and Move / Bend / Cut tools
- Topological operators: split segment, delete vertex, Cut to open a closed loop
Limitations of SVG Path
In Lesson 13 - Drawing path and sketchy style we learned how to draw paths. Figma also provides the VectorPath API, which supports a subset of SVG Path commands (see: VectorPath-data) and fillRule (called windingRule in Figma).
node.vectorPaths = [
    {
        windingRule: 'EVENODD',
        data: 'M 0 100 L 100 100 L 50 0 Z',
    },
];
So why introduce the VectorNetwork API? The reason is that SVG Path has some inherent limitations. The Engineering behind Figma's Vector Networks article vividly demonstrates this. The following shape cannot be described using just one Path:

It can only be described by splitting into multiple Paths. While this is possible, certain intuitive operations cannot be achieved in editing scenarios. For example, when dragging the center vertex at the bottom left, only one vertex will follow because it consists of two independent Paths:

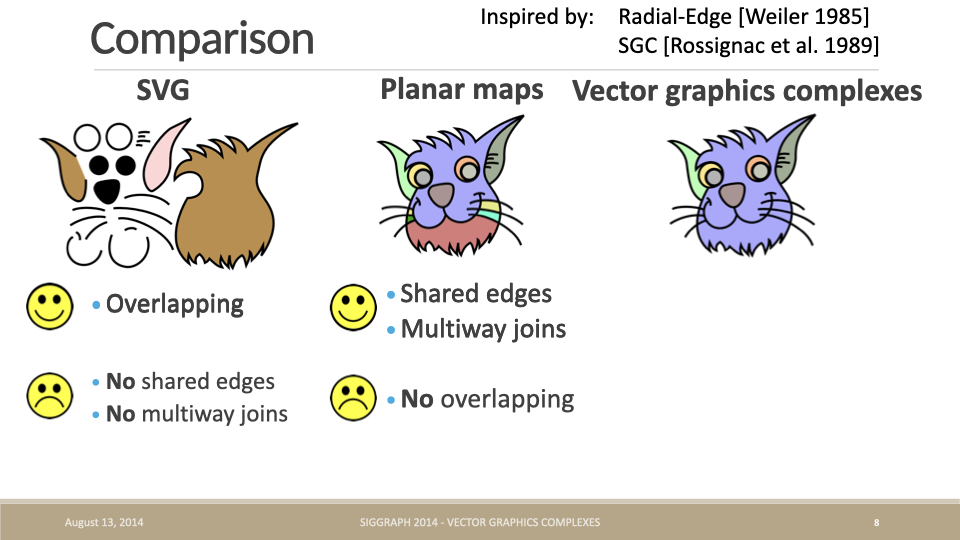
Besides vertices not being able to have more than 2 edges, edges cannot be shared either. The original paper and PPT of Vector Graphics Complexes compare SVG and Planar maps, neither of which can support overlapping, shared vertices, and edges, leading to a new geometric representation (hereinafter referred to as VGC):
vpaint is implemented based on VGC. You can see how natural the interactive effects are during editing after merging points and edges:
Or using the example of dragging an edge of a cube from The Engineering behind Figma's Vector Networks:

Double-click to enter edit mode, then drag any edge of the cube:
It's worth mentioning that the Discussion in HN points out the remarkable similarity between VGC and Figma's VectorNetwork. Considering that both started exploring around the same time, they arrived at similar solutions through different paths, hence we'll use the term VectorNetwork in the following text.
CEO of Figma here. Most of the original insights around vector networks were in 2013, though we continued to polish the implementation over time. We didn't exit stealth and ship the closed beta of Figma until December 2015 which is why there isn't blog content before then. At first glance, this thesis looks super neat! I'm excited to check it out! I don't believe I've seen it before which is surprising given the overlap.
Let's look at how VectorNetwork is defined.
Topology Definition of VectorNetwork
The definition of VectorNetwork/VGC is much more complex than Path. Its data structure is a graph consisting of vertices, edges, and faces (filled regions). The following image is from the original Vector Graphics Complexes paper.
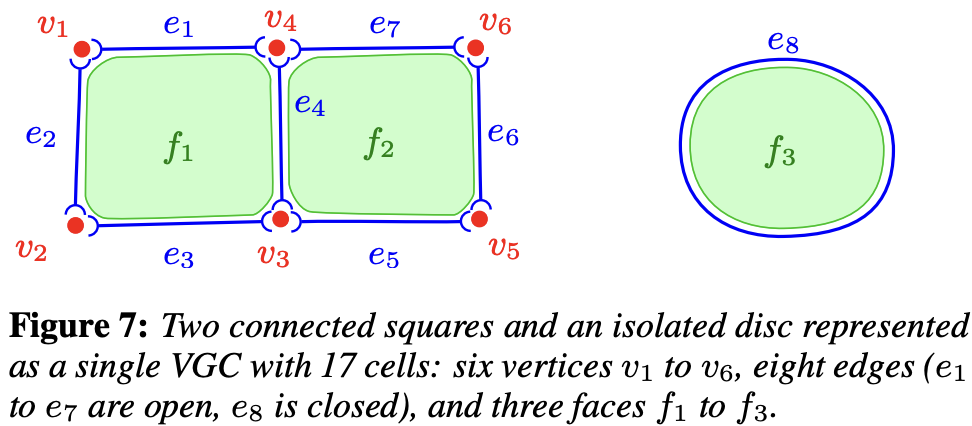
Here we only discuss the topology definition. Other drawing attributes can remain consistent with Path:
On top of this core structure, more drawing attributes can be added for fine control on rendering. For instance, we added vertex radius, variable edge width, cell color (possibly transparent), and edge junctions style (mitre join or bevel join).
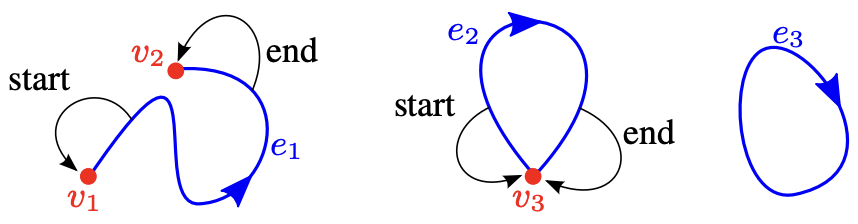
Vertices are easy to understand. In VGC, edges consist of a pair of start and end vertex indices, forming a self-loop when they coincide.
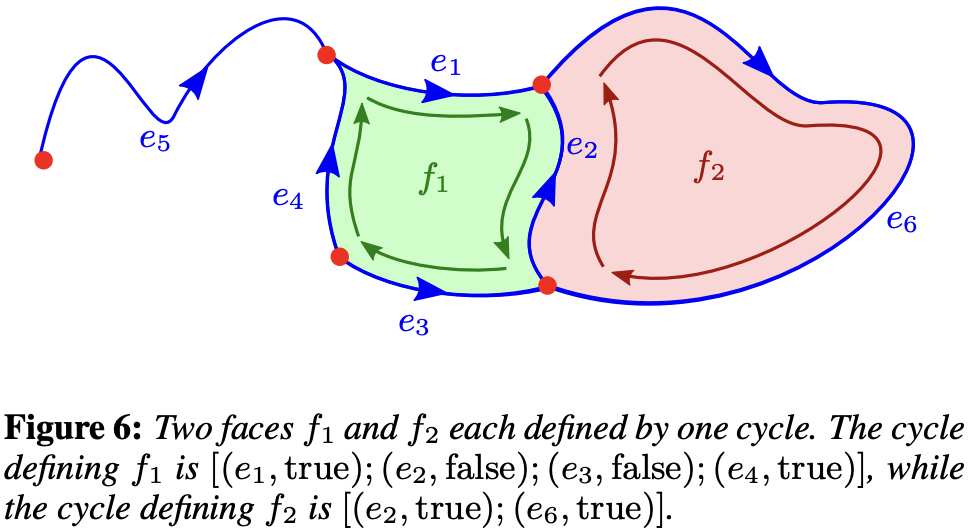
Filled regions are defined by closed loops of vertices. In VGC, they are defined using a set of halfedges:
The following triangle example is from the VectorNetwork API. You can see it's basically consistent with VGC, except that filled regions are defined by vertex indices and fillRule. Other non-geometric attributes like strokeCap remain consistent with Path:
node.vectorNetwork = {
    // The vertices of the triangle
    vertices: [
        { x: 0, y: 100 },
        { x: 100, y: 100 },
        { x: 50, y: 0 },
    ],

    // The edges of the triangle. 'start' and 'end' refer to indices in the vertices array.
    segments: [
        {
            start: 0,
            tangentStart: { x: 0, y: 0 }, // optional
            end: 1,
            tangentEnd: { x: 0, y: 0 }, // optional
        },
        {
            start: 1,
            end: 2,
        },
        {
            start: 2,
            end: 0,
        },
    ],

    // The loop that forms the triangle. Each loop is a
    // sequence of indices into the segments array.
    regions: [{ windingRule: 'NONZERO', loops: [[0, 1, 2]] }],
};
Following the Figma convention for cubics: P₀ is the start anchor, P₃ the end anchor, P₁ = P₀ + tangentStart, P₂ = P₃ + tangentEnd. When both handles coincide with their anchors (straight line), use two points; otherwise sample with CubicBezierCurve.getPoints, choosing a segment count from chord length and control hull (roughly 8–64).
In editing scenarios, vertices and edges are defined by users, while filled regions need to be automatically calculated by the system. So how do we find these filled regions?
Filling
In operations like click to fill, we need to find the minimum loop formed by vertices.
We treat the VectorNetwork as a planar graph and split each segment into two directed half-edges. At every vertex we sort the outgoing edges by polar angle; walking the "next half-edge" (the outgoing edge most clockwise relative to the incoming reverse edge) enumerates every minimal face. The smallest face that encloses the click position is the target region, and writing its ordered segment-index loop into VectorRegion.loops reuses the fill tessellation above.
export function findRegionLoopAtPoint(
    vertices: VectorVertexLike[],
    segments: VectorSegmentLike[],
    point: [number, number],
): number[] | null;
Numerical robustness: collinear edges, coincident vertices, and self-loops all need an EPS tolerance and degenerate-case handling; the unbounded outer face has a positive signed area under this traversal and must be skipped.
Convert to VectorNetwork
Following figma-fill-rule-editor, we use these type definitions:
export class VectorNetwork {
    @field.object declare vertices: VectorVertex[];
    @field.object declare segments: VectorSegment[];
    @field.object declare regions?: VectorRegion[];
}

interface VectorVertex {
    x: number;
    y: number;
    strokeLinecap?: Stroke['linecap'];
    strokeLinejoin?: Stroke['linejoin'];
    cornerRadius?: number;
    handleMirroring?: HandleMirroring;
}

interface VectorSegment {
    start: number;
    end: number;
    tangentStart?: VectorVertex;
    tangentEnd?: VectorVertex;
}

interface VectorRegion {
    fillRule: CanvasFillRule;
    loops: ReadonlyArray<ReadonlyArray<number>>;
}
Polyline is the easiest geometry to convert into a VectorNetwork:
class VectorNetwork {
    static fromEntity(entity: Entity): VectorNetwork {
        if (entity.has(Polyline)) {
            const { points } = entity.read(Polyline);
            const vertices: VectorVertex[] = points.map(([x, y]) => ({ x, y }));
            const segments: VectorSegment[] = points.slice(1).map((_, i) => ({
                start: i,
                end: i + 1,
            }));

            return { vertices, segments };
        }
    }
}
Converting a [Path] is more involved: after normalizing the SVG path commands (path2Absolute), each command is parsed in turn. M/L/H/V emit straight segments; C/S/Q/T emit cubics (Q/T are first elevated to cubic), converting the absolute control points into Figma-style relative tangents tangentStart = P1 - P0 and tangentEnd = P2 - P3; S/T track the previous control point for reflection; on Z, if the last point coincides with the start it reuses the start vertex to avoid duplicates, and a closed subpath emits a region loop. This lives in the pure function pathToVectorNetwork(d, fillRule), which fromEntity calls when entity.has(Path).
Tessellation
Stroke
We turn the graph into polylines and render them with the approach from Lesson 12 - Draw polyline.
- Maintain adjacency per vertex.
- Walk unused edges: extend forward and backward from a starting edge, continuing only when the current vertex has exactly one unused edge left, so degree-2 junctions become one polyline (join instead of cap).
- Stop at branches (degree ≥ 3); separate subpaths with
NaN.
For each traversed edge:
- Use the Figma cubic: P₀ and P₃ are anchors, P₁ = P₀ +
tangentStart, P₂ = P₃ +tangentEnd. - Straight edges (handles at anchors) use two points.
- Otherwise use
CubicBezierCurve.getPointswith a segment count derived from chord length and control hull.
function tessellateVectorSegment(
    vertices: VectorVertexLike[],
    seg: VectorSegmentLike,
): number[] {
    const a = vertices[seg.start];
    const b = vertices[seg.end];
    const p0 = vec2.fromValues(a.x, a.y);
    const p3 = vec2.fromValues(b.x, b.y);

    const ts = seg.tangentStart;
    const te = seg.tangentEnd;
    const p1 = vec2.create();
    const p2 = vec2.create();
    vec2.add(p1, p0, vec2.fromValues(ts?.x ?? 0, ts?.y ?? 0));
    vec2.add(p2, p3, vec2.fromValues(te?.x ?? 0, te?.y ?? 0));
}
Fill
Walk each Figma loops entry (ordered segment indices), tessellate every edge—including cubics—with the same tessellateVectorSegment, stitch in traversal order, drop duplicate points, and close the ring.
- For each region and each loop, build one closed contour.
- nonzero (or Figma
windingRule: 'NONZERO'): same earcut + holes path as Path fills inMesh(isClockWiseseparates outer rings from holes). - evenodd (or
EVENODD):triangulate(libtess). - Multiple regions are triangulated in sequence; vertices and indices are concatenated into one mesh with a running vertex offset.
Bending
The following is from Introducing Vector Networks - Bending. For Bezier curve editing, it's common in both Path and VectorNetwork:
Vector graphics today are based on cubic bezier splines, which are curves with two extra points called control handles that are positioned away from the curve itself and that control how much it bends, sort of like how a magnet might bend a wire towards it. Changing the shape of a curve involves dragging a control handle off in space instead of dragging the curve directly.

In VectorNetwork's edge definition, tangentStart and tangentEnd can define the two control points of a cubic Bezier curve. When both are [0, 0], it degenerates into a straight line.
You can also try the Konva example How to modify line points with anchors? or bezierjs.
Double-click edit mode, the Move / Bend / Cut toolbar, and midpoint insertion are covered in Entering edit mode and toolbar below.
export enum Pen {
    SELECT = 'select',
    HAND = 'hand',
    VECTOR_NETWORK = 'vector-network',
}
Unlike the OBB-based approach in Lesson 21 - Transformer:
- Dragging a
VectorSegmentmoves the whole shape, like OBB drag. - Dragging a
VectorVertexmoves only that vertex; every segment that shares it follows automatically — this is the core advantage of a Vector Network over a Path. The new coordinates are written back through a single entry pointAPI.updateNodeVectorNetwork(node, vectorNetwork), which updates the entity'sVectorNetworkcomponent and triggers re-tessellation plus history (undo/redo).
// packages/ecs/src/systems/Select.ts
// In handleControlPointMoving, for a vector-network node:
// 1. Read the VectorNetwork component and map the pointer back to local
//    space via the inverse of GlobalTransform.
// 2. Update vertices[activeIndex].x/y.
// 3. Call api.updateNodeVectorNetwork to write back.
On write-back, VectorNetwork.getGeometryBounds recomputes the geometry bounds and normalizes the top-left to local (0, 0) (all vertices shift by -minX/-minY, with that offset added to node.x/y), preserving the node.x == geometry left invariant that Transformer resize relies on.
Entering edit mode and toolbar
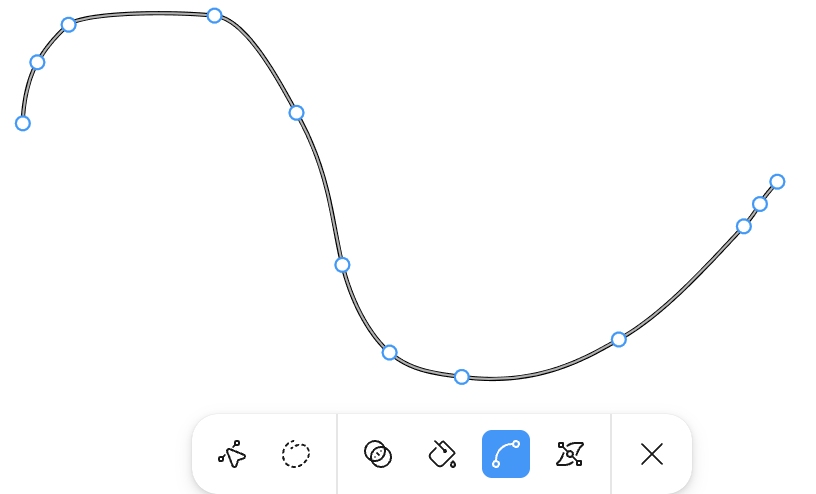
Following Figma's Edit vector layers, double-click a vector-network node to enter vertex edit mode: set Editable.isEditing = true on the entity and show a bottom-centered Move / Bend / Cut toolbar (VectorNetworkEditMode, see context-vector-network-edit-bar.ts). Exiting edit (toolbar close button, Esc, or clicking empty canvas) writes isEditing: false; RenderTransformer hides all edit anchors (vertices, segment midpoints, tangent handles).
| Mode | Interaction |
|---|---|
| Move | Drag vertices; hover a segment to show its midpoint, click to insert a new vertex |
| Bend | Show tangent handles on the selected vertex; drag to adjust tangentStart / tangentEnd |
| Cut | Same midpoint insertion as Move; click a vertex to break topology at the cut point and auto-switch to Move for dragging apart |
Hover highlight and selection are separate for anchors: Transformable.hoveredControlPointIndex clears when the pointer leaves; selectedControlPointIndex persists after a click until you click empty space or inside the shape.
Move: insert vertex at segment midpoint
When hovering a segment, render a midpoint anchor at the curve midpoint (t = 0.5; for cubic edges, the point on the curve). A click calls splitSegmentAt (see Creation & delete) to split the edge and write back the network. See Select.insertControlPointFromMidpoint and RenderTransformer.findHoveredVectorNetworkSegmentIndex (viewport-to-local curve distance).
Topological operators
Figma supports Boolean operations, for example union.
Paper.js may be a useful reference for implementations.
Creation & delete
Delete and Heal for Vector Networks
Adding a vertex: split a segment at parameter t into two segments and insert the new vertex (cubic edges are subdivided with de Casteljau to preserve the curve), instead of a plain splice into a points array:
export function splitSegmentAt(
    network: VectorNetworkData,
    segIdx: number,
    t: number,
): VectorNetworkData;
Deleting a vertex: after removing the vertex and its incident edges, a degree-2 neighbor is "healed" by merging its two edges into one, keeping the path connected (matching Figma's Delete and Heal). Triggered with Delete / Backspace in edit mode:
export function deleteVertex(
    network: VectorNetworkData,
    vertexIdx: number,
): VectorNetworkData;
These operators are pure functions (in
packages/ecs/src/utils/vector-network-topology.ts) taking and returning{ vertices, segments, regions }, so they are easy to unit-test and decoupled from rendering; the editing system feeds their result back throughAPI.updateNodeVectorNetwork.
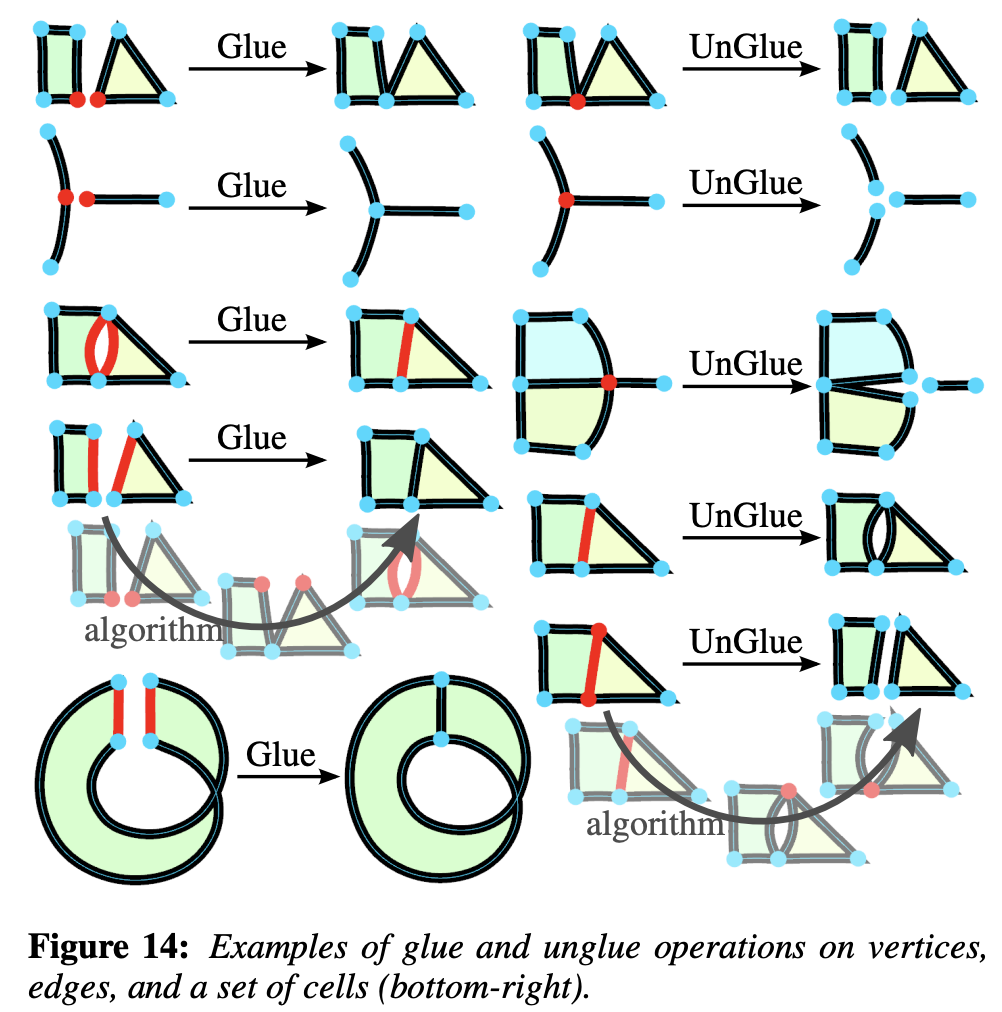
Glue & unglue
Cut & uncut

Cut breaks topology at the cut vertex (it does not remove the opposite edge). On a closed loop, keep both incident edges at the cut point, duplicate the closing endpoint, and rewrite the closing segment so the path opens there. For triangle 0—1—2—0 with a cut at vertex 1:
Before:  0 — 1 — 2 — 0 (closed)
After:   0 — 1 — 2 — 3 (3 coincident with 0, open polyline)
segments: [0,1], [1,2], [2,3]
On an open polyline, duplicate the cut vertex and reassign all but the first incident edge to the copy so the two chains can be pulled apart in Move mode. See breakVertex:
export function breakVertex(
    network: VectorNetworkData,
    vertexIndex: number,
): VectorNetworkData | null;
Clicking a vertex in Cut mode calls breakVectorNetworkAtVertex (Select.ts), writes back the network, records history, and setAppState({ vectorNetworkEditMode: MOVE }) so you can drag immediately. regions are dropped after a break; use click-to-fill again or rebuild via region detection later.