Lesson 16 - Text advanced features
In the previous lesson, we introduced the principles of SDF-based text rendering, experimented with ESDT and MSDF to improve rendering quality, and mentioned the advanced text rendering features that CanvasKit provides compared to Canvas.
In this lesson, we'll first look at rendering methods beyond SDF, then discuss and try to implement features like: decorative lines, shadows, text following paths. Finally, text should not only be renderable but also have good interaction - we'll discuss topics like input boxes, text selection, and A11y.
Let's first look at what text rendering methods are available besides SDF.
Rendering Text with Bezier Curves
Using Figma's SVG export feature, you can see that its text is also rendered using Paths. If we don't consider rendering performance and CJK characters, using Bezier curves to render text is indeed a good choice. To obtain vector information for characters in a browser environment, we can use:
- opentype.js
- use-gpu uses use-gpu-text which is wrapped based on ab-glyph
- More and more applications are using harfbuzzjs, see: State of Text Rendering 2024. For example, font-mesh-pipeline is a simple demonstration
Below we'll show examples of rendering text using opentype.js and harfbuzzjs, both of which support the ttf font format.
opentype.js
opentype.js provides the getPath method, which completes Shaping and obtains SVG path-commands given text content, position, and font size.
opentype.load('fonts/Roboto-Black.ttf', function (err, font) {
    const path = font.getPath('Hello, World!', 0, 0, 32); // x, y, fontSize
    // convert to svg path definition
});
harfbuzzjs
First initialize harfbuzzjs WASM using Vite's ?init syntax. Then load the font file and create a font object.
import init from 'harfbuzzjs/hb.wasm?init';
import hbjs from 'harfbuzzjs/hbjs.js';

const instance = await init();
hb = hbjs(instance);

const data = await (
    await window.fetch('/fonts/NotoSans-Regular.ttf')
).arrayBuffer();
blob = hb.createBlob(data);
face = hb.createFace(blob, 0);
font = hb.createFont(face);
font.setScale(32, 32); // Set font size
Then create a buffer object and add text content. As mentioned before, harfbuzz doesn't handle BiDi, so we need to manually set the text direction. Finally, call hb.shape method to perform Shaping calculation.
buffer = hb.createBuffer();
buffer.addText('Hello, world!');
buffer.guessSegmentProperties();
// TODO: use BiDi
// buffer.setDirection(segment.direction);

hb.shape(font, buffer);
const result = buffer.json(font);
Now we have the glyph data, and we can use Path to draw it
result.forEach(function (x) {
    const d = font.glyphToPath(x.g);
    const path = new Path({
        d,
        fill: '#F67676',
    });
});
TeX math rendering
We can use MathJax to render TeX mathematical formulas, convert them to SVG, and then render them using Path. Here we follow the approach from LaTeX in motion-canvas to get SVGElement:
const JaxDocument = mathjax.document('', {
    InputJax: new TeX({ packages: AllPackages }),
    OutputJax: new SVG({ fontCache: 'local' }),
});

const svg = Adaptor.innerHTML(JaxDocument.convert(formula));
const parser = new DOMParser();
const doc = parser.parseFromString(svg, 'image/svg+xml');
const $svg = doc.documentElement;
Then use the method introduced in Lesson 10 - From SVGElement to Serialized Node to convert SVGElement to graphics and add them to the canvas.
const root = await deserializeNode(fromSVGElement($svg));Text stroke
Both strokeText in Canvas and -webkit-text-stroke in CSS provide text strokes. The good news is that strokes are naturally easy to implement in SDF:
if (strokeWidth > 0.0 && strokeColor.a > 0.0) {
    float fillAlpha = smoothstep(buff - gamma_scaled, buff + gamma_scaled, dist);
    float strokeThreshold = buff - strokeWidth / fontSize;
    float strokeAlpha = smoothstep(strokeThreshold - gamma_scaled, strokeThreshold + gamma_scaled, dist);

    vec4 finalColor = mix(strokeColor, fillColor, fillAlpha);
    outputColor = finalColor;
    opacity *= strokeAlpha;
}
The following shows renderings based on SDF and MSDF, and you can see that MSDF stays sharp even when stroked:
Text Decoration
In CSS, early browsers had a crude implementation of text-decoration, as exemplified by underline, from which the following image is taken: Crafting link underlines on Medium
The perfect underline should be visible, but unobtrusive — allowing people to realize what’s clickable, but without drawing too much attention to itself. It should be positioned at just the right distance from the text, sitting comfortably behind it for when descenders want to occupy the same space:

Current browsers have perfected this implementation. In addition, Canvas does not provide this feature, and CanvasKit enhances it with a set of properties that correspond to CSS text-decoration:
// @see https://developer.mozilla.org/en-US/docs/Web/CSS/text-decoration#constituent_properties
// @see https://skia.org/docs/dev/design/text_shaper/#principles
const paraStyle = new CanvasKit.ParagraphStyle({
    textStyle: {
        decoration: CanvasKit.UnderlineDecoration,
        decorationColor,
        decorationThickness,
        decorationStyle: CanvasKit.DecorationStyle.Solid,
    },
});
Another interesting implementation underlineJS is based on Canvas.
Use polyline
The decoration line style is controlled by the decorationStyle property:
export type TextDecorationStyle =
  | 'solid'
  | 'double'
  | 'dotted'
  | 'dashed'
  | 'wavy';
: TextDecorationStyle;
In the simplest solid style, for example, we pass in decorationColor and decorationThickness as strokeColor and strokeWidth:
if (instance instanceof Text) {
    const {
        decorationColorRGB,
        decorationThickness,
        decorationStyle,
        metrics,
    } = instance;
    u_StrokeColor = [
        decorationColorRGB.r / 255,
        decorationColorRGB.g / 255,
        decorationColorRGB.b / 255,
        fo,
    ];
    u_ZIndexStrokeWidth[1] = decorationThickness;
}
Decoration style
Polyline itself supports strokeDasharray, so both dotted and dashed can be realized by it. Here we refer to Skia's implementation to set the ratio of dash to gap:
// @see https://github.com/google/skia/blob/main/modules/skparagraph/src/Decorations.cpp#L187
SkScalar scaleFactor = textStyle.getFontSize() / 14.f;
switch (textStyle.getDecorationStyle()) {
    case TextDecorationStyle::kDotted: {
        dashPathEffect.emplace(1.0f * scaleFactor, 1.5f * scaleFactor);
        break;
    }
    case TextDecorationStyle::kDashed: {
        dashPathEffect.emplace(4.0f * scaleFactor, 2.0f * scaleFactor);
        break;
    }
    default: break;
}
To be specific, we need to calculate and sample the wavy lines, which we'll do here by generating an SVG Path and using the method described in Lesson 13 - Sampling on a curve:
// @see https://github.com/google/skia/blob/main/modules/skparagraph/src/Decorations.cpp#L215
let d = 'M 0 0';
while (x_start + quarterWave * 2 < line.width) {
    d += ` Q ${x_start + quarterWave} ${
        wave_count % 2 != 0 ? quarterWave : -quarterWave
    } ${x_start + quarterWave * 2} 0`;

    x_start += quarterWave * 2;
    ++wave_count;
}
The effect is as follows:
Calculate position
The position is controlled by the property decorationLine:
export type TextDecorationLine =
    | 'underline'
    | 'overline'
    | 'line-through'
    | 'none';
We refer to the Skia Decorations::calculatePosition implementation for underline as an example:
void Decorations::calculatePosition(TextDecoration decoration, SkScalar ascent) {
    switch (decoration) {
        case TextDecoration::kUnderline:
            if ((fFontMetrics.fFlags & SkFontMetrics::FontMetricsFlags::kUnderlinePositionIsValid_Flag) &&
                fFontMetrics.fUnderlinePosition > 0) {
                fPosition  = fFontMetrics.fUnderlinePosition;
            } else {
                fPosition = fThickness;
            }
            fPosition -= ascent;
            break;
    }
}
Export SVG
Unfortunately, as of now (2025.7.9), SVG does not fully support text-decoration. In the right image below, text-decoration-color does not respect the blue color we set, but is overridden by the text color, and text-decoration-style is not supported at all. See: Text decoration of a text svg in html.
Apparentrly, text-decoration-color does not apply to SVG text elements
This is circumvented in Figma by exporting as <path>. We still want to keep <text>, so when exporting SVGs, we can only use <foreignObject> wrappers, see below left:
<foreignObject width="50" height="20">
    <span style="text-decoration: underline; text-decoration-color: blue;">
        Text
    </span>
</foreignObject>Shadows
Pixi.js provides DropShadowFilter, but we can implement it directly in SDF without using post-processing. Use shadowOffset and shadowBlurRadius to control the offset and blurring of the SDF texture.
// @see https://github.com/soimy/pixi-msdf-text/blob/master/src/msdf.frag#L49
vec3 shadowSample = texture2D(uSampler, vTextureCoord - shadowOffset).rgb;
float shadowDist = median(shadowSample.r, shadowSample.g, shadowSample.b);
float distAlpha = smoothstep(0.5 - shadowSmoothing, 0.5 + shadowSmoothing, shadowDist);
vec4 shadow = vec4(shadowColor, shadowAlpha * distAlpha);
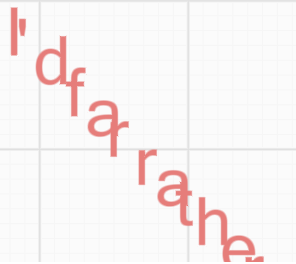
gl_FragColor = mix(shadow, text, text.a);Text Along Path
In the Figma community, many users are looking forward to this feature, for example: Make text follow a path or a circle. This feature was recently officially supported: Type text on a path.
In SVG, this can be achieved through textPath, see: Curved Text Along a Path
<path
    id="curve"
    d="M73.2,148.6c4-6.1,65.5-96.8,178.6-95.6c111.3,1.2,170.8,90.3,175.1,97"
/>
<text width="500">
    <textPath xlink:href="#curve"> Dangerous Curves Ahead </textPath>
</text>
Skia provides the MakeOnPath method, see Draw text along a path:
const textblob = CanvasKit.TextBlob.MakeOnPath(text, skPath, skFont);
canvas.drawTextBlob(textblob, 0, 0, textPaint);
In Mapbox, placing labels along roads and rivers is a common scenario, see Map Label Placement in Mapbox GL

Kittl provides a Easily Type Text On Any Path tool.
A more appropriate reference implementation comes from Fabricjs, see: fabricjs - text on path.
We refer to the implementation from Fabricjs: fabricjs - text on path, which adds a stage after the regular layout to compute the position of the current character on the path, using the method we introduced Lesson 13 - Sampling on a curve:
const centerPosition = positionInPath + positionedGlyph.width / 2;
const ratio = centerPosition / totalPathLength;
const point = path.getPointAt(ratio);
In addition, you need to use the Path method when calculating the bounding box.
Adjust rotation
The normal/tangent direction also needs to be calculated and passed into the shader for text rotation.
const tangent = path.getTangentAt(ratio);
const rotation = Math.atan2(tangent[1], tangent[0]);
We can optionally add a component to a_Position to store the rotation, and later construct the rotation matrix in the vertex shader:
this.vertexBufferDescriptors = [
    {
        arrayStride: 4 * 3,
        arrayStride: 4 * 4,
        stepMode: VertexStepMode.VERTEX,
        attributes: [
            {
                shaderLocation: Location.POSITION, // a_Position
                offset: 0,
                format: Format.F32_RGB,
                format: Format.F32_RGBA,
            },
        ],
    },
];
Optionally, the Quad four-vertex transformation can be done on the CPU side.
Export SVG
In SVG this can be achieved with textPath, see: Curved Text Along a Path.
<path
    id="MyPath"
    fill="none"
    stroke="red"
    d="M10,90 Q90,90 90,45 Q90,10 50,10 Q10,10 10,40 Q10,70 45,70 Q70,70 75,50"
></path>
<text>
    <textPath href="#MyPath">Quick brown fox jumps over the lazy dog.</textPath>
</text>More Friendly Interaction
Browser-native <textarea>s provide convenient features such as blinking cursors, selections, keyboard control, copy and paste, etc. If you wish to implement these features from scratch based on <canvas>, it would be a very tedious task, e.g. fabricjs - loading custom fonts and google docs, so we won't be choosing this option.
Text Input
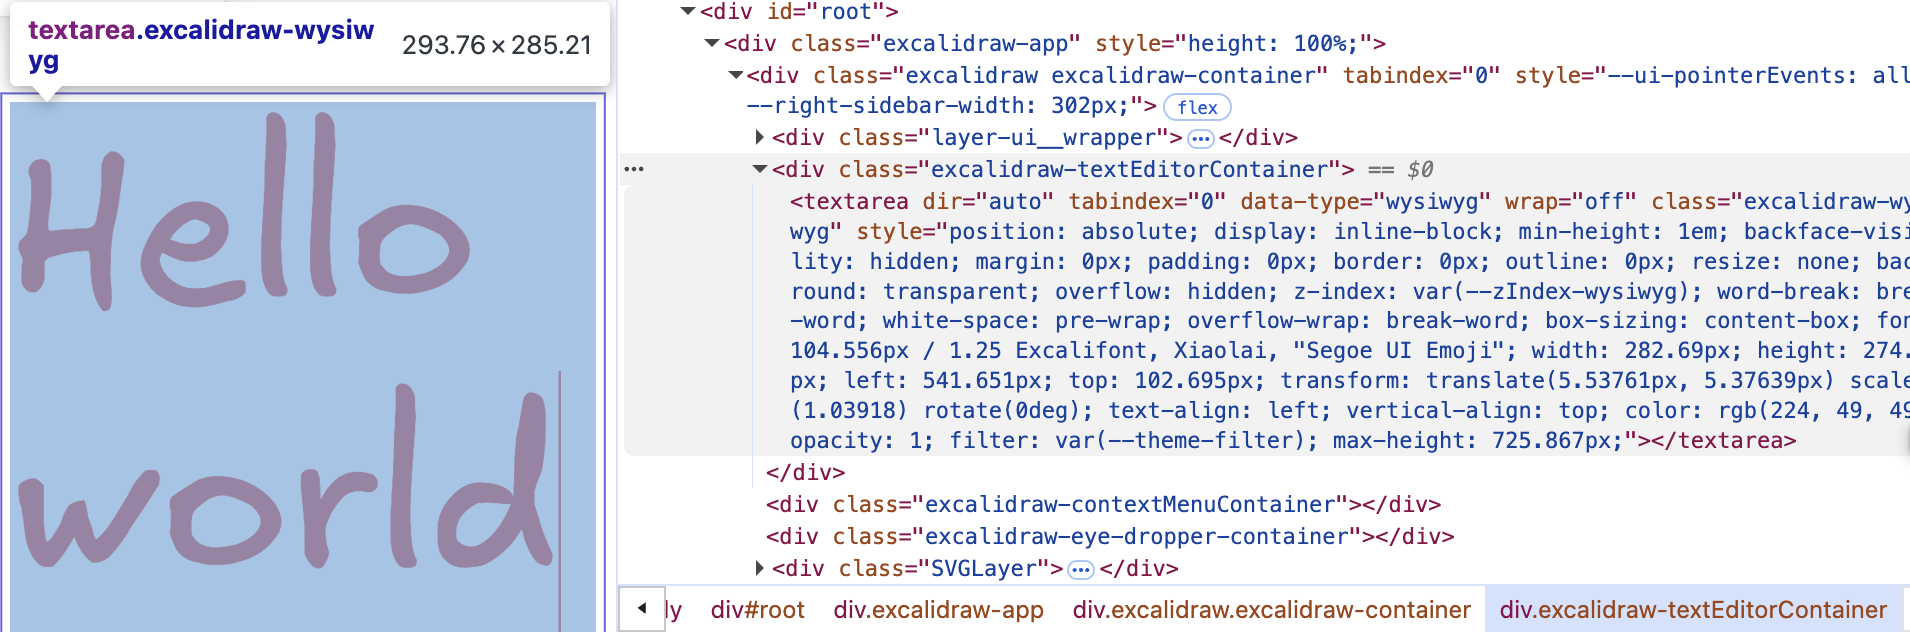
Below, from Figma, you can see that the native <textarea> element is used to position itself on the canvas, and when Text is double-clicked, the input box is displayed:
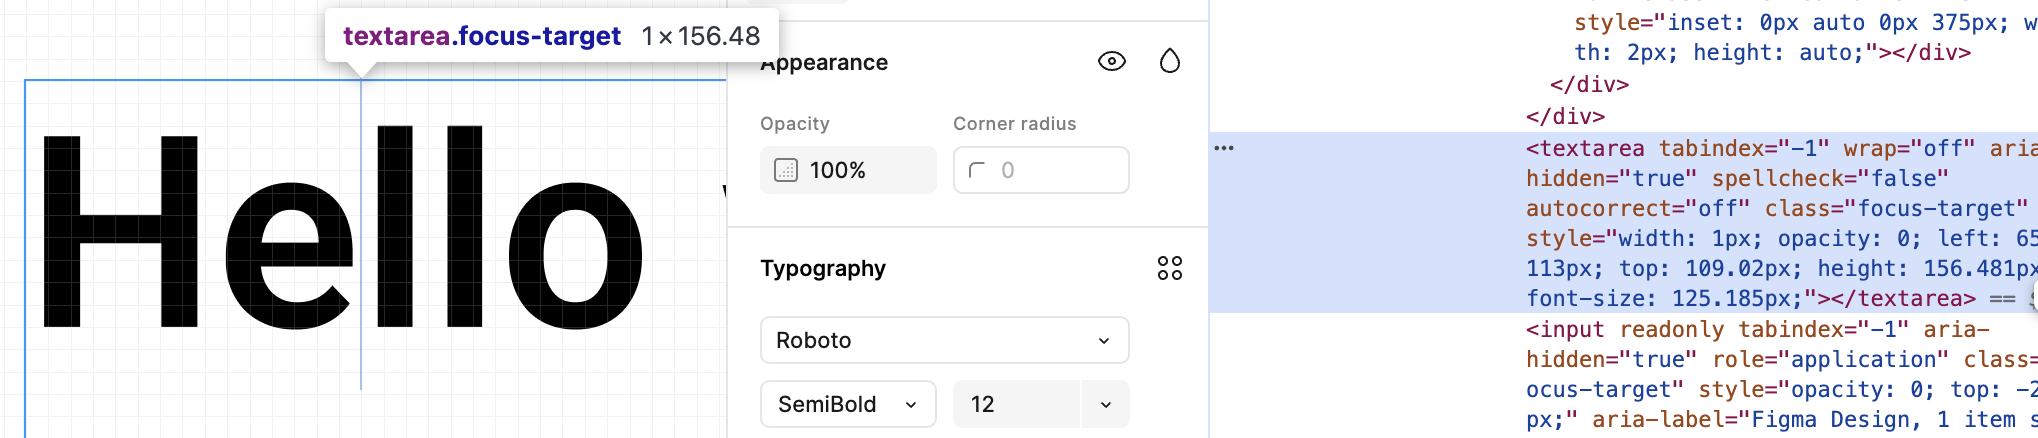
This is also used in excalidraw, see: textWysiwyg.tsx。
We also add a <ic-text-editor> element to make it fit the Text rendering in the canvas as closely as possible. The native <textarea> element is stylistically reset, e.g. not showing borders and backgrounds. The fontFamily, fontSize, and color properties all have corresponding CSS properties that can be set directly, but there are a number of factors that need to be taken into account when using absolute positioning:
@customElement('ic-text-editor')
export class TextEditor extends LitElement {
    static styles = css`
        :host {
            position: absolute;
        }
        textarea {
            position: absolute;
            display: none;
            margin: 0;
            padding: 0;
            border: 0;
            outline: 0;
            resize: none;
            background: transparent;
        }
    `;

    @query('textarea')
    editable: HTMLTextAreaElement;

    render() {
        return html`<textarea></textarea>`;
    }
}
First you need to convert the mouse event position coordinates of the double click to the viewport coordinate system:
const { x, y } = this.api.canvas2Viewport({
    x: this.node.x,
    y: this.node.y,
});

this.editable.style.left = `${x}px`;
this.editable.style.top = `${y}px`;
The current zoom level of the camera then needs to be taken into account:
const { zoom } = this.api.getCamera().read(ComputedCamera);
this.editable.style.transform = `scale(${zoom})`;
this.editable.style.transformOrigin = `left top`;
Finally, we want scrolling on the <textarea> element not to trigger the browser's default behavior, but to cut through it and trigger it on the <canvas> element, which performs the camera pan and zoom operations:
handleWheel = (event: WheelEvent) => {
    event.preventDefault();
    event.stopPropagation();

    const newWheelEvent = new WheelEvent('wheel', {});
    $canvas.dispatchEvent(newWheelEvent);
};
The effect is as follows:
Calculate size when text changed
The width and height of <textarea> needs to be recalculated and set when typing and pasting text in real time.
Handle Tab
The default behavior of pressing the Tab key in <textarea> is to switch focus to the next element. We want it to be the same as the code editor.
Text Selection
Once you have support for overlaying textarea on Text, it's easy to implement this feature.
Special Effects
Loading Web Fonts
For solutions using Canvas2D API to generate SDF, just use webfontloader to load fonts first, then specify the font using fontFamily.
import WebFont from 'webfontloader';
WebFont.load({
google: {
families: ['Gaegu'], // specify font
},
active: () => {
const text = new Text({
x: 150,
y: 150,
content: 'Hello, world',
fontFamily: 'Gaegu', // specify font
fontSize: 55,
fill: '#F67676',
});
},
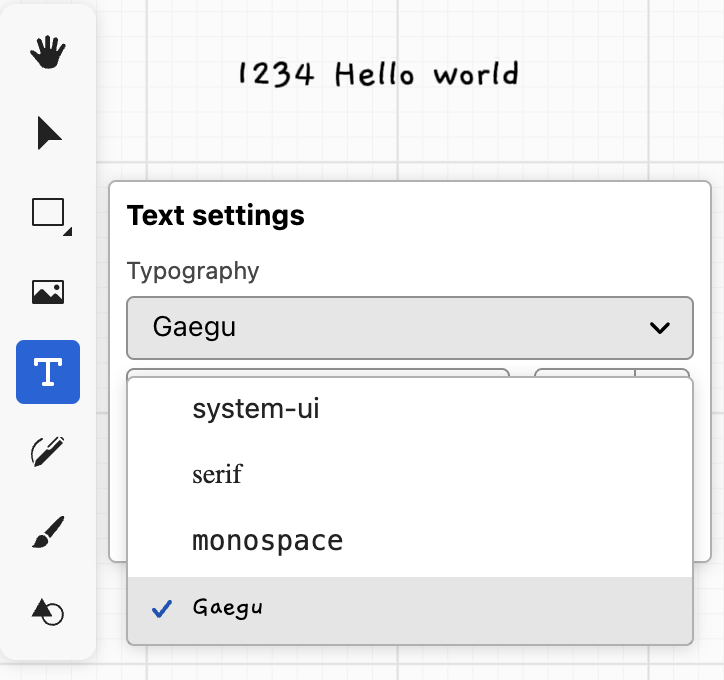
});You can also switch to Text mode and select the Gaegu custom font in the home page example:
Material Design on the GPU
Material Design on the GPU introduce a material effect based on SDF text, using normal maps and lighting to simulate ink spreading on paper. We don't need to consider lighting, just use simplex noise to implement it, and add multiple absorption effects:
import { simplex_2d } from './simplex-2d';
import { aastep } from './aastep';
export const absorb = /* wgsl */ `
  ${aastep}
  ${simplex_2d}
  float absorb(float sdf, vec2 uv, float scale, float falloff) {
    float distort = sdf + snoise(uv * scale) * falloff;
    return aastep(0.5, distort);
  }
`;