Lesson 22 - VectorNetwork
In this lesson, you will learn about:
- Limitations of SVG Path
- What is VectorNetwork?
- Using the Pen tool to modify Path
- Double-click to enter vector edit mode and Move / Bend / Cut / Fill tools
- Topological operators: split segment, delete vertex, Cut to open a closed loop
Limitations of SVG Path
In Lesson 13 - Drawing path and sketchy style we learned how to draw paths. Figma also provides the VectorPath API, which supports a subset of SVG Path commands (see: VectorPath-data) and fillRule (called windingRule in Figma).
node.vectorPaths = [
    {
        windingRule: 'EVENODD',
        data: 'M 0 100 L 100 100 L 50 0 Z',
    },
];
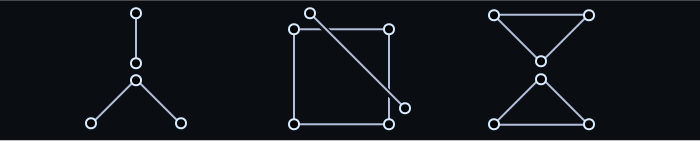
So why introduce the VectorNetwork API? The reason is that SVG Path has some inherent limitations. The Engineering behind Figma's Vector Networks article vividly demonstrates this. The following shape cannot be described using just one Path:

It can only be described by splitting into multiple Paths. While this is possible, certain intuitive operations cannot be achieved in editing scenarios. For example, when dragging the center vertex at the bottom left, only one vertex will follow because it consists of two independent Paths:
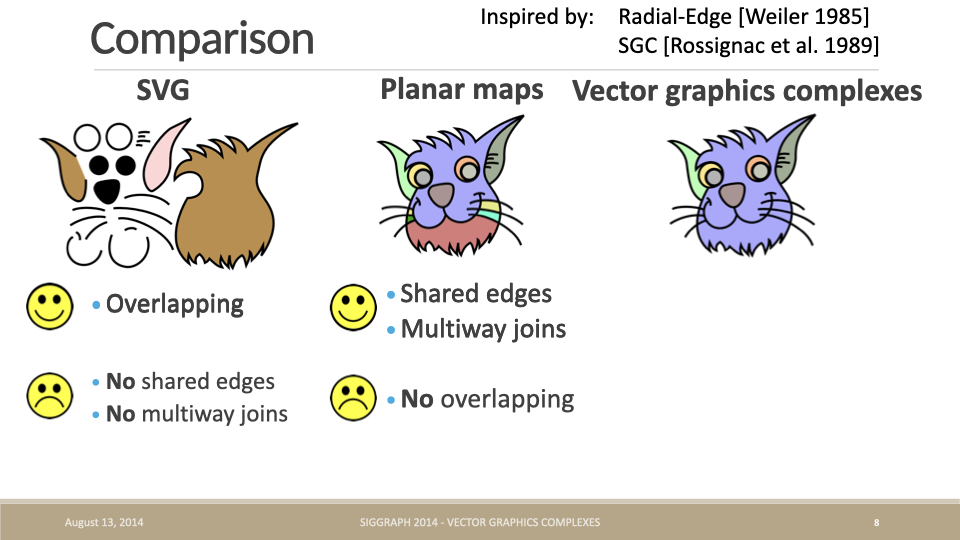
Besides vertices not being able to have more than 2 edges, edges cannot be shared either. The original paper and PPT of Vector Graphics Complexes compare SVG and Planar maps, neither of which can support overlapping, shared vertices, and edges, leading to a new geometric representation (hereinafter referred to as VGC):
vpaint is implemented based on VGC. You can see how natural the interactive effects are during editing after merging points and edges:
Or using the example of dragging an edge of a cube from The Engineering behind Figma's Vector Networks:
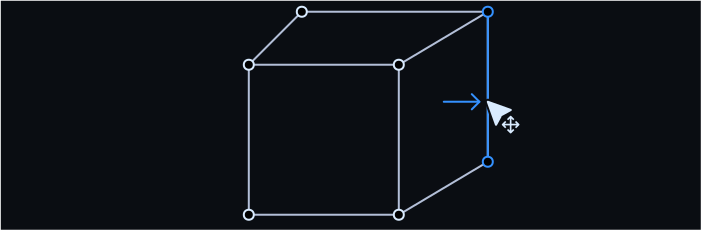
Double-click to enter edit mode, then drag any edge of the cube:
It's worth mentioning that the Discussion in HN points out the remarkable similarity between VGC and Figma's VectorNetwork. Considering that both started exploring around the same time, they arrived at similar solutions through different paths, hence we'll use the term VectorNetwork in the following text.
CEO of Figma here. Most of the original insights around vector networks were in 2013, though we continued to polish the implementation over time. We didn't exit stealth and ship the closed beta of Figma until December 2015 which is why there isn't blog content before then. At first glance, this thesis looks super neat! I'm excited to check it out! I don't believe I've seen it before which is surprising given the overlap.
Let's look at how VectorNetwork is defined.
Topology Definition of VectorNetwork
The definition of VectorNetwork/VGC is much more complex than Path. Its data structure is a graph consisting of vertices, edges, and faces (filled regions). The following image is from the original Vector Graphics Complexes paper.
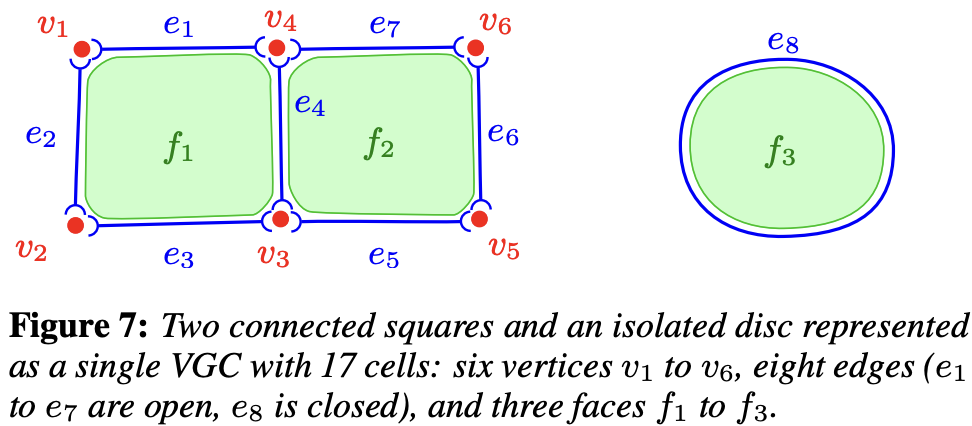
Here we only discuss the topology definition. Other drawing attributes can remain consistent with Path:
On top of this core structure, more drawing attributes can be added for fine control on rendering. For instance, we added vertex radius, variable edge width, cell color (possibly transparent), and edge junctions style (mitre join or bevel join).
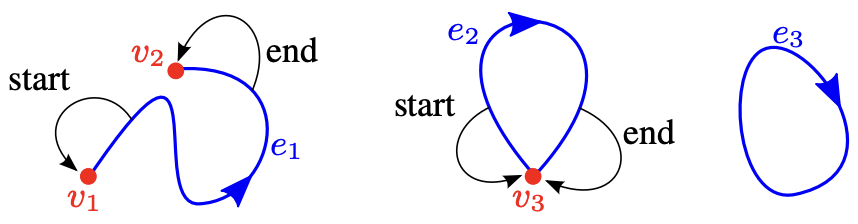
Vertices are easy to understand. In VGC, edges consist of a pair of start and end vertex indices, forming a self-loop when they coincide.
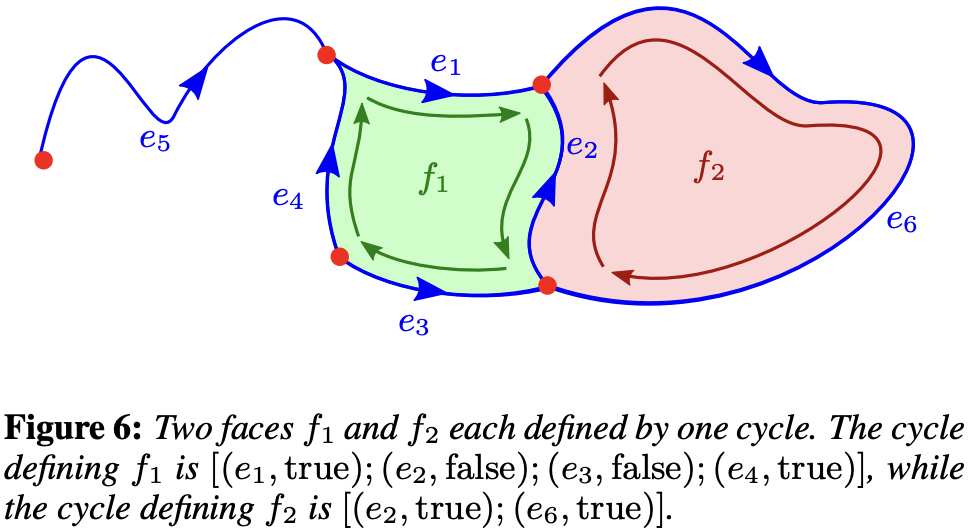
Filled regions are defined by closed loops of vertices. In VGC, they are defined using a set of halfedges:
The following triangle example is from the VectorNetwork API. You can see it's basically consistent with VGC, except that filled regions are defined by vertex indices and fillRule. Other non-geometric attributes like strokeCap remain consistent with Path:
node.vectorNetwork = {
    // The vertices of the triangle
    vertices: [
        { x: 0, y: 100 },
        { x: 100, y: 100 },
        { x: 50, y: 0 },
    ],

    // The edges of the triangle. 'start' and 'end' refer to indices in the vertices array.
    segments: [
        {
            start: 0,
            tangentStart: { x: 0, y: 0 }, // optional
            end: 1,
            tangentEnd: { x: 0, y: 0 }, // optional
        },
        {
            start: 1,
            end: 2,
        },
        {
            start: 2,
            end: 0,
        },
    ],

    // The loop that forms the triangle. Each loop is a
    // sequence of indices into the segments array.
    regions: [{ windingRule: 'NONZERO', loops: [[0, 1, 2]] }],
};
Following the Figma convention for cubics: P₀ is the start anchor, P₃ the end anchor, P₁ = P₀ + tangentStart, P₂ = P₃ + tangentEnd. When both handles coincide with their anchors (straight line), use two points; otherwise sample with CubicBezierCurve.getPoints, choosing a segment count from chord length and control hull (roughly 8–64).
In editing scenarios, vertices and edges are defined by users, while filled regions need to be automatically calculated by the system. So how do we find these filled regions?
Filling
In operations like click to fill, we need to find the minimum loop formed by vertices.
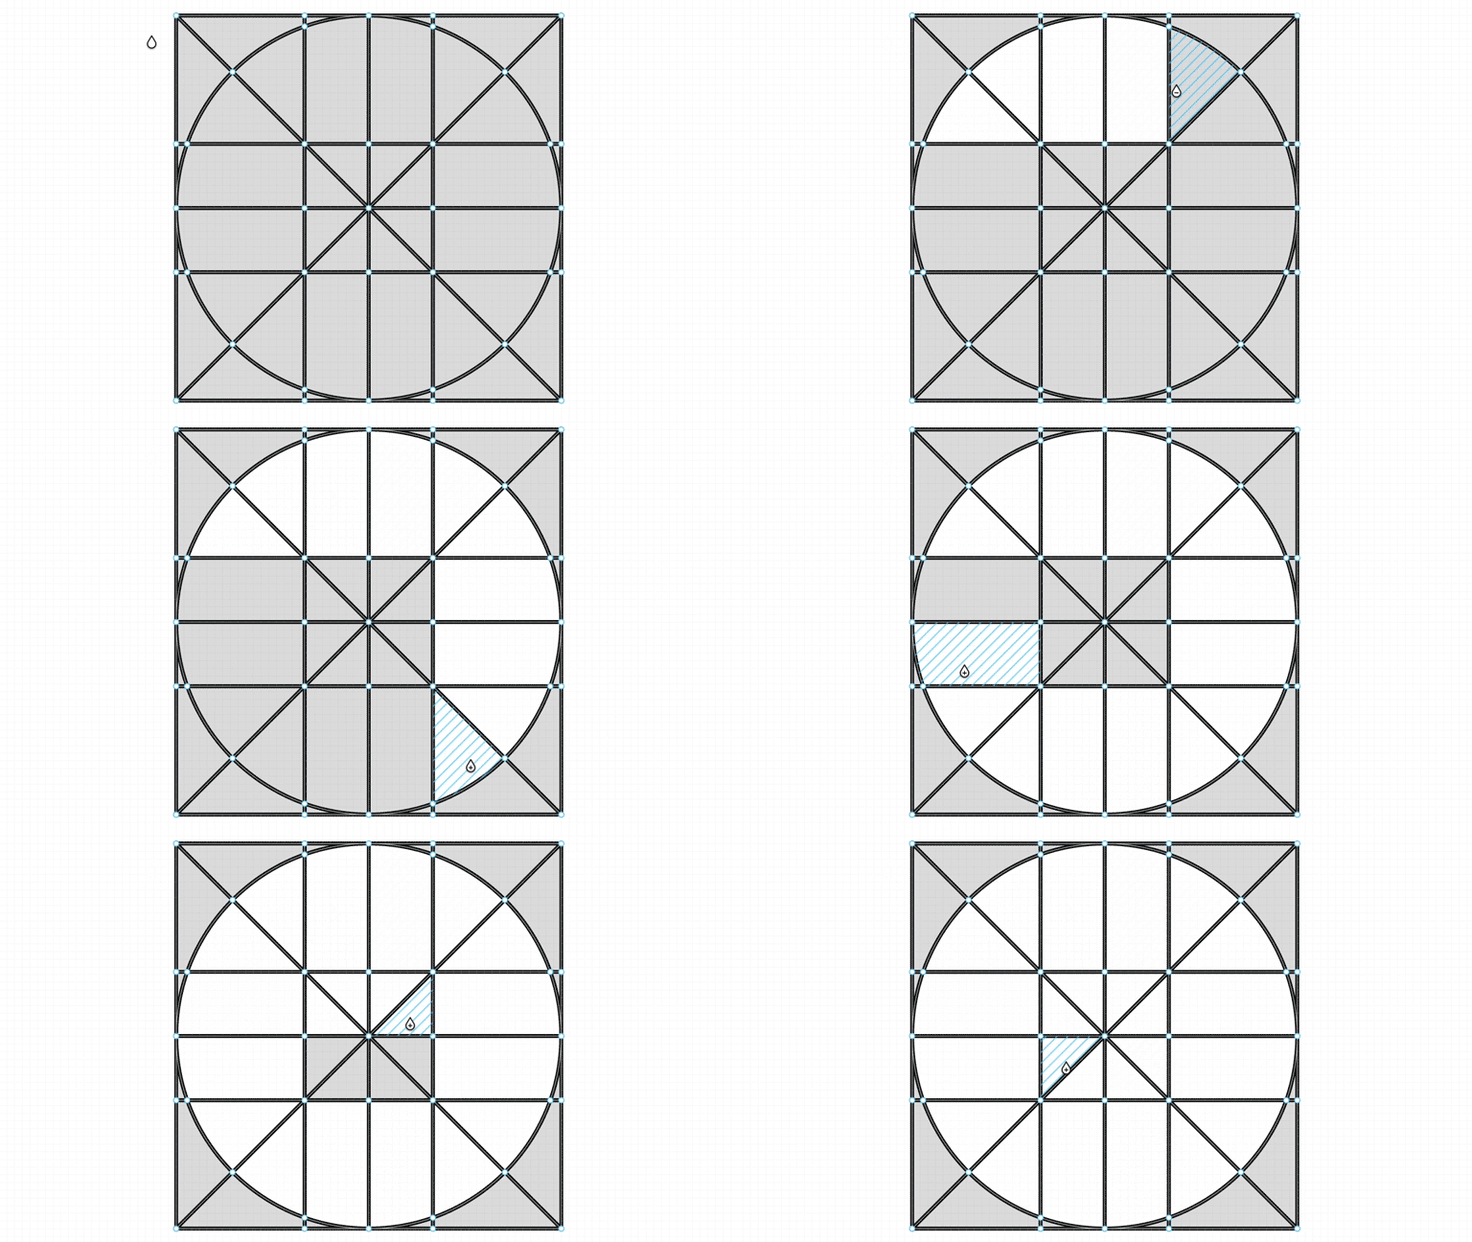
We treat the VectorNetwork as a planar graph and split each segment into two directed half-edges. At every vertex we sort the outgoing edges by polar angle; walking the "next half-edge" (the outgoing edge most clockwise relative to the incoming reverse edge) enumerates every minimal face. The smallest face that encloses the click position is the target region, and writing its ordered segment-index loop into VectorRegion.loops reuses the fill tessellation above.
export function findRegionLoopAtPoint(
    vertices: VectorVertexLike[],
    segments: VectorSegmentLike[],
    point: [number, number],
): number[] | null;
Numerical robustness: collinear edges, coincident vertices, and self-loops all need an EPS tolerance and degenerate-case handling; the unbounded outer face has a positive signed area under this traversal and must be skipped.
Convert to VectorNetwork
Following figma-fill-rule-editor, we use these type definitions:
export class VectorNetwork {
    @field.object declare vertices: VectorVertex[];
    @field.object declare segments: VectorSegment[];
    @field.object declare regions?: VectorRegion[];
}

interface VectorVertex {
    x: number;
    y: number;
    strokeLinecap?: Stroke['linecap'];
    strokeLinejoin?: Stroke['linejoin'];
    cornerRadius?: number;
    handleMirroring?: HandleMirroring;
}

interface VectorSegment {
    start: number;
    end: number;
    tangentStart?: VectorVertex;
    tangentEnd?: VectorVertex;
}

interface VectorRegion {
    fillRule: CanvasFillRule;
    loops: ReadonlyArray<ReadonlyArray<number>>;
}
Polyline is the easiest geometry to convert into a VectorNetwork:
class VectorNetwork {
    static fromEntity(entity: Entity): VectorNetwork {
        if (entity.has(Polyline)) {
            const { points } = entity.read(Polyline);
            const vertices: VectorVertex[] = points.map(([x, y]) => ({ x, y }));
            const segments: VectorSegment[] = points.slice(1).map((_, i) => ({
                start: i,
                end: i + 1,
            }));

            return { vertices, segments };
        }
    }
}
Converting a [Path] is more involved: after normalizing the SVG path commands (path2Absolute), each command is parsed in turn. M/L/H/V emit straight segments; C/S/Q/T emit cubics (Q/T are first elevated to cubic), converting the absolute control points into Figma-style relative tangents tangentStart = P1 - P0 and tangentEnd = P2 - P3; S/T track the previous control point for reflection; on Z, if the last point coincides with the start it reuses the start vertex to avoid duplicates, and a closed subpath emits a region loop. This lives in the pure function pathToVectorNetwork(d, fillRule), which fromEntity calls when entity.has(Path).
Tessellation
Stroke
We turn the graph into polylines and render them with the approach from Lesson 12 - Draw polyline.
- Maintain adjacency per vertex.
- Walk unused edges: extend forward and backward from a starting edge, continuing only when the current vertex has exactly one unused edge left, so degree-2 junctions become one polyline (join instead of cap).
- Stop at branches (degree ≥ 3); separate subpaths with
NaN.
For each traversed edge:
- Use the Figma cubic: P₀ and P₃ are anchors, P₁ = P₀ +
tangentStart, P₂ = P₃ +tangentEnd. - Straight edges (handles at anchors) use two points.
- Otherwise use
CubicBezierCurve.getPointswith a segment count derived from chord length and control hull.
function tessellateVectorSegment(
    vertices: VectorVertexLike[],
    seg: VectorSegmentLike,
): number[] {
    const a = vertices[seg.start];
    const b = vertices[seg.end];
    const p0 = vec2.fromValues(a.x, a.y);
    const p3 = vec2.fromValues(b.x, b.y);

    const ts = seg.tangentStart;
    const te = seg.tangentEnd;
    const p1 = vec2.create();
    const p2 = vec2.create();
    vec2.add(p1, p0, vec2.fromValues(ts?.x ?? 0, ts?.y ?? 0));
    vec2.add(p2, p3, vec2.fromValues(te?.x ?? 0, te?.y ?? 0));
}
Fill
Walk each Figma loops entry (ordered segment indices), tessellate every edge—including cubics—with the same tessellateVectorSegment, stitch in traversal order, drop duplicate points, and close the ring.
- For each region and each loop, build one closed contour.
- nonzero (or Figma
windingRule: 'NONZERO'): usetriangulate(libtess) with nonzero winding across all contours, supporting disconnected islands and nested holes regardless of contour order. - evenodd (or
EVENODD):triangulate(libtess). - Multiple regions are triangulated in sequence; vertices and indices are concatenated into one mesh with a running vertex offset.
Click to fill a region
Double-click a VectorNetwork and choose Fill. Hover previews the smallest enclosed face; click to fill it and click again to clear it. Each click is one undo step. Drags, cancelled pointers and multi-touch zoom do not commit a fill. Switching tools, pressing Esc, clicking empty canvas outside the shape, or destroying the canvas clears the preview.
Try the cube below, which starts in Fill mode. Hover over its front, top or right face to preview it, then click to fill it. Fill two neighbouring faces and click either one again: only that face is cleared. Use the canvas's Undo / Redo buttons to step through your changes.
In Fill mode, click the color swatch beside the tool buttons to open the color picker. Choose a color or enter a color value before clicking a face. Changing the color also updates all already-filled faces in this network; color changes can be undone. Faces currently share one fill style.
findVectorNetworkFaces walks directed half-edges and attaches the exterior boundaries of enclosed disconnected components as holes. Previews and newly created regions use evenodd, so holes do not depend on the storage direction of edges. Existing nonzero / evenodd fills are resolved to minimal faces by their coverage; clearing one face preserves neighbouring fills.
Faces share the node's fills. The first fill on a stroke-only network uses the pen's configured visible fill, falling back to blue. Previews live in a transient SVG overlay and never enter the document, exports or history. Picking uses local coordinates and supports rotation, reflection and scaling.
Fill splits crossings into shared vertices in temporary geometry before finding faces. Hovering does not change the document: the first fill click commits both topology and paint, and one undo restores both. Independent paint per face remains a separate extension.
Drawing with the Pen
Choose the Vector Network pen. Click to place corner anchors; drag to place smooth anchors. The first anchor remains a transient preview until the first edge is committed, so abandoning a single point does not create an empty document node.
A drag defines the new anchor's outgoing handle. Its incoming handle is the opposite vector, and the outgoing vector becomes the next edge's tangentStart. Both the rubber-band preview and committed geometry use these same cubic controls, including a drag on the first anchor. The preview also shows the handle line.
Click an existing anchor within 10 viewport pixels to close the network and return to Select. Snapping uses the press position, so dragging the closing handle away does not create an extra vertex. Closed faces are detected automatically and rendered with the pen's configured fill; the default stroke-only style remains unfilled until Fill is used. Click the active anchor, or press Enter / Esc, to finish an open path. An unfinished drag is discarded.
Each committed edge is one undo step. Pointer cancellation, leaving the canvas, and switching tools discard the pending gesture; committed edges remain. Undo or an external geometry edit clears the continuation point, so the next stroke cannot attach to a stale vertex. Previews belong to their canvas's SVG overlay and are excluded from saved nodes, history and exports; destroying the canvas removes them.
Resume an existing network
Select a VectorNetwork and switch to the pen. Hover near an existing vertex to see its snap indicator, click it to start, then click or drag the next anchor to add an edge to the same network. This extends endpoints and creates branches at shared vertices. Choosing the first anchor does not change the document; each committed edge is one undo step. Starting away from a vertex creates a separate network.
Continuation supports rotation, nonuniform scaling and reflection, using the same cubic controls for preview and commit. Existing edge handles, fills and holes are preserved; use Fill to paint newly enclosed faces. Connecting to an existing vertex finishes the stroke, and retracing an identical edge creates no duplicate. Locked, hidden or noninvertible nodes cannot be resumed. Cancellation, switching tools or undo during drawing discards the pending edge while retaining completed edits.
Bending
In Bend, drag an interior point on an edge directly. Its anchors stay fixed while the grabbed curve point follows the pointer. Straight edges become cubic Béziers. Every update starts from the pointer-down snapshot, preventing accumulated control displacement. Picking uses screen coordinates, including rotation, reflection and nonuniform scaling.
At parameter t, the two control weights are a = 3(1-t)²t and b = 3(1-t)t². For pointer displacement Δ, the controls move by aΔ/(a²+b²) and bΔ/(a²+b²). This minimizes squared control displacement while keeping the grabbed point under the pointer. Direct edge bending releases handle coupling at its endpoints; other edges retain their controls. Near endpoints, anchor and handle interactions take priority.
Double-click a vector network, choose Bend, then select an anchor to reveal its handles. For anchors with exactly two incident edge ends, Handle coupling offers three modes:
- Independent: move either handle without changing the other.
- Align angles: keep the handles on opposite rays while preserving the other handle's length.
- Mirror angle and length: keep the handles opposite and equally long.
Changing the mode aligns the pair immediately, using the first non-zero handle as reference. Hold Alt while dragging to break the coupling; the anchor remains independent afterward. Branch vertices with three or more incident edge ends keep independent handles. A self-loop contributes two ends. A collapsed handle has no direction, so angle-only coupling retains the other handle until the dragged handle has a direction again.
Straight edges expose temporary handle positions pointing toward the other endpoint; dragging one creates its Bézier control. These guides do not change saved geometry until dragged. Each completed drag or coupling change is one undo step. Esc, pointer cancellation, leaving the canvas, or switching tools cancels a pending drag and restores its original geometry. Changing curve bounds preserves anchor positions under rotation, reflection and scaling.
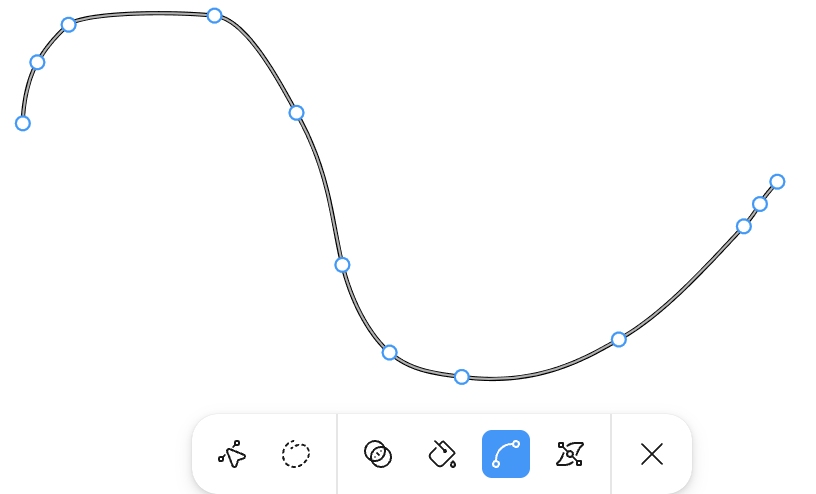
The following is from Introducing Vector Networks - Bending. For Bezier curve editing, it's common in both Path and VectorNetwork:
Vector graphics today are based on cubic bezier splines, which are curves with two extra points called control handles that are positioned away from the curve itself and that control how much it bends, sort of like how a magnet might bend a wire towards it. Changing the shape of a curve involves dragging a control handle off in space instead of dragging the curve directly.

In VectorNetwork's edge definition, tangentStart and tangentEnd can define the two control points of a cubic Bezier curve. When both are [0, 0], it degenerates into a straight line.
You can also try the Konva example How to modify line points with anchors? or bezierjs.
Double-click edit mode, the Move / Bend / Cut / Fill toolbar, and midpoint insertion are covered in Entering edit mode and toolbar below.
export enum Pen {
    SELECT = 'select',
    HAND = 'hand',
    VECTOR_NETWORK = 'vector-network',
}
Unlike the OBB-based approach in Lesson 21 - Transformer:
- In edit mode, dragging a
VectorSegmentmoves both endpoints; adjacent edges sharing those vertices follow naturally. - Dragging a
VectorVertexmoves only that vertex; every segment that shares it follows automatically — this is the core advantage of a Vector Network over a Path. The new coordinates are written back through a single entry pointAPI.updateNodeVectorNetwork(node, vectorNetwork), which updates the entity'sVectorNetworkcomponent and triggers re-tessellation plus history (undo/redo).
// packages/ecs/src/systems/Select.ts
// In handleControlPointMoving, for a vector-network node:
// 1. Read the VectorNetwork component and map the pointer back to local
//    space via the inverse of GlobalTransform.
// 2. Update vertices[activeIndex].x/y.
// 3. Call api.updateNodeVectorNetwork to write back.
On write-back, VectorNetwork.getGeometryBounds recomputes the geometry bounds and shifts all vertices by -minX/-minY, normalizing the top-left to local (0, 0). Before adding the compensating offset to node.x/y, it applies the node's scale and rotation to express the offset in the parent coordinate system. Rebasing therefore preserves world-space anchor positions. Tangents are relative to their anchors and need no translation.
Entering edit mode and toolbar
Following Figma's Edit vector layers, double-click a vector-network node to enter vertex edit mode: set Editable.isEditing = true on the entity and show a bottom-centered Move / Bend / Cut / Fill toolbar (VectorNetworkEditMode, see context-vector-network-edit-bar.ts). Exiting edit (toolbar close button, Esc, or clicking empty canvas) writes isEditing: false; RenderTransformer hides all edit anchors (vertices, segment midpoints, tangent handles).
| Mode | Interaction |
|---|---|
| Move | Drag vertices; hover a segment to show its midpoint, click to insert a new vertex |
| Bend | Drag an edge to bend it directly, or edit its handles with three coupling modes |
| Cut | Same midpoint insertion as Move; click a vertex to break topology at the cut point and auto-switch to Move for dragging apart |
| Fill | Hover to preview a closed face; click to toggle its fill while preserving holes and neighbouring faces |
Hover highlight and selection are separate for anchors: Transformable.hoveredControlPointIndex clears when the pointer leaves; selectedControlPointIndex persists after a click until you click empty space or inside the shape.
Move: insert vertex at segment midpoint
When hovering a segment, render a midpoint anchor at the curve midpoint (t = 0.5; for cubic edges, the point on the curve). A click calls splitSegmentAt (see Creation & delete) to split the edge and write back the network. See Select.insertControlPointFromMidpoint and RenderTransformer.findHoveredVectorNetworkSegmentIndex (viewport-to-local curve distance).
Move drags either one vertex or an entire edge, moving both endpoints while preserving tangents. Rotated, scaled and mirrored nodes use the coordinate system captured on press, avoiding drift when bounds change. A vertex snaps near another vertex and merges on release. Esc, pointer cancellation or switching tools restores the whole gesture, including a newly inserted midpoint. Cut commits on click and remains disconnected on release. Delete acts on the selected vertex even after the pointer moves away.
Geometry changes during a drag remain uncommitted. Undo and redo first restore the gesture’s starting geometry, then apply history, keeping bounds and vertices from the same edit. If an external update has replaced geometry or transforms, the old gesture is discarded instead: later movement, release or Escape cannot restore its stale snapshot. Style-only changes do not interrupt the drag, and cancelling geometry preserves the new paint. Delete during a drag first cancels the unfinished move, then deletes the selected original vertex; for a newly inserted midpoint, it only cancels that insertion.
Topological operators
Automatic intersection splitting
Committing a Pen edge or finishing a Move or Bend drag connects transverse crossings and T junctions within that network. This supports lines, cubic Béziers, multiple crossings and a cubic's self-intersection. De Casteljau subdivision preserves curve shape; region and hole walks are rewritten in traversal order. Existing vertex indices stay stable, so Pen continuation still starts at the clicked endpoint.
Topology stays unchanged during a drag. Splitting commits with the shape edit on release; cancellation leaves no junctions, and undo/redo covers the whole operation. Call splitVectorNetworkIntersections(network) to normalize imported geometry explicitly. Detection uses adaptive subdivision and numerical refinement; tangent contacts, boolean merging of overlapping spans, and connections across separate nodes are not supported. Endpoint-only contacts remain separate to preserve Cut results.
Figma supports Boolean operations, for example union.
Paper.js may be a useful reference for implementations.
Creation & delete
Delete and Heal for Vector Networks
Adding a vertex: split a segment at parameter t into two segments and insert the new vertex (cubic edges are subdivided with de Casteljau to preserve the curve), instead of a plain splice into a points array:
export function splitSegmentAt(
    network: VectorNetworkData,
    segIdx: number,
    t: number,
): number; // Mutates network and returns the new vertex index.
Deleting a vertex: after removing the vertex and its incident edges, a degree-2 neighbor is "healed" by merging its two edges into one, keeping the path connected (matching Figma's Delete and Heal). Triggered with Delete / Backspace in edit mode:
export function deleteVertex(
    network: VectorNetworkData,
    vertexIdx: number,
): VectorNetworkData;
Delete, break and merge return a new network;
splitSegmentAtmutates the supplied network copy and returns the inserted vertex index. The operators inpackages/ecs/src/utils/vector-network-topology.tsare decoupled from rendering and independently testable; the editing system feeds their result back throughAPI.updateNodeVectorNetwork.
For curves, Heal first attempts to recover an original subdivided cubic. Otherwise it fits a cubic with a checked error bound, defaulting to 5% of the control-point bounding extent; maxError sets a tolerance in local units. If the tolerance cannot be met, the original network is retained. Shift + Delete / Backspace removes the vertex and incident edges without healing. Splitting and editing remap boundary indices in traversal order and preserve valid regions.
Glue & unglue
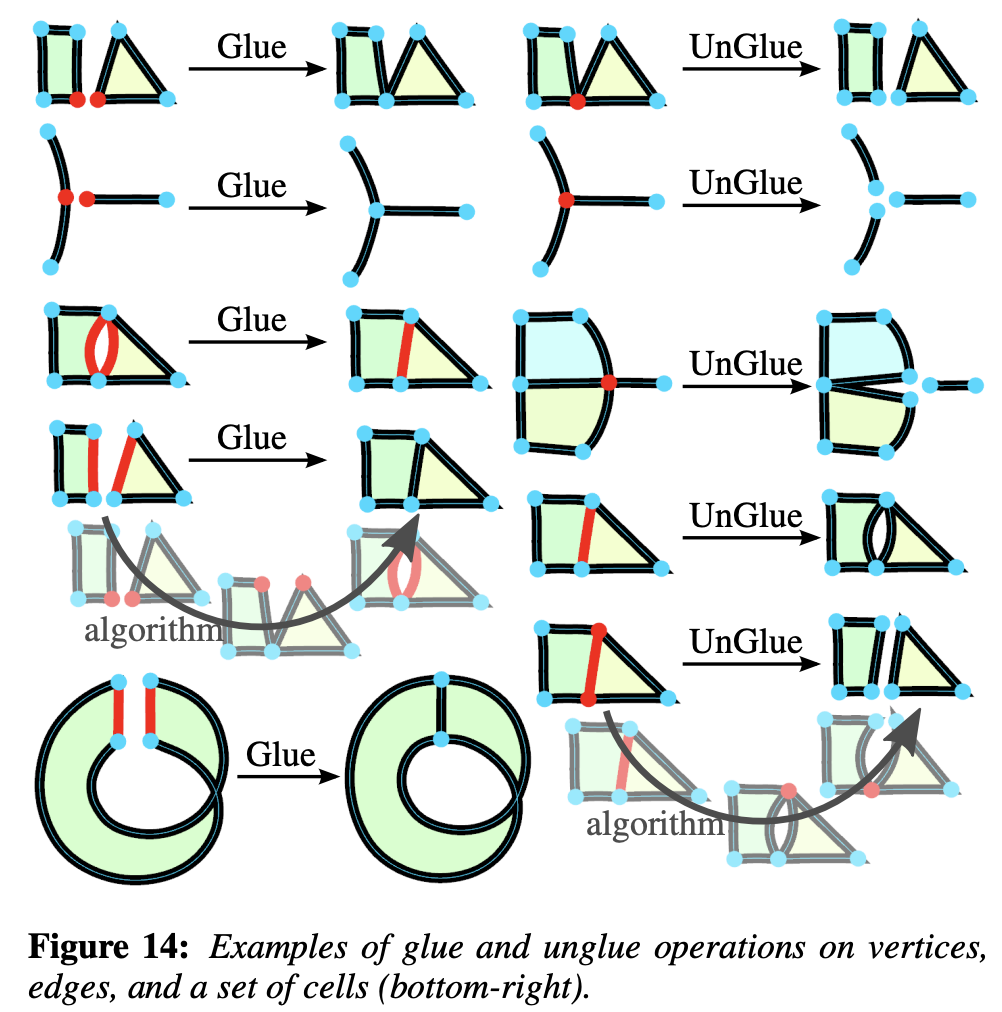
In Move, select a vertex, then click Glue / Unglue (the chain icon). The panel labels vertices V1, V2, … and incident edges E1, E2, … on the canvas.
- Glue: choose a target vertex and confirm. The selected vertex moves to the target and their connections are combined. Distinct curves and curved self-loops are retained; identical edges coalesce.
- Unglue: check the edge ends to detach, then confirm. A new vertex is created at the same position, connected only to those ends. It becomes selected so you can immediately drag it away. Keep at least one end attached to the original vertex. A self-loop's start and end can be chosen separately.
Try selecting the cube's front top-right junction, open Glue / Unglue, and detach E7 · Start. Drag the selected copy away, then use Glue with V3 as the target to join it back.
The preview does not modify the document. Cancel closes it without changing geometry; an external geometry update, undo, or leaving edit mode invalidates the pending operation. Each confirmed operation is one undo step. Unglue preserves curve geometry and still-closed regions; opening an outer boundary or a hole removes the entire affected fill region. Glue restores connectivity but does not automatically restore removed fills: use Fill again, or Undo to restore the complete previous state.
glueVertices(network, source, target) and unglueVertex(network, vertex, endpoints) return a VectorTopologyResult: either a failure reason or the new network, vertex/segment index maps and selected vertex index. Endpoints use { segmentIndex, end: 'start' | 'end' }; indices in the API are zero-based. Inputs are not mutated. This first stage operates on vertices within one network; shared-edge and face operations are described below.
Shared-edge Glue / Unglue
In Move, select an endpoint and open Glue / Unglue, then set Topology target to Edges. Choose a Source edge to label its incident filled regions R1, R2, …. Checked regions are highlighted. Boundary uses are labelled R (region) · L (loop) · position within the loop, all one-based.
The cube below has three filled faces. Select the front top-right vertex V3, choose Unglue edge → E7, check R2 · L1 · 4 (the top face), and confirm. The top face now uses the copy E10, while the right face still uses E7. Unglue enters Bend automatically: drag the middle of the diagonal to bend only the copy and the top face's boundary. Both endpoints remain shared. To edit the overlapping original instead, return to Move, choose E7 in the Edges panel, and click Bend selected edge.
Undo the bend to make the curves coincide again, switch back to Move and select V3. In the Edges panel, choose Glue edges to merge E10 into E7. Glue supports reversed storage direction and welds coincident endpoint vertices with different indices. Only the requested source edge is removed; unrelated duplicates remain. Mismatching curves or control points, incompatible endpoints, two edges used in the same boundary loop, and partial winding reversals that could change nonzero fills are rejected.
Unglue preserves curve geometry, endpoints and all regions, including holes, moving only selected boundary uses to the copy. At least one use must remain on the original. Regions currently store filled boundaries: an edge needs at least two such uses, so fill adjacent faces first if needed. Fill can normalize imported broad regions into separate faces. While copies still overlap, use Bend or Glue; Fill and face Cut / Uncut still assume a planar embedding. Each Glue / Unglue is one undo step. Preview and Bend selected edge create no history entry.
The pure function vectorEdgeUses(network, edge) returns { regionIndex, loopIndex, offset } entries. unglueVectorNetworkEdge(network, edge, uses) and glueVectorNetworkEdges(network, source, target) return VectorEdgeTopologyResult: the new network, vertex/edge index maps and selected edge, or a failure reason. API indices are zero-based; inputs are not mutated.
Cut & uncut
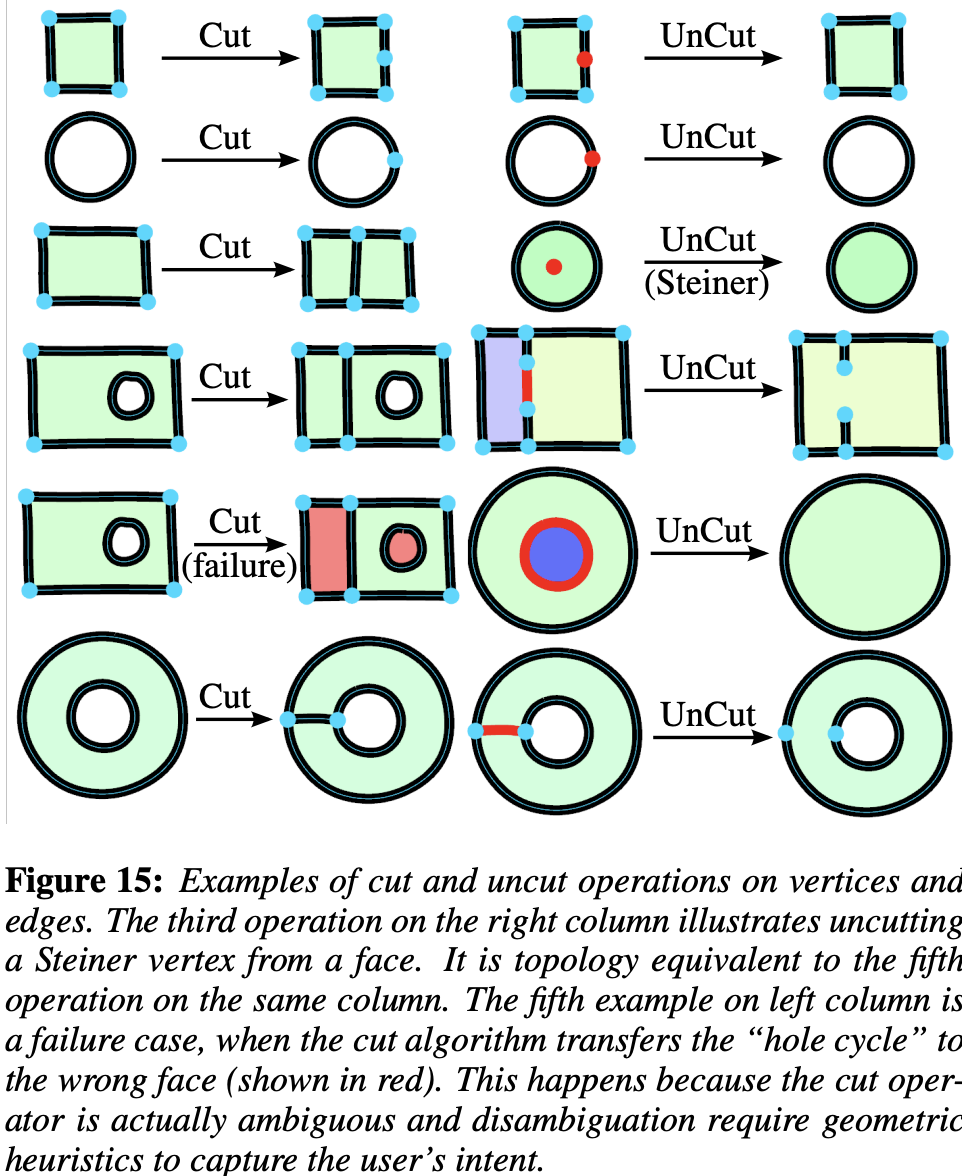
Split and merge faces
In Move, select a vertex and click Cut / Uncut faces (the divided-path icon). Cut face connects boundary vertices of the same face with a straight seam, including connections to or between holes. Uncut edge removes a shared edge between adjacent faces or a seam joining boundary components. Vertex positions and existing curve control points stay unchanged. Both operations support one-step Undo / Redo.
Try the filled front face below: select its bottom-left vertex V1, choose Cut face → V3, and confirm. The new diagonal E10 splits the blue face into two filled triangles. Open the panel again, choose Uncut edge → E10, and confirm to merge them back. You can use Fill to clear one triangle; Uncut then explains that both sides must have the same fill state instead of changing the painted area unexpectedly.
Cuts must remain inside a planar face: crossing or touching another edge, overlapping an edge, or passing through a hole is rejected. Existing curved boundaries and holes on either side are preserved. Cuts currently use straight seams rather than arbitrary drawn curves. When Uncut merges two bounded faces, both must be filled or both unfilled. Removing a seam that joins hole boundaries preserves the original fill. Dangling strokes are not removed as boundary-joining seams. The preview is temporary; Cancel, Undo, changing the selected vertex, or external geometry updates discard it. A rejected operation explains the reason and creates no history entry.
The pure functions cutVectorNetworkFace(network, from, to) and uncutVectorNetworkEdge(network, edgeIndex) return VectorFaceTopologyResult, including failure reasons or the new network, vertex/edge index maps and selected vertex. Indices are zero-based. Filled regions are normalized into minimal planar faces, preserving the visible painted area and holes. This face operation is separate from the existing Cut tool that opens a vertex, described below.
Connecting hole boundaries
The ring below has an unfilled hole. In Move, select the outer top-left corner V1, open Cut / Uncut faces, and choose Cut face → V5. The new E9 joins the outer boundary to the hole. The blue area remains one face, the hole stays transparent, and the boundary traverses E9 once in each direction.
Next select the outer top-right corner V2 and choose Cut face → V6. The new E10 splits the ring into two faces that Fill can toggle independently. Without changing the fills, select V2 and Uncut edge → E10, then select V1 and Uncut edge → E9, to restore the ring with two separate boundary loops. Each step supports undo and redo.
Two holes can also be connected when the entire seam lies inside the same face without touching other boundaries. Joining different boundaries removes one boundary loop without adding a face; cutting within one boundary adds a face. Existing curved boundaries stay unchanged, and fills are normalized into evenodd face regions while preserving their coverage.
Open a vertex
Cut breaks topology at the selected vertex. Duplicate that vertex, keep its first incident endpoint, and move the remaining endpoints to the copy. Closed loops and open chains use the same rule. For triangle 0—1—2—0 with a cut at vertex 1:
Before:  0 — 1 — 2 — 0 (closed)
After:   1 — 0 — 2 — 3 (3 coincident with 1, open polyline)
segments: [0,1], [3,2], [2,0]
On an open polyline, duplicate the cut vertex and reassign all but the first incident edge to the copy so the two chains can be pulled apart in Move mode. See breakVertex:
export function breakVertex(
    network: VectorNetworkData,
    vertexIndex: number,
): VectorNetworkData | null;
Clicking a vertex in Cut mode calls breakVectorNetworkAtVertex (Select.ts), writes back the network, records history, and setAppState({ vectorNetworkEditMode: MOVE }) so you can drag immediately. Regions whose boundaries remain closed are preserved. An invalid boundary removes its containing region, including when a hole breaks, to avoid accidentally filling that hole. Clearing uses explicit regions: [] so the entity and undo history stay in sync. A one-vertex cubic self-loop can also be cut.