Lesson 9 - Drawing ellipse and rectangle
In this lesson, you will learn the following:
- Derive the SDF representations for ellipse and rounded rectangle
- Add drop and inner shadows to rounded rectangle and other SDFs
- Determine whether any point is inside an ellipse or a rounded rectangle
In Lesson 2, we used SDFs to draw circles, and it is easy to extend this to ellipse and rectangle. 2D distance functions provide more SDF expressions for 2D graphics:
float sdf_ellipse(vec2 p, vec2 r) {}
float sdf_rounded_box(vec2 p, vec2 b, vec4 r) {}
In the Shader, use the shape variable to distinguish between these three shapes, so we can draw them with the same set of Shaders:
if (shape < 0.5) {
  outerDistance = sdf_circle(v_FragCoord, 1.0);
  innerDistance = sdf_circle(v_FragCoord, r.x);
} else if (shape < 1.5) {
  outerDistance = sdf_ellipse(v_FragCoord, vec2(wh, 1.0));
  innerDistance = sdf_ellipse(v_FragCoord, r);
} else if (shape < 2.5) {
  outerDistance = sdf_rounded_box(v_FragCoord, vec2(wh, 1.0), 0.0);
  innerDistance = sdf_rounded_box(v_FragCoord, r, 0.0);
}
Next, let's look at how the SDF is derived.
Rectangle
The SDF of a Box and Leveraging Rust and the GPU to render user interfaces at 120 FPS have demonstrated the derivation process in the form of videos and animations.
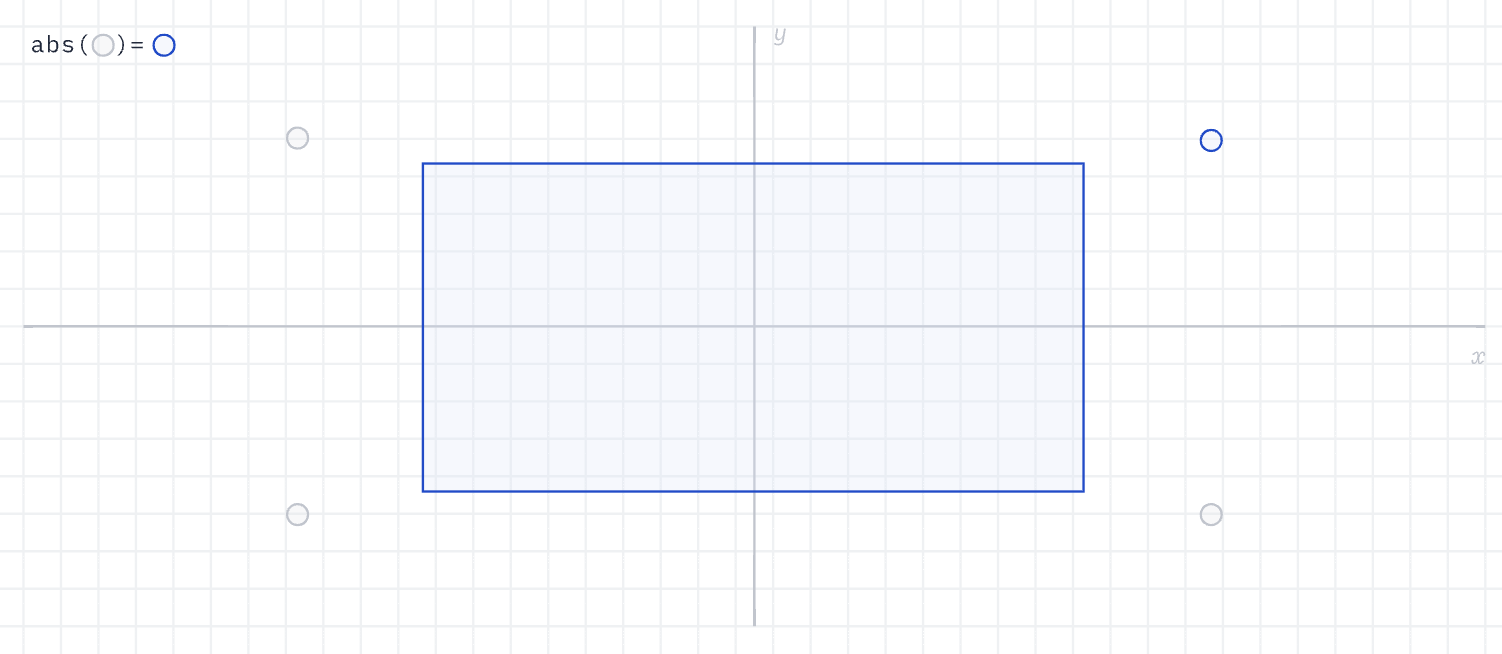
Based on the symmetry of the rectangle, by placing its center at the origin, we can transform the problem of the distance from any point to the rectangle edge to the first quadrant using the abs() function, where p is the coordinate of any point, b is the coordinate of the top right corner of the rectangle, and since the center coincides with the origin, it is [width / 2, height / 2], q represents the vector from the point to the top right corner:
float sdf_box(vec2 p, vec2 b) {
  vec2 q = abs(p) - b;
}
Then consider the case where the point is outside the rectangle. Extending outward from the top right corner of the rectangle, it can be divided into four quadrants. In the first quadrant shown in the figure below, the distance is the length of the q vector length(q). If the point falls in the second quadrant, the distance is q.y because q.x is negative, and similarly, if it falls in the fourth quadrant, the distance is q.x.
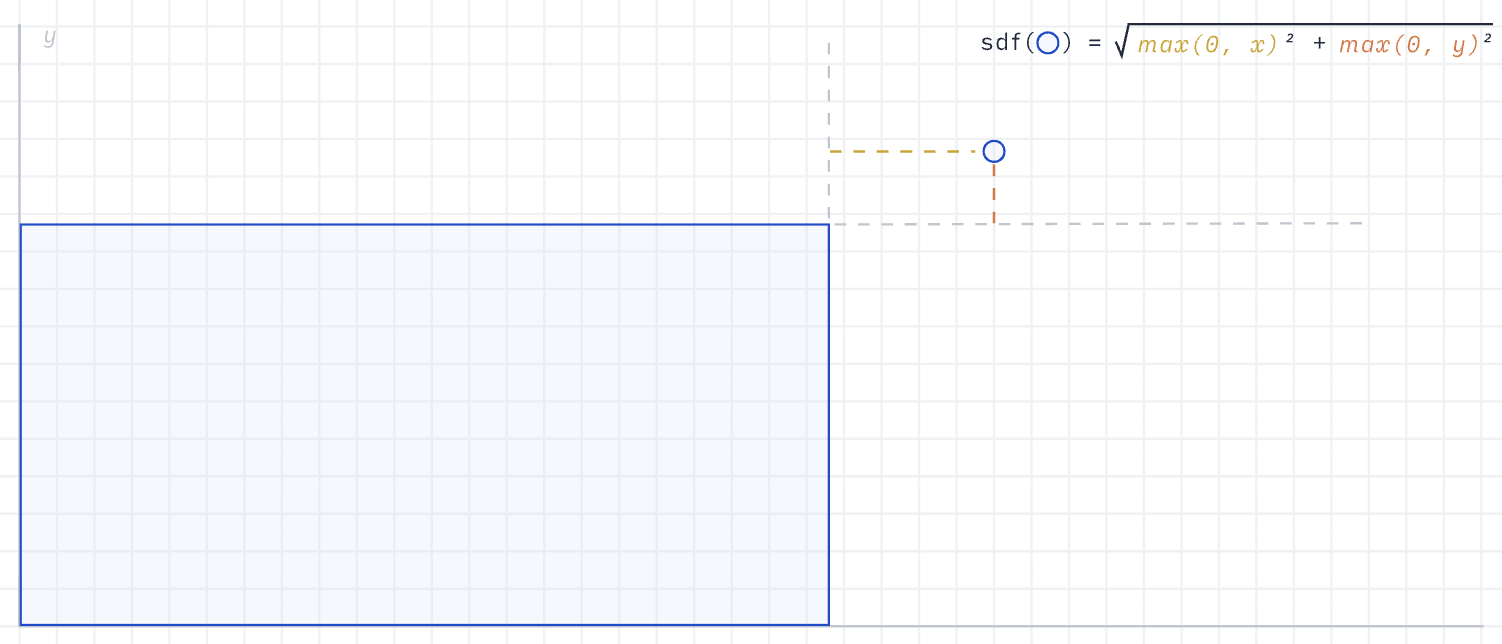
The original author cleverly used length(max(q, 0.0)) to unify these three cases, using max() to eliminate the negative components, reducing the branch judgment in the Shader to the greatest extent. Then consider the case where the point is inside the rectangle, that is, in the third quadrant of the above figure, at this time, both components of q are negative, max(q.x, q.y) can obtain the absolute value of the closer distance, and the outermost min() can unify the case where the point is inside with the previous three, still in order to reduce branch judgment. The complete SDF is as follows:
float sdf_box(vec2 p, vec2 b) {
  vec2 q = abs(p) - b;
  return length(max(q, 0.0)) + min(max(q.x, q.y), 0.0);
}
So far, we can draw rectangles, and refer to SVG <rect> to add the following properties:
const rect = new Rect({
    x,
    y,
    width,
    height,
    fill,
});
Add Rounded Corners
The following figure comes from Rounding Corners in SDFs. If we observe the distance field visualized by contour lines, we can find that the rectangle itself is rounded. Taking the points near the top right corner of the rectangle as an example, there are not only one point with equal distance, but they are just distributed on the circle with the top right corner as the center.
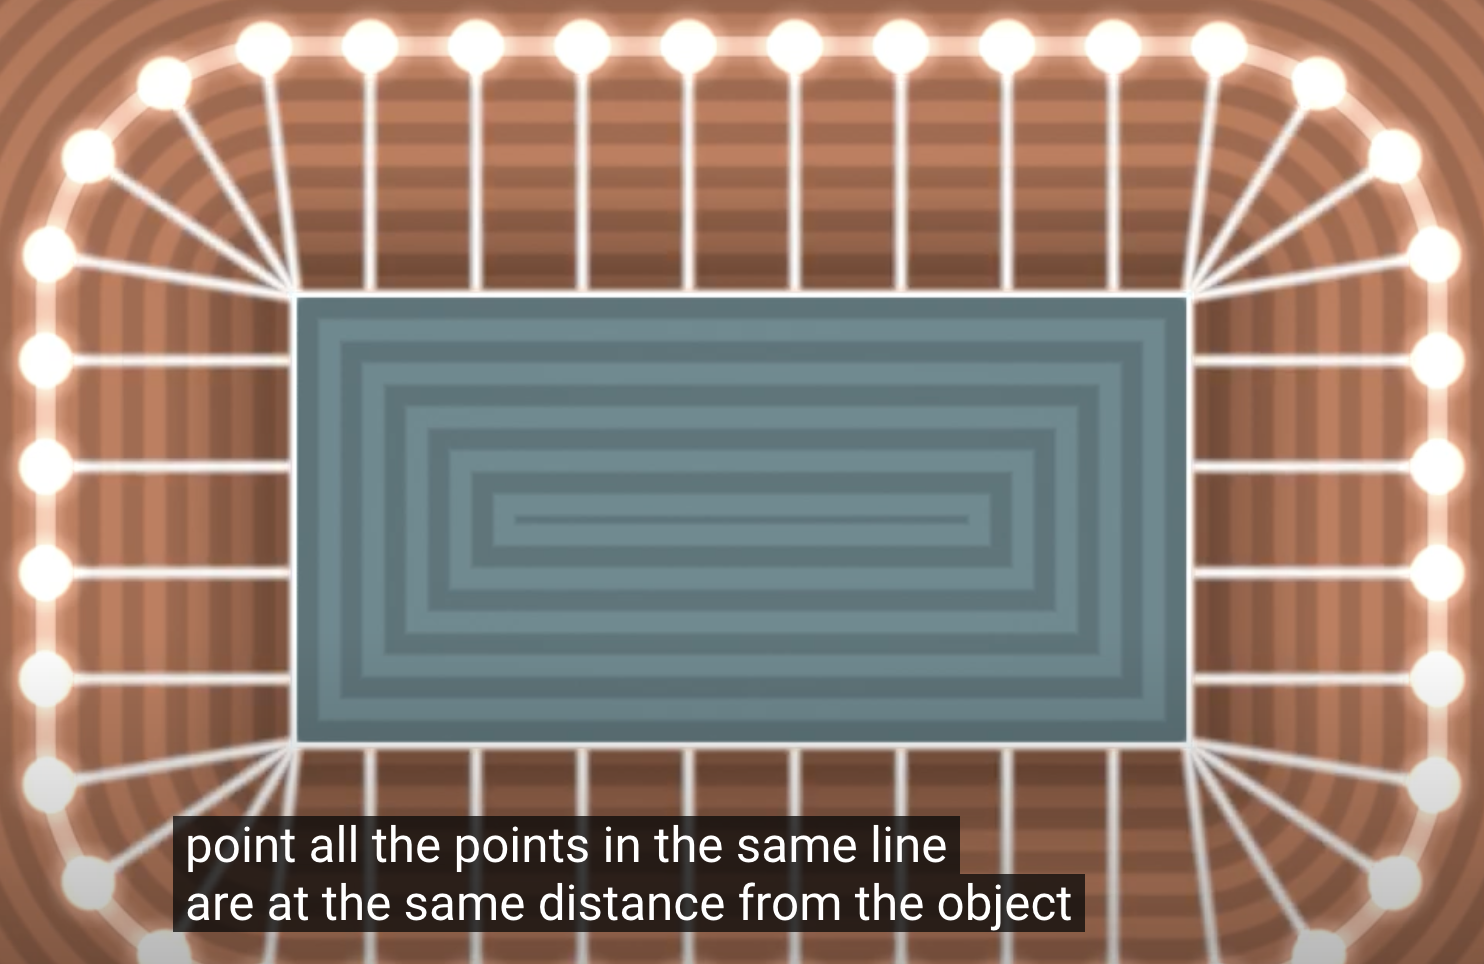
In fact, not only rectangles, but all graphics represented by SDFs can be converted into "rounded" versions. The following figure comes from 2D distance functions:
float opRound( in vec2 p, in float r ) {
  return sdShape(p) - r;
}
So the complete SDF representation of the rounded rectangle is as follows:
float sdf_rounded_box(vec2 p, vec2 b, float r) {
  vec2 q = abs(p) - b + r;
  return length(max(q, 0.0)) + min(max(q.x, q.y), 0.0) - r;
}
Referencing Figma's naming, we use cornerRadius, but SDF alone cannot achieve the smoothing effect, see Adjust corner radius and smoothing and Desperately seeking squircles for details. In addition, it is also possible to support different corner radii for each corner, refer to Zed Blade WGSL, which is a Shader written by Zed based on blade renderer, using WGSL syntax.
$icCanvas2 = call(() => {
    return document.createElement('ic-canvas-lesson9');
});call(() => {
const { Canvas, Rect } = Lesson9;
const stats = new Stats();
stats.showPanel(0);
const $stats = stats.dom;
$stats.style.position = 'absolute';
$stats.style.left = '0px';
$stats.style.top = '0px';
$icCanvas2.parentElement.style.position = 'relative';
$icCanvas2.parentElement.appendChild($stats);
$icCanvas2.addEventListener('ic-ready', (e) => {
const canvas = e.detail;
for (let i = 0; i < 1000; i++) {
const fill = `rgb(${Math.floor(Math.random() * 255)},${Math.floor(
Math.random() * 255,
)},${Math.floor(Math.random() * 255)})`;
const rect = new Rect({
x: Math.random() * 1000,
y: Math.random() * 1000,
fill,
cornerRadius: 10,
});
// rect.x = Math.random() * 1000;
// rect.y = Math.random() * 1000;
rect.width = Math.random() * 40;
rect.height = Math.random() * 40;
canvas.appendChild(rect);
rect.addEventListener('pointerenter', () => {
rect.fill = 'red';
});
rect.addEventListener('pointerleave', () => {
rect.fill = fill;
});
}
});
$icCanvas2.addEventListener('ic-frame', (e) => {
stats.update();
});
});Add Drop Shadow
When it comes to shadows, you may have heard of box-shadow and filter: drop-shadow() in CSS. The following figure is from the article Drop-Shadow: The Underrated CSS Filter, which intuitively shows the difference between the two:
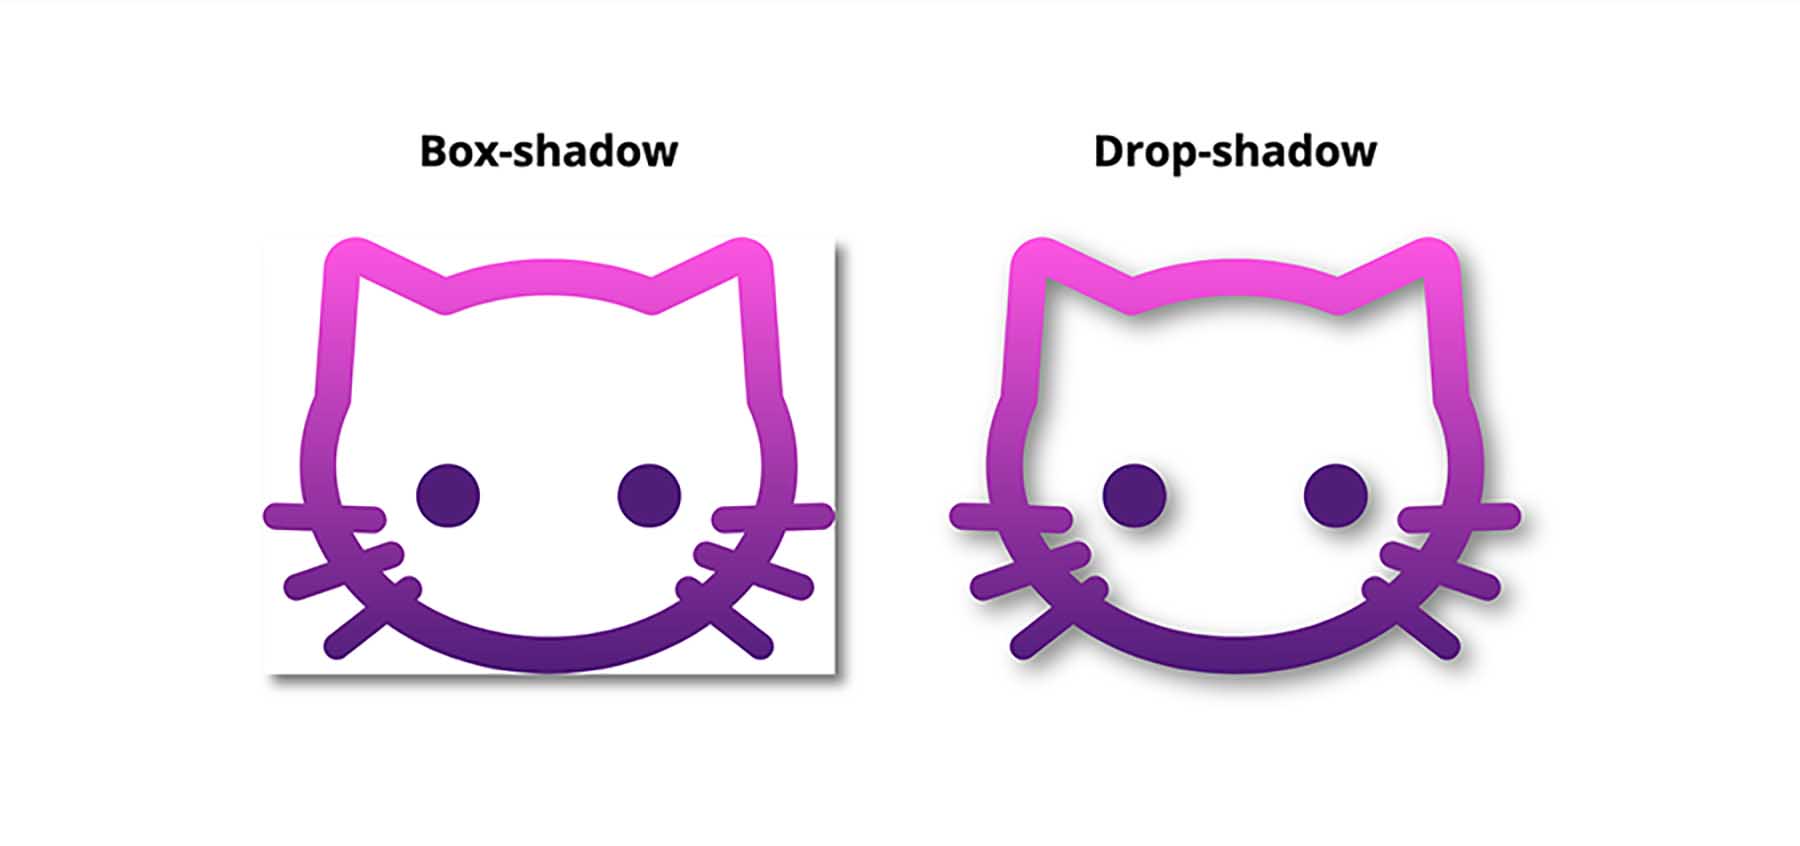
The latter is usually more commonly used, such as tailwindcss - Drop Shadow. So we add the following properties to the rectangle:
rect.dropShadowColor = 'black';
rect.dropShadowOffsetX = 10;
rect.dropShadowOffsetY = 10;
rect.dropShadowBlurRadius = 5;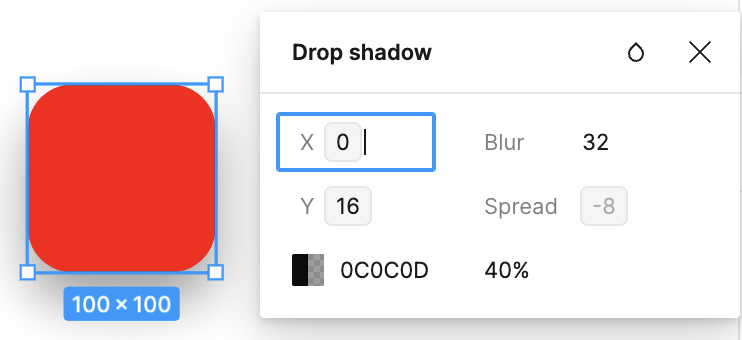
Next, we will use WebGL / WebGPU to draw shadows for 2D graphics. The usual approach is to use Gaussian blur in post-processing, such as Pixi.js's DropShadowFilter. The 2D Gaussian blur effect can be decomposed into two 1D effects for horizontal and vertical processing, but the convolution operation still requires sampling of adjacent pixel points (depending on the size of the convolution kernel).
Figma's CTO Evan Wallace introduced a faster approximation method in the article Fast Rounded Rectangle Shadows, which does not require sampling of textures, and the article Leveraging Rust and the GPU to render user interfaces at 120 FPS also provided a more detailed introduction. The convolution of the Gaussian function with the step function is equivalent to the integral of the Gaussian function, which results in the error function Error function (also known as erf). Therefore, generating a blurred rectangle is equivalent to blurring each dimension separately and then taking the intersection of the two results, without considering the corner radius.
Gaussian function:
The error function is the integral of a Gaussian function used to describe the cumulative distribution function of a normal distribution.
A common approximation to the error function comes from Abramowitz and Stegun. Handbook of Mathematical Functions.
where the coefficients of the polynomial terms are:
The following implementation is from Zed Blade WGSL, which we have rewritten in GLSL. Blurred rounded rectangles also gives another verion of erf.
vec2 erf(vec2 x) {
  vec2 s = sign(x), a = abs(x);
  x = 1.0 + (0.278393 + (0.230389 + 0.078108 * (a * a)) * a) * a;
  x *= x;
  return s - s / (x * x);
}
Disregard the rounded corners for now and calculate the final shadow mask value. Here the boundary of the shadow is determined by the difference between integral_x and integral_y. integral_x.x - integral_x.y calculates the width of the shadow on the x-axis and integral_y.x - integral_y.y calculates the height of the shadow on the y-axis. Multiply these two values to get the final shadow mask value.
// Return the mask for the shadow of a box from lower to upper
float rect_shadow(vec2 pixel_position, vec2 origin, vec2 size, float sigma) {
  vec2 bottom_right = origin + size;
  vec2 x_distance = vec2(pixel_position.x - origin.x, pixel_position.x - bottom_right.x);
  vec2 y_distance = vec2(pixel_position.y - origin.y, pixel_position.y - bottom_right.y);
  vec2 integral_x = 0.5 + 0.5 * erf(x_distance * (sqrt(0.5) / sigma));
  vec2 integral_y = 0.5 + 0.5 * erf(y_distance * (sqrt(0.5) / sigma));
  return (integral_x.x - integral_x.y) * (integral_y.x - integral_y.y);
}
A closed-form solution like the one above, however, doesn't exist for the 2D convolution of a rounded rectangle with a Gaussian, because the formula for a rounded rectangle is not separable. The cleverness of Evan Wallace's approximation comes from performing a closed-form, exact convolution along one axis, and then manually sliding the Gaussian along the opposite axis a finite amount of times:
float blur_along_x(float x, float y, float sigma, float corner, vec2 half_size) {
  float delta = min(half_size.y - corner - abs(y), 0.);
  float curved =
  half_size.x - corner + sqrt(max(0., corner * corner - delta * delta));
  vec2 integral =
  0.5 + 0.5 * erf((x + vec2(-curved, curved)) * (sqrt(0.5) / sigma));
  return integral.y - integral.x;
}// The signal is only non-zero in a limited range, so don't waste samples
float low = center_to_point.y - half_size.y;
float high = center_to_point.y + half_size.y;
float start = clamp(-3. * blur_radius, low, high);
float end = clamp(3. * blur_radius, low, high);
// Accumulate samples (we can get away with surprisingly few samples)
float step = (end - start) / 4.;
float y = start + step * 0.5;
for (int i = 0; i < 4; i++) {
alpha += blur_along_x(center_to_point.x, center_to_point.y - y, blur_radius,
cornerRadius, half_size) *
gaussian(y, blur_radius) * step;
y += step;
}In the implementation, the shadows need to be drawn individually for each rectangle, which breaks the effect of the previous combined batch. The reason for this is that we have to do it in a strict drawing order, even reordering before each repaint. The following code comes from this article: Fast Rounded Rectangle Shadows. Before drawing you need to sort all rectangles by a pre-set depth and then draw the shadows and body in turn:
render() {
  boxes.sort(function(a, b) {
    return a.depth - b.depth;
  });
  for (var i = 0; i < boxes.length; i++) {
    boxes[i].callback(); // Draw shadow first and then the rectangle itself.
  }
}
As an example, the following two rectangles are drawn in the following order: green rectangle shadow, green rectangle, red rectangle shadow, red rectangle. If we follow the previous idea of merging the two shadows and the two rectangle bodies into two separate batches of drawings, we won't be able to get the shadows of the red rectangles to cast on the green rectangles. So when using it, we need to set batchable = false for the rectangles with shadows
$icCanvas3 = call(() => {
    return document.createElement('ic-canvas-lesson9');
});call(() => {
const { Canvas, Rect } = Lesson9;
const stats = new Stats();
stats.showPanel(0);
const $stats = stats.dom;
$stats.style.position = 'absolute';
$stats.style.left = '0px';
$stats.style.top = '0px';
$icCanvas3.parentElement.style.position = 'relative';
$icCanvas3.parentElement.appendChild($stats);
$icCanvas3.addEventListener('ic-ready', (e) => {
const canvas = e.detail;
const rect = new Rect({
x: 50,
y: 50,
fill: 'green',
cornerRadius: 50,
batchable: false,
dropShadowColor: 'black',
dropShadowOffsetX: 10,
dropShadowOffsetY: 10,
dropShadowBlurRadius: 10,
});
rect.width = 400;
rect.height = 100;
canvas.appendChild(rect);
const rect2 = new Rect({
x: 100,
y: 100,
fill: 'red',
batchable: false,
cornerRadius: 50,
dropShadowColor: 'black',
dropShadowBlurRadius: 10,
});
rect2.width = 400;
rect2.height = 100;
canvas.appendChild(rect2);
});
$icCanvas3.addEventListener('ic-frame', (e) => {
stats.update();
});
});One more thing to note is that due to the shadow blur radius, you need to make the rectangle flare out a circle from its original size, which is here set to 3 * dropShadowBlurRadius.
float margin = 3.0 * dropShadow.z;
origin += dropShadow.xy;
v_Origin = origin;
v_Size = size;

origin -= margin;
size += 2.0 * margin;
vec2 center = origin + size / 2.0;
v_Point = center + a_FragCoord * (size / 2.0);
Finally shadows also affect the RenderBounds calculation, otherwise rectangles will be incorrectly rejected when their body is outside the viewport but their shadows are inside:
this.renderBounds.addBounds(
    new AABB(
        x + dropShadowOffsetX - dropShadowBlurRadius,
        y + dropShadowOffsetY - dropShadowBlurRadius,
        x + dropShadowOffsetX + width + dropShadowBlurRadius,
        y + dropShadowOffsetY + height + dropShadowBlurRadius,
    ),
);
Based on this approach, some interesting effects can also be realized, see: Shape Lens Blur Effect with SDFs and WebGL.
Obviously the above method only works for rounded rectangles, but is there a more general method for circles, ellipses, and other SDF representations? There is an example on Shader toy: Drop shadow of rounded rect, and interestingly, there is another example based on this example that allows for both outer and inner shadow implementations. Below we focus on the inner shadow implementation.
Add Inner Shadow
The image below shows the inner shadow effect of Figma, which is often used in UI components like Button.
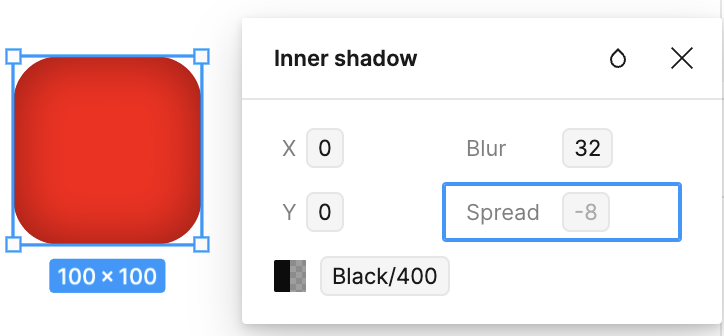
Let's add the following attribute:
rect.innerShadowColor = 'black';
rect.innerShadowOffsetX = 10;
rect.innerShadowOffsetY = 10;
rect.innerShadowBlurRadius = 5;
Referring to the example on Shader toy: Inner shadow of rounded rect we similarly add shadow drawing logic for each of the three current shapes. We use sigmoid here for smoothing purpose:
float make_shadow(vec2 pos, vec2 halfSize, float cornerRd, float blurRd, float distMul, float shape) {
  float distance;
  if (shape < 0.5) {
    distance = sdf_circle(pos, halfSize.x);
  } else if (shape < 1.5) {
    distance = sdf_ellipse(pos, halfSize);
  } else if (shape < 2.5) {
    distance = sdf_rounded_box(pos, halfSize, cornerRd + blurRd);
  }
  float dist = sigmoid(distMul * distance / blurRd);
  return clamp(dist, 0.0, 1.0);
}$icCanvas4 = call(() => {
return document.createElement('ic-canvas-lesson9');
});call(() => {
const { Canvas, Rect, Circle, Ellipse } = Lesson9;
const stats = new Stats();
stats.showPanel(0);
const $stats = stats.dom;
$stats.style.position = 'absolute';
$stats.style.left = '0px';
$stats.style.top = '0px';
$icCanvas4.parentElement.style.position = 'relative';
$icCanvas4.parentElement.appendChild($stats);
$icCanvas4.addEventListener('ic-ready', (e) => {
const canvas = e.detail;
for (let i = 0; i < 10; i++) {
const fill = `rgb(${Math.floor(Math.random() * 255)},${Math.floor(
Math.random() * 255,
)},${Math.floor(Math.random() * 255)})`;
const rect = new Rect({
x: Math.random() * 1000,
y: Math.random() * 1000,
fill,
cornerRadius: 50,
innerShadowColor: 'black',
innerShadowOffsetX: Math.random() * 20 - 10,
innerShadowOffsetY: Math.random() * 20 - 10,
innerShadowBlurRadius: Math.random() * 10,
});
rect.width = 200;
rect.height = 100;
canvas.appendChild(rect);
const circle = new Circle({
cx: Math.random() * 1000,
cy: Math.random() * 1000,
r: 100,
fill,
innerShadowColor: 'black',
innerShadowOffsetX: Math.random() * 20 - 10,
innerShadowOffsetY: Math.random() * 20 - 10,
innerShadowBlurRadius: Math.random() * 10,
});
canvas.appendChild(circle);
const ellipse = new Ellipse({
cx: Math.random() * 1000,
cy: Math.random() * 1000,
rx: 100,
ry: 50,
fill,
innerShadowColor: 'blue',
innerShadowOffsetX: Math.random() * 20 - 10,
innerShadowOffsetY: Math.random() * 20 - 10,
innerShadowBlurRadius: Math.random() * 10,
});
canvas.appendChild(ellipse);
}
});
$icCanvas4.addEventListener('ic-frame', (e) => {
stats.update();
});
});Ellipse
Unlike determining the closest distance from an arbitrary point to a circle, the exact method of analyzing an ellipse is much more complex, and Distance to an ellipse gives two methods: the quadratic equation and the Newton method.
Quadratic equation
An ellipse is represented using
Unfolded:
Derived from
The nearest point derivative is 0, obtained by bringing
This is a one-dimensional quadratic equation for
To reduce the coefficients of the quadratic term to 1 to get Monic Polynomial, divide each of the above coefficients by
This gives Quartic Equation with the following coefficients:
Since the highest sub-coefficient is 1, this can be transformed into a problem of solving a cubic equation Cubic Formula, using Resolvent Cubic:
where the coefficients correspond to:
Substituting gives:
Solving Cubic Formula involves trying to eliminate the binomial coefficients, which can be done by making
Substituting
Continuing to simplify the above equation, let:
The standardized form becomes:
This method is computationally expensive, and the example written on ShaderToy shown in Distance to an ellipse has a much lower FPS than the two methods described below.
Newton method
The vector formed by any point
Among them:
Substitution gives:
Newton's method, which is a method for solving equations approximately over the domains of real and complex numbers.
Substitution gives:
Distance to an ellipse The original author used 5 iterations to achieve a very good result:
for (int i=0; i<5; i++) {
  vec2 cs = vec2(cos(w),sin(w));
  vec2 u = ab*vec2( cs.x,cs.y);
  vec2 v = ab*vec2(-cs.y,cs.x);
  w = w + dot(p-u,v)/(dot(p-u,u)+dot(v,v));
}
All that is needed below is to find
bool s = dot(p/ab,p/ab)>1.0;If outside the ellipse, it can be stretched into a circle (the method described in the following subsection will also be used), where
If inside the ellipse, choose either the half-length axis
float w = s ? atan(p.y*ab.x, p.x*ab.y) :
  ((ab.x*(p.x-ab.x)<ab.y*(p.y-ab.y))? 1.5707963 : 0.0);
Compared to the previous method of solving a quadratic equation in one variable, this method has less overhead. But after all, it still contains a for loop with a fixed number of iterations, which is stretched out when compiling GLSL, see: Loop performance in a shader. Finally, we will present an approximate estimation method with minimal overhead.
Stretch approximately method
Ellipsoid SDF describes this method of stretching into a unit circle and then recovering into an ellipse. But how do you choose the stretching coefficients when recovering? If the point is on the X-axis, the coefficient is r.x, and on the Y-axis it is r.y, and the smaller of the two is chosen first:
float sdf_ellipse_V1( in vec2 p, in vec2 r )
{
  float k1 = length(p/r);
  return (k1-1.0)*min(r.x,r.y);
}
The actual rendering reveals that this approach has significant problems at the long axis and doesn't fit well:
The original author gave an improved version:
float sdf_ellipse_V3( in vec3 p, in vec3 r )
{
  float k1 = length(p/r);
  return length(p)*(1.0-1.0/k1);
}
However, the actual rendering reveals that this approach has significant jaggedness at the edges:

Eventually the authors added consideration of gradients, which we also use:
float sdf_ellipse_V2( in vec2 p, in vec2 r )
{
  float k1 = length(p/r);
  float k2 = length(p/(r*r));
  return k1*(k1-1.0)/k2;
}
You can see the results are much better.
$icCanvas = call(() => {
    return document.createElement('ic-canvas-lesson9');
});call(() => {
const { Canvas, Ellipse } = Lesson9;
const stats = new Stats();
stats.showPanel(0);
const $stats = stats.dom;
$stats.style.position = 'absolute';
$stats.style.left = '0px';
$stats.style.top = '0px';
$icCanvas.parentElement.style.position = 'relative';
$icCanvas.parentElement.appendChild($stats);
$icCanvas.addEventListener('ic-ready', (e) => {
const canvas = e.detail;
for (let i = 0; i < 1000; i++) {
const fill = `rgb(${Math.floor(Math.random() * 255)},${Math.floor(
Math.random() * 255,
)},${Math.floor(Math.random() * 255)})`;
const ellipse = new Ellipse({
cx: Math.random() * 1000,
cy: Math.random() * 1000,
rx: Math.random() * 20,
ry: Math.random() * 20,
fill,
});
canvas.appendChild(ellipse);
ellipse.addEventListener('pointerenter', () => {
ellipse.fill = 'red';
});
ellipse.addEventListener('pointerleave', () => {
ellipse.fill = fill;
});
}
});
$icCanvas.addEventListener('ic-frame', (e) => {
stats.update();
});
});Picking
Currently our pickup plugin uses Geometric method, so we need to implement separate determination methods for ellipses and rounded rectangles, and we will introduce a more general color-coded GPU-based pickup method later. In the above two examples, you can hover your mouse over any shape to experience the pickup effect.
Ellipse
The ellipse picking decisions are simpler, for example, the fill and stroke areas are taken into account by default:
function isPointInEllipse(
    x: number,
    y: number,
    h: number,
    k: number,
    a: number,
    b: number,
) {
    const dx = x - h;
    const dy = y - k;

    const squaredDistance = (dx * dx) / (a * a) + (dy * dy) / (b * b);

    // Inside ellipse
    return squaredDistance <= 1;
}
Rounded rect
It is also very simple if rounded corners are not considered.
function isPointInRoundedRectangle(
    x: number,
    y: number,
    x1: number,
    y1: number,
    x2: number,
    y2: number,
    r: number,
) {
    // Determine if a point is inside the corners of a rectangle.
    function isInsideCorner(
        x: number,
        y: number,
        cornerX: number,
        cornerY: number,
        r: number,
    ) {
        const distance = Math.sqrt(
            Math.pow(x - cornerX, 2) + Math.pow(y - cornerY, 2),
        );
        return distance <= r;
    }

    // Determine if a point is inside a rounded rectangle
    if (x >= x1 && x <= x2 && y >= y1 && y <= y2) {
        // Points inside the rectangle
        if (
            isInsideCorner(x, y, x1 + r, y1 + r, r) || // top-left
            isInsideCorner(x, y, x2 - r, y1 + r, r) || // top-right
            isInsideCorner(x, y, x2 - r, y2 - r, r) || // bottom-right
            isInsideCorner(x, y, x1 + r, y2 - r, r) // bottom-left
        ) {
            return true; // Points inside the corner
        }
        return !(
            x <= x1 + r ||
            x >= x2 - r || // The point is on the non-circular boundary of the rectangle
            y <= y1 + r ||
            y >= y2 - r
        );
    }
    return false; // Points outside the rectangle
}