Lesson 19 - History
In this lesson, we will explore how to implement features related to history.
Whether you are a text or graphical editor, the history and undo redo functionality is a must. As implemented in JavaScript-Undo-Manager, we can use an undoStack to save each operation and its inverse:
function createPerson(id, name) {
    // first creation
    addPerson(id, name);

    // make undoable
    undoManager.add({
        undo: () => removePerson(id),
        redo: () => addPerson(id, name),
    });
}
We can also use two stacks to manage undo and redo operations separately, see: UI Algorithms: A Tiny Undo Stack. The last section of [How Figma's multiplayer technology works] introduces Figma's implementation approach:
This is why in Figma an undo operation modifies redo history at the time of the undo, and likewise a redo operation modifies undo history at the time of the redo.
Referring to Excalidraw HistoryEntry, we add a History class to manage undo and redo operations.
export class History {
    #undoStack: HistoryStack = [];
    #redoStack: HistoryStack = [];

    clear() {
        this.#undoStack.length = 0;
        this.#redoStack.length = 0;
    }
}
Each entry in the history stack contains two types of modifications to the system state, which we describe below:
type HistoryStack = HistoryEntry[];
export class HistoryEntry {
    private constructor(
        public readonly appStateChange: AppStateChange,
        public readonly elementsChange: ElementsChange,
    ) {}
}
Design states
Referring to Excalidraw, we split the system state into AppState and Elements. The former includes the state of the canvas as well as the UI components, such as the current theme, the camera zoom level, the toolbar configurations and selections, etc.
export interface AppState {
    theme: Theme;
    checkboardStyle: CheckboardStyle;
    cameraZoom: number;
    penbarAll: Pen[];
    penbarSelected: Pen;
    taskbarAll: Task[];
    taskbarSelected: Task[];
    layersSelected: SerializedNode['id'][];
    propertiesOpened: SerializedNode['id'][];
}
As you can see, we prefer to use a flat data structure rather than a nested object structure like { penbar: { all: [], selected: [] } }, in order to allow for quicker and easier state diff considerations that don't require recursion, see: distinctKeysIterator.
The latter is the array of shapes in the canvas, which we previously covered in Lesson 10 in the context of serializing shapes. Here we use a flat array instead of a tree structure, move the attributes in the attributes object up to the top level, and represent the parent-child relationship slightly differently, using parentId to associate the parent node with the id. However, we can't just traverse the tree structure and render it, we need to sort the graph array according to some rules, which we'll cover later:
// before
interface SerializedNode {
    id: string;
    children: [];
    attributes: {
        fill: string;
        stroke: string;
    };
}

// after
interface SerializedNode {
    id: string;
    parentId?: string;
    fill: string;
    stroke: string;
}
Consider collaboration we'll add more attributes like version later on.
State as a snapshot
The following image from State as a Snapshot shows how the React render function executes and then takes a snapshot before updating the DOM tree:
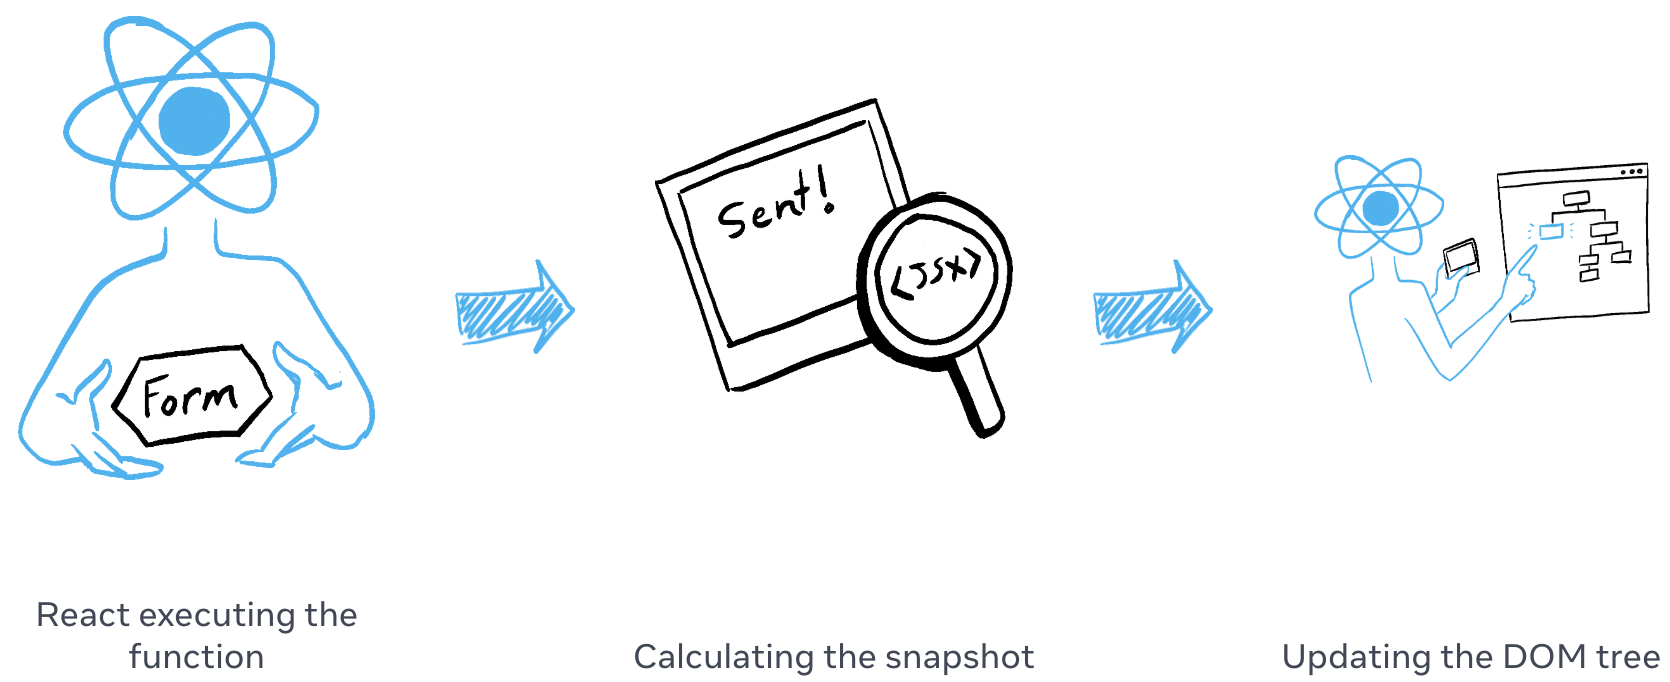
Our snapshot contains the two types of system states defined above, there will only be one snapshot of the system at any given moment, and each time the state changes, you can calculate with the current snapshot to get the corresponding modification of the state, e.g., "A graphic was deleted" in ElementsChange, "A layer was selected" in AppStateChange, and so on.
class Snapshot {
    private constructor(
        public readonly elements: Map<string, SerializedNode>,
        public readonly appState: AppState,
    ) {}
}
So how should the system update the snapshot? Strategically you can choose to directly overwrite, or compute an incremental update. excalidraw provides captureUpdate to describe these two behaviors, which are suitable for different scenarios, for example, direct overwrite is suitable for scene initialization, after all, at this time, there is no need to fall back to a blank canvas state:
class Store {
    private _snapshot = Snapshot.empty();

    commit(
        elements: Map<string, SerializedNode> | undefined,
        appState: AppState | undefined,
    ) {
        try {
            // Capture has precedence since it also performs update
            if (this.#scheduledActions.has(CaptureUpdateAction.IMMEDIATELY)) {
                this.captureIncrement(elements, appState);
            } else if (this.#scheduledActions.has(CaptureUpdateAction.NEVER)) {
                this.updateSnapshot(elements, appState);
            }
        } finally {
            // Defensively reset all scheduled actions, potentially cleans up other runtime garbage
            this.#scheduledActions = new Set();
        }
    }
}
Let's focus on how to calculate the increment and use it to create a HistoryEntry.
class Store {
    captureIncrement(
        elements: Map<string, SerializedNode> | undefined,
        appState: AppState | undefined,
    ) {
        const prevSnapshot = this.snapshot;
        const nextSnapshot = this.snapshot.maybeClone(elements, appState);
        const elementsChange = nextSnapshot.meta.didElementsChange
            ? ElementsChange.calculate(
                  prevSnapshot.elements,
                  nextSnapshot.elements,
                  this.api,
              )
            : ElementsChange.empty();
        // AppStateChange 同理

        // Use history.record to create HistoryEntry
    }
}
Let's see how to add a history entry.
Record a history entry
In the example at the top of this section, we used the API to insert two histories for updating the fill color of the rectangle, which you can do using the undo and redo operations in the top toolbar:
api.updateNode(node, {
    fill: 'red',
});
api.record();

api.updateNode(node, {
    fill: 'blue',
});
api.record();
Each call to api.record updates the snapshot with the current AppState and Elements state:
class API {
    record(
        captureUpdateAction: CaptureUpdateActionType = CaptureUpdateAction.IMMEDIATELY,
    ) {
        if (
            captureUpdateAction === CaptureUpdateAction.NEVER ||
            this.#store.snapshot.isEmpty()
        ) {
            this.#store.shouldUpdateSnapshot();
        } else {
            this.#store.shouldCaptureIncrement();
        }
        this.#store.commit(arrayToMap(this.getNodes()), this.getAppState());
    }
}
Each call to api.record adds a history record because the state of the graph did change, but it is important to note that only AppState changes should not reset the redoStack. when a change occurs we add the inverse operation of the change to the undoStack:
export class History {
    record(elementsChange: ElementsChange, appStateChange: AppStateChange) {
        const entry = HistoryEntry.create(appStateChange, elementsChange);

        if (!entry.isEmpty()) {
            // 添加逆操作
            this.#undoStack.push(entry.inverse());
            if (!entry.elementsChange.isEmpty()) {
                this.#redoStack.length = 0;
            }
        }
    }
}
Now we can look at how to design the AppStateChange and ElementsChange data structures for Change, allowing us to use a generic entry.inverse() instead of describing each changeable attribute with add/removeFill add/removeStroke and so on.
Design change structure
The Change interface in Excalidraw is very simple:
export interface Change<T> {
    /**
     * Inverses the `Delta`s inside while creating a new `Change`.
     */
    inverse(): Change<T>;

    /**
     * Applies the `Change` to the previous object.
     *
     * @returns a tuple of the next object `T` with applied change, and `boolean`, indicating whether the applied change resulted in a visible change.
     */
    applyTo(previous: T, ...options: unknown[]): [T, boolean];

    /**
     * Checks whether there are actually `Delta`s.
     */
    isEmpty(): boolean;
}
Changes to the two types of state can be described by generics, where SceneElementsMap is a Map<SerializedNode[‘id’], SerializedNode>:
class AppStateChange implements Change<AppState> {}
class ElementsChange implements Change<SceneElementsMap> {}
Let's start with the simpler AppStateChange, whose constructor is a Delta instance that accepts deleted and added/modified attributes, and if you need to reverse them just swap the order of the two:
class AppStateChange implements Change<AppState> {
    private constructor(private readonly delta: Delta<AppState>) {}

    inverse(): AppStateChange {
        const inversedDelta = Delta.create(
            this.delta.inserted,
            this.delta.deleted,
        );
        return new AppStateChange(inversedDelta);
    }
}

class Delta<T> {
    private constructor(
        public readonly deleted: Partial<T>,
        public readonly inserted: Partial<T>,
    ) {}
}
Apply changes
export class ElementsChange implements Change<SceneElementsMap> {
    applyTo(
        elements: SceneElementsMap,
        snapshot: Map<string, SerializedNode>,
    ): [SceneElementsMap, boolean] {
        this.updated.forEach((delta, id) => {
            const { inserted, deleted } = delta;
            const element = nextElements.get(id);
            if (element) {
                Object.keys(deleted).forEach((key) => {
                    delete element[key];
                });
                Object.assign(element, inserted);
                this.api.updateNode(element, delta.inserted);
            }
        });
    }
}