Lesson 11 - Test and server-side rendering
Currently our canvas functionality is getting progressively more complex and it's time to introduce tests to improve the quality of the project. In this lesson you will learn the following:
- Jest-based test environment setup, including local and CI environments
- Using unit tests to improve code coverage
- Visual regression testing
- Server-side rendering based on headless-gl, targets WebGL1
- E2E testing base on Playwright, targets WebGL2 & WebGPU
- E2E UI testing
- Browser Compatibility Test based on BrowserStack
- Render in WebWorker
All of the above project related code can be found under the __tests__ folder of our project.
Test environment
We choose Jest for our testing framework and add test commands in package.json to count code coverage:
"scripts": {
    "cov": "jest --coverage"
}
Execute the test command pnpm cov in GitHub workflow, preceded by the xvfb-run command when introduced to server-side rendering:
- name: Cov
run: |
    xvfb-run -s "-ac -screen 0 1280x1024x16" pnpm cov
env:
    CI: true
- name: Coveralls
uses: coverallsapp/github-action@master
with:
    github-token: ${{ secrets.GITHUB_TOKEN }}
With d3-color, we run into a common problem. Since D3 only provides ESM output by default, we can't run it directly in Node.js. We have two options.
- Jest provides a transformIgnorePatterns configuration that allows you to add
d3-colorand even D3-related dependencies and compile them into CJS. - Use the D3 replacement library victory-vendor, which is functionally identical but provides additional CJS output, see d3-color issue in recharts.
We choose the first approach:
const esm = ['d3-*'].map((d) => `_${d}|${d}`).join('|');
module.exports = {
    transformIgnorePatterns: [`<rootDir>/node_modules/(?!(?:.pnpm/)?(${esm}))`],
};
The test environment is ready and you can now start writing your first test case.
Unit test
Let's start with the easiest to implement unit tests, which are good for testing non-rendering related functionality, such as setting graphical properties, calculating the size of the bounding box, picking up determinations, various util methods, and so on.
// __tests__/unit/circle.spec.ts
import { Circle } from '../../packages/core/src';

describe('Circle', () => {
    it('should get/set attributes correctly.', () => {
        const circle = new Circle({
            cx: 50,
            cy: 50,
            r: 50,
            fill: '#F67676',
        });
        expect(circle.cx).toBe(50);
    });
});
Looks good. We've increased Circle's test coverage to 100%.
------------------------------|---------|----------|---------|---------|-----------------------
File                          | % Stmts | % Branch | % Funcs | % Lines | Uncovered Line #s
------------------------------|---------|----------|---------|---------|-----------------------
All files                     |   14.21 |    10.44 |    8.18 |   14.29 |
 src/shapes                   |   26.81 |    22.64 |   21.62 |   28.15 |
  Circle.ts                   |     100 |      100 |     100 |     100 |
But unit testing has its limitations. After all, it only targets a small part of the code, and cannot guarantee that the whole system as a whole is working properly. For example, we might be able to tell if one circle is drawn correctly, but what if there are 100? Writing test assertions would be much more time consuming and difficult.
Visual regression testing
In the testing world, "golden image" is a term used to describe a standard or reference image in a set of test cases. The term is often used in Visual Regression Testing, an automated testing methodology that detects visual changes by comparing screenshots of an application or website with a set of pre-defined reference images.
For rendering engines, it is easier to verify the correctness of rendering results than unit testing, and can greatly reduce the need to write manual assertions. pixelmatch makes it easy to compare images and highlight the differences:
There are two ways to think about getting screenshots in Node.js:
server-side rendering. Depending on the rendering technique, you can choose the Node.js implementation:
- node-canvas Cairo-based implementation of Canvas
- jsdom Pure JS implementation of DOM and HTML.
- headless-gl supports creating a WebGL context, but only supports WebGL1. 2.
headless browsers. Examples include early puppeteer, electron, or the newer Playwright.
It's interesting to see what popular rendering engines are currently using:
- Three.js Puppeteer
- Babylon.js use Jest + Puppeteer once but use Playwright now, see: Move visualization testing to playwright
- luma.gl use headless-gl, see: Register devices
- plot use mocha + JSDOM
Let's explore both options separately.
Server-side rendering
Although server-side rendering based on the headless-gl implementation only supports WebGL1, there are scenarios where server-side rendering is appropriate:
- Scenarios with little or no interaction
- Weakly interactive or even non-interactive scenes that do not require high real-time performance and can be generated offline without runtime performance issues.
- The output is a pixel or vector image that can be displayed across multiple sites.
To support server-side rendering, we need to ensure that our code runs in a Node.js environment, so how should we handle DOM API calls in our code? The first idea is to judge by the environment, for example, only register event listeners in the browser environment and call the addEventListener() method:
const plugins = [
    isBrowser ? new DOMEventListener() : undefined,
    //...
];
Another way of thinking about this can be found in d3-selector, where we note that it doesn't assume the existence of the global variable document, but instead chooses to fetch it from the context, so that the upper layers have the opportunity to pass in a pure JS implementation of the DOM API like jsdom, which will also work on the server side.
function creatorInherit(name) {
  return function() {
    var document = this.ownerDocument,
        uri = this.namespaceURI;
    return uri === xhtml && document.documentElement.namespaceURI === xhtml
        ? document.createElement(name)
        : document.createElementNS(uri, name);
  };
}
The same idea can be seen in react-reconciler, where different environments such as DOM, Canvas, console, etc. only need to implement the interfaces agreed upon in the configuration:
A "host config" is an object that you need to provide, and that describes how to make something happen in the "host" environment (e.g. DOM, canvas, console, or whatever your rendering target is). It looks like this:
const HostConfig = {
    createInstance(type, props) {
        // e.g. DOM renderer returns a DOM node
    },
    // ...
    appendChild(parent, child) {
        // e.g. DOM renderer would call .appendChild() here
    },
    // ...
};
Vite's Environment API tries to solve a similar problem:
The changes started by the Runtime API are now prompting a complete review of the way Vite handles environments (client, SSR, workerd, etc).
Returning to our scenario, the following configuration items need to be provided for the Node.js environment:
export interface CanvasConfig {
    /**
     * @see https://developer.mozilla.org/en-US/docs/Web/API/Window/devicePixelRatio
     */
    devicePixelRatio?: number;
    /**
     * There is no `style.cursor = 'pointer'` in WebWorker.
     */
    setCursor?: (cursor: Cursor | string) => void;
}
Generate PNG
Using headless-gl you can create a WebGLRenderingContext and encapsulate it into an object of class HTMLCanvasElement. You can use it later to create a canvas normally:
export function getCanvas(width = 100, height = 100) {
    let gl = _gl(width, height, {
        antialias: false,
        preserveDrawingBuffer: true,
        stencil: true,
    });

    const mockedCanvas: HTMLCanvasElement = {
        width,
        height,
        getContext: () => {
            gl.canvas = mockedCanvas;
            return gl;
        },
        addEventListener: () => {},
    };

    return mockedCanvas;
}
Once you have the WebGLRenderingContext, you can call readPixels to get the pixel values in the specified area, and then write them to the PNG to get the base image.
async function writePNG(gl: WebGLRenderingContext, path: string) {
    const width = gl.canvas.width;
    const height = gl.canvas.height;

    const pixels = new Uint8Array(width * height * 4);
    gl.readPixels(0, 0, width, height, gl.RGBA, gl.UNSIGNED_BYTE, pixels);

    await createPNGFromRawdata(path, width, height, pixels);
}
Each time you run a test, you can compare the baseline image with the image generated by this test using pixelmatch, and write the differences to a file for easy viewing. This is done using a custom assertion extension provided by Jest:
// useSnapshotMatchers.ts
// @see https://jestjs.io/docs/26.x/expect#expectextendmatchers
expect.extend({
    toMatchWebGLSnapshot,
    toMatchSVGSnapshot,
});

// Diff with golden image in test case.
expect($canvas.getContext()).toMatchWebGLSnapshot(dir, 'rect');
The full code is detailed: toMatchWebGLSnapshot.ts
Generate SVG
In order to test our image export functionality, we need to provide jsdom and xmlserializer as alternatives to the browser environment for ImageExporter. The former is used to create SVGElement in the Node.js environment and the latter is used to serialize it into a string:
import xmlserializer from 'xmlserializer';
import { JSDOM } from 'jsdom';

const exporter = new ImageExporter({
    canvas,
    document: new JSDOM().window._document,
    xmlserializer,
});
Once you have the SVGElement string, you can write it to a file, and before doing so, you can format it with prettier to make it easier to read:
import xmlserializer from 'xmlserializer';
import { format } from 'prettier';

export function toMatchSVGSnapshot(
    dom: SVGElement | null,
    dir: string,
    name: string,
    options: ToMatchSVGSnapshotOptions = {},
) {
    let actual = dom
      ? format(xmlserializer.serializeToString(dom), {
          parser: 'babel',
        })
}
The full code is detailed: toMatchSVGSnapshot.ts
How to simulate interaction events
Using JSDOM, you can simulate interaction events like MouseEvent and trigger the corresponding Hook directly after creation, thus bypassing the limitation of having to listen to events via the DOM API:
const window = new JSDOM().window;

const pointerdownEvent = new window.MouseEvent('pointerdown', {
    clientX: 100,
    clientY: 100,
});
canvas.pluginContext.hooks.pointerDown.call(pointerdownEvent);
This also makes it easy to simulate a combination of events like drag and drop. The following test case demonstrates the testing of the Drag & Drop Plugin decision threshold. We simulate a set of consecutive pointerdown pointermove and pointerup events, but the dragstart event will not be triggered due to the short interval and proximity of the neighboring events:
const dragstartHandler = jest.fn();

canvas.root.addEventListener('dragstart', dragstartHandler);
canvas.pluginContext.hooks.pointerDown.call(
    createMouseEvent('pointerdown', { clientX: 100, clientY: 100 }),
);
canvas.pluginContext.hooks.pointerMove.call(
    createMouseEvent('pointermove', { clientX: 101, clientY: 101 }),
);
canvas.pluginContext.hooks.pointerUp.call(
    createMouseEvent('pointerup', { clientX: 101, clientY: 101 }),
);
expect(dragstartHandler).not.toBeCalled();
SSR in CI
How can I use headless-gl with a continuous integration service?
- name: Install headless-gl dependencies
    run: |
        sudo apt-get update
        sudo apt-get install -y mesa-utils xvfb libgl1-mesa-dri libglapi-mesa libosmesa6

- name: Cov
    run: |
        xvfb-run -s "-ac -screen 0 1280x1024x16" pnpm cov
The full code is detailed: github workflows - test
Headless browser
As good as server-side rendering is, headless browser solutions have their own irreplaceable advantages in testing, using Playwright as an example:
- WebGL 1/2 and even WebGPU support with the latest Chrome.
- Official assertions like toHaveScreenshot are provided directly, pixel-level comparisons are built-in, and diffs are shown in the report when they fail, see Visual comparisons for details.
- Support for sharding supports multi-machine parallelism on CI.
Run devserver
The Playwright browser needs to access the test cases deployed on the development server, and we chose Vite as the test server:
import { devices, defineConfig } from '@playwright/test';

export default defineConfig({
    // Run your local dev server before starting the tests
    webServer: {
        command: 'npm run dev:e2e', // vite dev
        url: 'http://localhost:8080',
        reuseExistingServer: !process.env.CI,
        stdout: 'ignore',
        stderr: 'pipe',
    },
});
Browse testcase
Access the URL corresponding to the test case after starting the server:
test(name, async ({ page, context }) => {
    const url = `./infinitecanvas/?name=${name}`;
    await page.goto(url);
    await readyPromise;

    await expect(page.locator('canvas')).toHaveScreenshot(`${name}.png`);
});
The comparison between this result and the benchmark image is visualized in the generated test report:
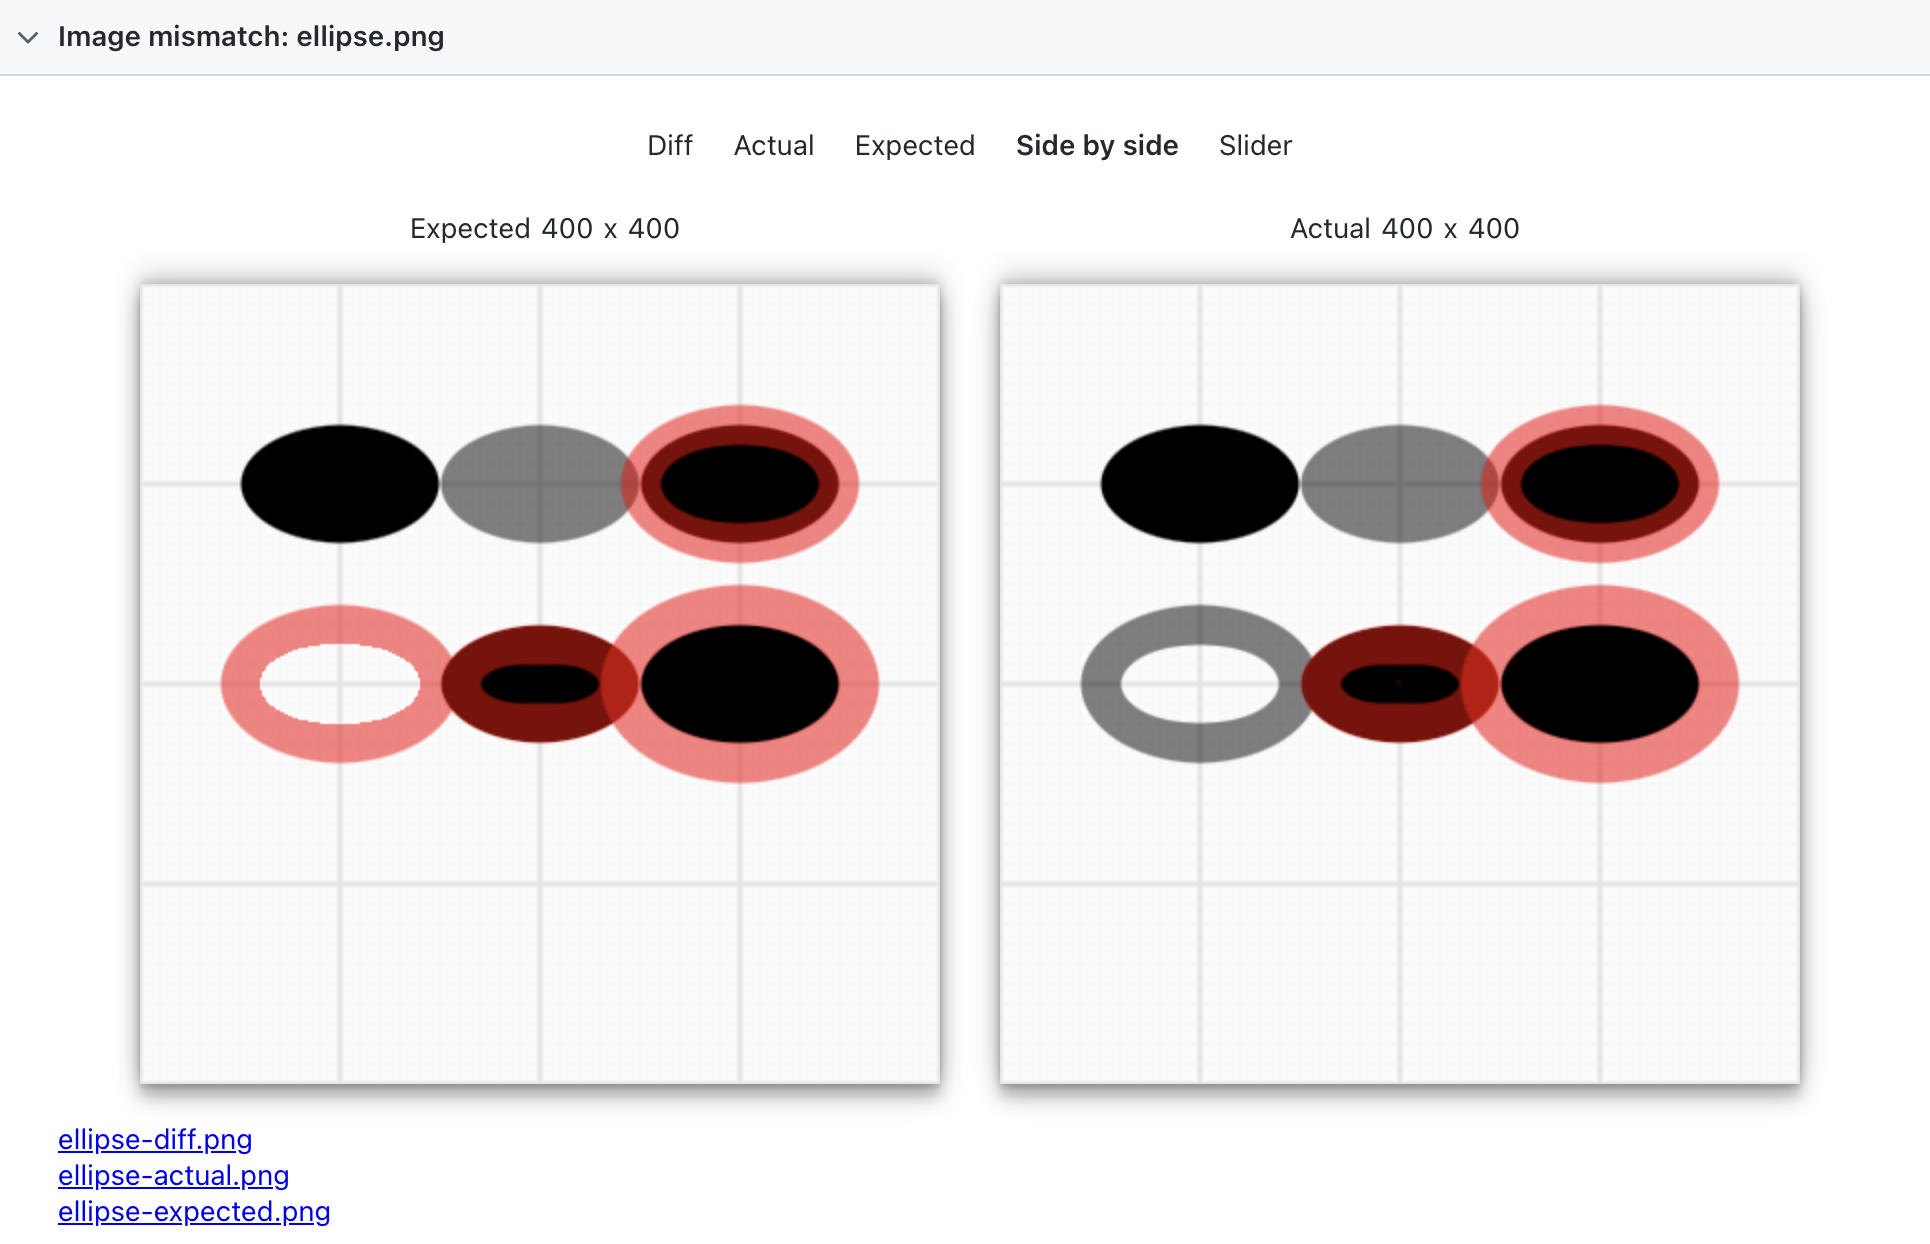
In practice, I've found that locally generated screenshots are often slightly different from the CI environment. For example, on the left side of the image below is a screenshot generated by my local environment, while on the right side is a screenshot generated by the CI environment, with some rectangles having weird slashes. In this case, you can use the CI environment instead of the locally generated baseline image to ensure consistency. You can upload GitHub workflow artifacts to get a screenshot of your CI environment and download it locally as a baseline image.

WebGL2 & WebGPU
The biggest advantage of an end-to-end test solution over headless-gl server-side rendering is that it supports both WebGL2 and WebGPU, allowing us to write just one set of test cases, create a canvas based on the renderer configurations in the URLs, and generate the baseline images for WebGL2 and WebGPU, respectively.
['webgl', 'webgpu'].forEach((renderer) => {
    test(`${name} with ${renderer}`, async ({ page, context }) => {
        const url = `./infinitecanvas/?name=${name}`;
        const url = `./infinitecanvas/?name=${name}&renderer=${renderer}`;
        await page.goto(url);
        await expect(page.locator('canvas')).toHaveScreenshot([
            renderer,
            `${name}.png`,
        ]);
    });
});
CI configuration
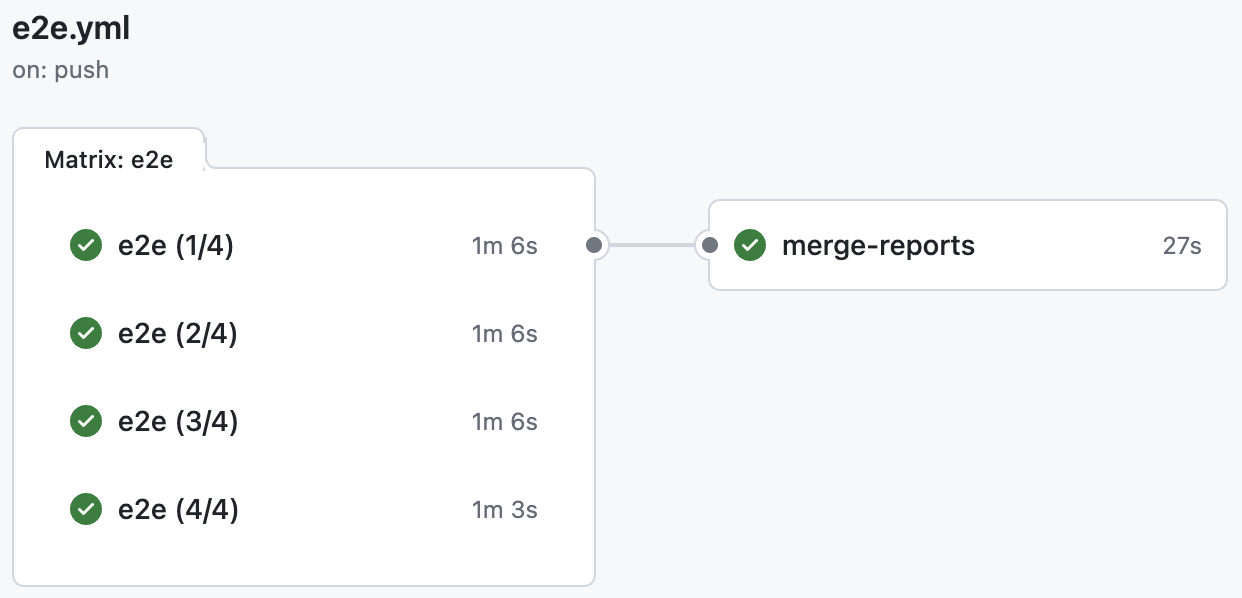
As I mentioned before, sharding supports multiple machine parallelism on CI, and each machine can have multiple threads enabled. For example, let's use 4 machines, each with 10 workers in parallel, and merge the reports into a single one at the end.
jobs:
    e2e:
        timeout-minutes: 60
        runs-on: ubuntu-latest
        strategy:
            fail-fast: false
            matrix:
                shard: [1/4, 2/4, 3/4, 4/4]
Runs as follows, for details: E2E action
AWS lambda function
Now we need to create a Lambda function on AWS that performs server-side rendering using a custom Layer containing headless-gl.
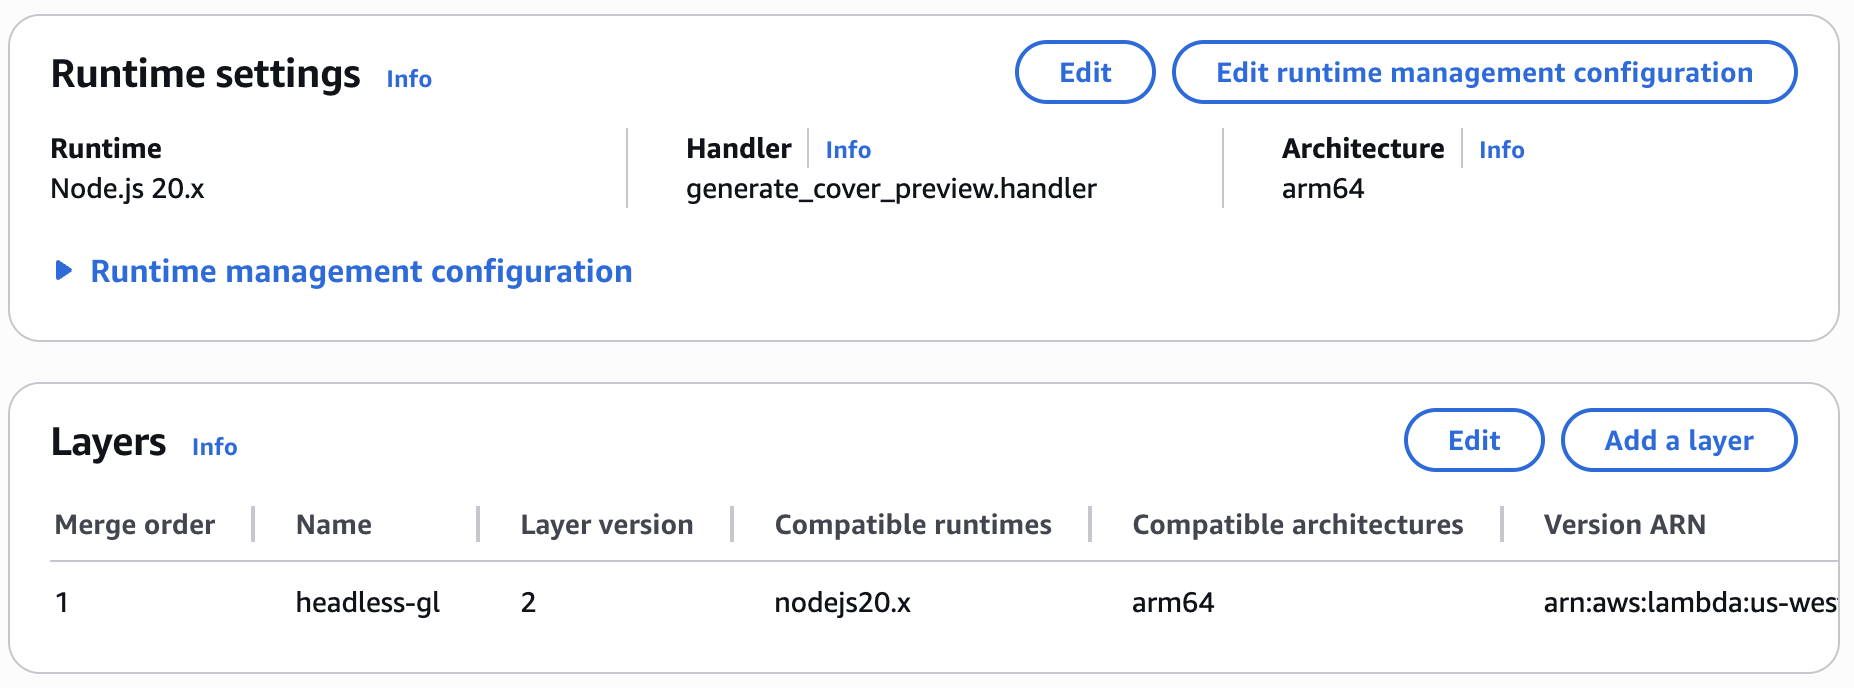
Let's build the Layer locally using the Amazon Linux 2023 image, since our target runtime environment is Node.js 20.x:
# Lambda runtime compatible base
FROM amazonlinux:2023

# Enable Node.js 20 and essential build tools
RUN yum update -y && \
    yum install -y \
      gcc \
      gcc-c++ \
      make \
      python3 \
      pkgconf-pkg-config \
      mesa-libGL-devel \
      mesa-libEGL-devel \
      mesa-libGLU-devel \
      mesa-libOSMesa-devel \
      libXi-devel \
      libXext-devel \
      libX11-devel \
      libxcb-devel \
      libXau-devel \
      libXdmcp-devel && \
    ln -sf /usr/bin/python3 /usr/bin/python

WORKDIR /build

# Create nodejs directory (Lambda Layer structure)
RUN mkdir -p nodejs

# Install Node.js (Amazon Linux 2023 default no Node)
RUN curl -fsSL https://rpm.nodesource.com/setup_20.x | bash - && \
    yum install -y nodejs

# Install headless-gl and dependencies
RUN npm install --prefix ./nodejs gl --build-from-source

# Copy mesa libraries (optional but helps ensure runtime success)
RUN mkdir -p lib64 && \
    cp /usr/lib64/libGL.so.* lib64/ && \
    cp /usr/lib64/libGLU.so.* lib64/ && \
    cp /usr/lib64/libOSMesa.so.* lib64/ && \
    cp /usr/lib64/libX11.so.* lib64/ && \
    cp /usr/lib64/libXau.so.* lib64/ && \
    cp /usr/lib64/libXi.so.* lib64/ && \
    cp /usr/lib64/libxcb.so.* lib64/ && \
    cp /usr/lib64/libXdmcp.so.* lib64/ && \
    cp /usr/lib64/libXext.so.* lib64/ || true

# Package final layer zip (AWS expects nodejs/ at root)
RUN zip -r9 /opt/headless-gl-layer.zip nodejs lib64

CMD ["bash"]
Then upload to S3 to complete the creation of the layer:
aws lambda publish-layer-version \
  --layer-name headless-gl-layer \
  --description "Headless GL for Node.js on AL2 arm64" \
  --compatible-runtimes nodejs20.x \
  --compatible-architectures arm64 \
  --content S3Bucket=<your-bucket>,S3Key=headless-gl-layer.zip
You can now select this Layer in the AWS console to add it to your function.
E2E test
Playwright Components (experimental) supports component-level testing of UI frameworks such as React, Svelte, Vue, and others. Compared to writing test cases using @playwright/test, a mount method has been added to the parameter object:
import { test, expect } from '@playwright/experimental-ct-react';

test('should work', async ({ mount }) => {
  const component = await mount(<HelloWorld msg="greetings" />);
  await expect(component).toContainText('Greetings');
});
The recommended testing framework in Lit Testing does not include Playwright, but we can test our Web Components using Playwright Web component testing in the community.
import { defineConfig } from '@playwright/test';
import { defineConfig } from '@sand4rt/experimental-ct-web';

export default defineConfig({});
Now it's time to write tests against our Web Component component.
Test Web Component
Using the camera zoom toolbar component as an example, we can test whether the zoom property is being displayed correctly:
import { test, expect } from '@sand4rt/experimental-ct-web';
import { ZoomToolbar } from '../../packages/ui/src';

test('should display zoom correctly.', async ({ mount }) => {
    const component = await mount(ZoomToolbar, {
        props: {
            zoom: 100,
        },
    });
    await expect(component).toContainText('100%');
});
Browser compatibility test
BrowserStack is a cloud testing platform that provides a range of tools and services for testing web and mobile applications across different browsers, operating systems, devices, and real-world environments.BrowserStack allows developers and QA (quality assurance) teams to test their applications on a variety of configurations to ensure compatibility, performance, and user experience.
Babylon.js uses browserstack-local for compatibility testing.
Rendering in WebWorker
In addition to the server side, WebWorker is also considered a special runtime environment. Running your rendering code in a WebWorker avoids blocking the main thread and improves performance. Use cases are provided by well-known rendering engines:
In our WebWorker example, the main thread is not busy and therefore does not show its advantages. However, it is possible to experience canvas interactions such as zooming, panning and rotating the camera, picking up shapes, and so on.
Create OffscreenCanvas
First, you need to make sure that your operating environment supports OffscreenCanvas, see Can I use OffscreenCanvas?:
if ('OffscreenCanvas' in window && 'transferControlToOffscreen' in mainCanvas) {
    // Ok to use offscreen canvas
}
Then we need to make our canvas support creation from OffscreenCanvas:
export interface CanvasConfig {
    canvas: HTMLCanvasElement;
    canvas: HTMLCanvasElement | OffscreenCanvas;
}
The main thread code is as follows:
- first transfer the control of the main canvas to the OffscreenCanvas by transferControlToOffscreen
- Create a WebWorker, using the method provided by Vite. This listens for messages that are passed to it, such as setting the mouse style.
- Normally we would pass the first parameter of postMessage to the WebWorker, but since OffscreenCanvas is Transferable, we need to use the second parameter here.
// @see https://vitejs.dev/guide/features.html#import-with-query-suffixes
import Worker from './worker.js?worker&inline';

// 1.
const offscreenCanvas = mainCanvas.transferControlToOffscreen();

// 2.
worker = new Worker();
worker.onmessage = function (event) {
    // TODO: Handle message from WebWorker later.
};

// 3.
worker.postMessage(
    {
        type: 'init',
        offscreenCanvas,
        devicePixelRatio,
        boundingClientRect: mainCanvas.getBoundingClientRect(),
    },
    [offscreenCanvas],
);
The WebWorker code is as follows:
- Get the OffscreenCanvas passed from the main thread in the event object. 2.
- Create a canvas with the OffscreenCanvas and set the devicePixelRatio.
- Create a Render Loop that creates the graphics and adds them to the canvas normally.
// worker.js
self.onmessage = function (event) {
    const { type } = event.data;
    if (type === 'init') {
        // 1.
        const { offscreenCanvas, devicePixelRatio } = event.data;

        (async () => {
            // 2.
            const canvas = await new Canvas({
                canvas: offscreenCanvas,
                devicePixelRatio,
            }).initialized;

            // 3.
            const animate = () => {
                canvas.render();
                self.requestAnimationFrame(animate);
            };
            animate();
        })();
    }
    // ...Handle other messages.
};
In practice, it is inevitable that communication between the main thread and the WebWorker needs to be handled manually. for example:
- interaction events. The event system relies on the DOM API, but it is not available in WebWorker, so you need to listen to the main thread canvas interaction events and notify WebWorker.
- canvas size change. Same as above. 3.
- set the main canvas mouse style.
Events in WebWorker
Taking the pointerdown event as an example, we listen for it on the main canvas, and since the native Event is not Transferable, we need to serialize it and pass it to the WebWorker:
mainCanvas.addEventListener(
    'pointerdown',
    (e) => {
        worker.postMessage({
            type: 'event',
            name: 'pointerdown',
            event: clonePointerEvent(e), // Simple copy of common properties on event objects
        });
    },
    true,
);
The corresponding Hook is triggered directly when the WebWorker receives a message of this type:
self.onmessage = function (event) {
    const { type } = event.data;
    if (type === 'event') {
        const { name, event: ev } = event.data;
        if (name === 'pointerdown') {
            canvas.pluginContext.hooks.pointerDown.call(ev);
        }
    }
};
Handling the canvas size change event is the same as above, so we omit it.
Set cursor style
The WebWorker also needs to pass messages to the main thread during rendering, for example:
- Notify the main thread every frame that rendering is complete, passing statistics such as the actual rendered graphics, the number of rejected graphics, etc.
- Setting the mouse style when the graphic is picked up
setCursor: (cursor) => {
    self.postMessage({ type: 'cursor', cursor });
},
The main thread receives the message and sets the canvas mouse style:
worker.onmessage = function (event) {
    if (event.data.type === 'cursor') {
        mainCanvas.style.cursor = event.data.cursor;
    }
};
Anyway, rendering the canvas in WebWorker requires additional handling of communication with the main thread, interaction events, styles, and UI components all need to be designed with corresponding events. I guess this is the reason why most Web 3D rendering engines only provide simple examples or guidelines.