4강 - 카메라
이번 강의에서는 다음 내용을 중점적으로 다룹니다.
- 카메라란 무엇인가?
- 투영 변환 (Projection transformation)
- 카메라 변환 (Camera transformation)
- 카메라 애니메이션. 랜드마크를 활용한 다양한 카메라 상태 간의 전환
카메라를 조작하면 캔버스에 표시되는 콘텐츠를 바꿀 수 있습니다. 마우스 드래그로 팬(이동), Shift를 누른 채 드래그하면 지정한 지점 중심으로 회전, 마우스 휠로 지정한 지점 중심의 확대/축소가 가능합니다. 버튼을 누르면 부드럽게 초기 상태로 돌아갑니다.
$button = call(() => {
    const $button = document.createElement('button');
    $button.textContent = 'FlyTo origin';
    return $button;
});(async () => {
const { Canvas, Circle, Group } = Lesson4;
const canvas = await Utils.createCanvas(Canvas, 400, 400);
const solarSystem = new Group();
const earthOrbit = new Group();
const moonOrbit = new Group();
const sun = new Circle({
cx: 0,
cy: 0,
r: 100,
fill: 'red',
});
const earth = new Circle({
cx: 0,
cy: 0,
r: 50,
fill: 'blue',
});
const moon = new Circle({
cx: 0,
cy: 0,
r: 25,
fill: 'yellow',
});
solarSystem.appendChild(sun);
solarSystem.appendChild(earthOrbit);
earthOrbit.appendChild(earth);
earthOrbit.appendChild(moonOrbit);
moonOrbit.appendChild(moon);
solarSystem.position.x = 200;
solarSystem.position.y = 200;
earthOrbit.position.x = 100;
moonOrbit.position.x = 100;
canvas.appendChild(solarSystem);
let id;
const animate = () => {
solarSystem.rotation += 0.01;
earthOrbit.rotation += 0.02;
canvas.render();
id = requestAnimationFrame(animate);
};
animate();
unsubscribe(() => {
cancelAnimationFrame(id);
canvas.destroy();
});
const landmark = canvas.camera.createLandmark({
x: 0,
y: 0,
zoom: 1,
rotation: 0,
});
$button.onclick = () => {
canvas.camera.gotoLandmark(landmark, {
duration: 1000,
easing: 'ease',
});
};
return canvas.getDOM();
})();카메라란 무엇인가?
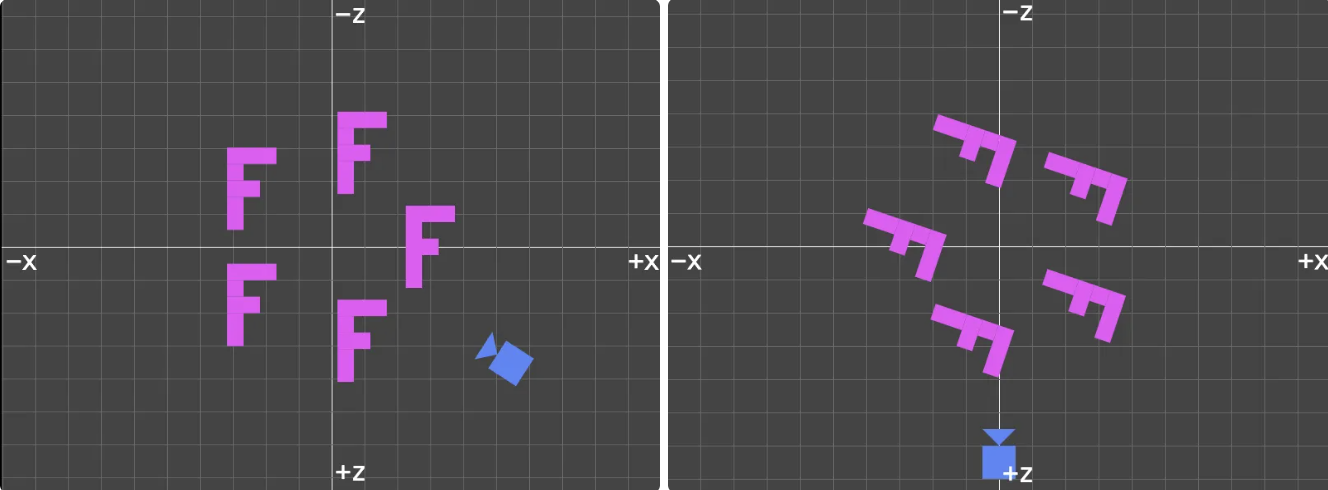
카메라는 우리가 세계를 바라보는 시점입니다. 초점과 카메라 위치가 모두 최종 이미지에 영향을 줍니다. 2D와 3D 씬 모두 마찬가지입니다. 카메라를 제어하면 이전에 전체 캔버스를 이동하던 작업을 쉽게 수행할 수 있고, 카메라 애니메이션도 만들 수 있습니다. WebGL 3D - Cameras의 다음 그림은 XZ 평면의 내용을 위에서 내려다본 모습입니다. 동일한 시각적 효과를 얻으려면, 전체 캔버스 내의 모든 객체를 회전하는 것(오른쪽 이미지)보다 카메라를 이동하는 것(왼쪽 이미지)이 더 직관적이고 구현 성능도 좋습니다. 곧 이 점을 확인할 수 있습니다.
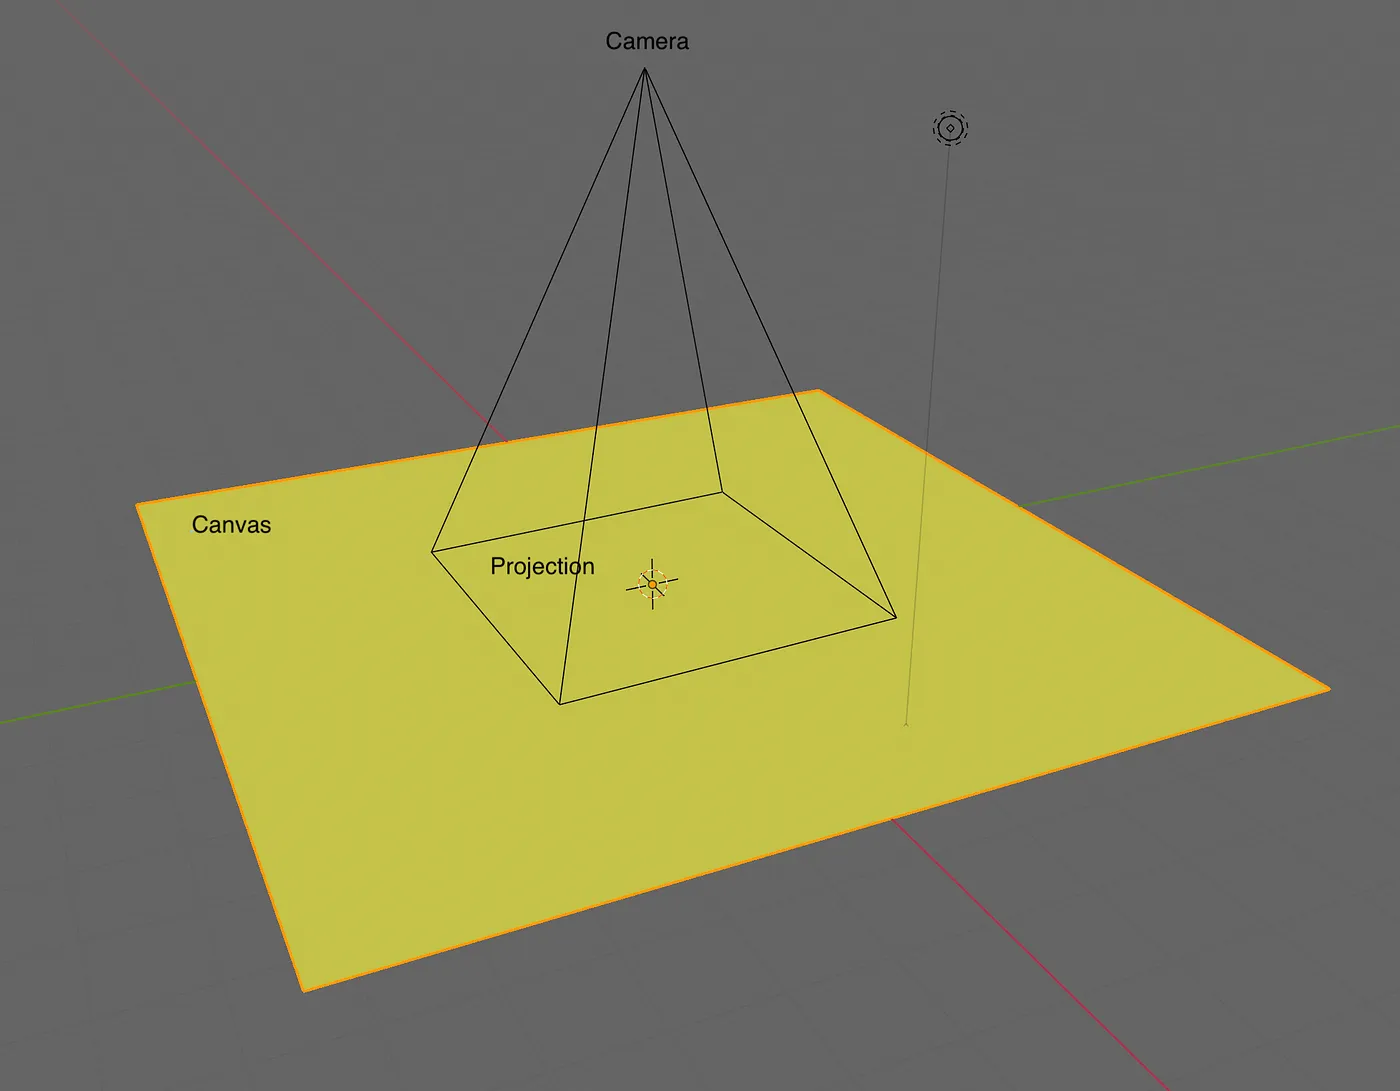
캔버스는 XY 평면에 있고, 카메라는 화면 밖에서 안쪽을 바라봅니다. How to Create a Figma-like Infinite Canvas in WebGL의 다음 이미지를 보면 캔버스를 왼쪽으로 팬하려면 카메라는 오른쪽으로 이동해야 합니다.
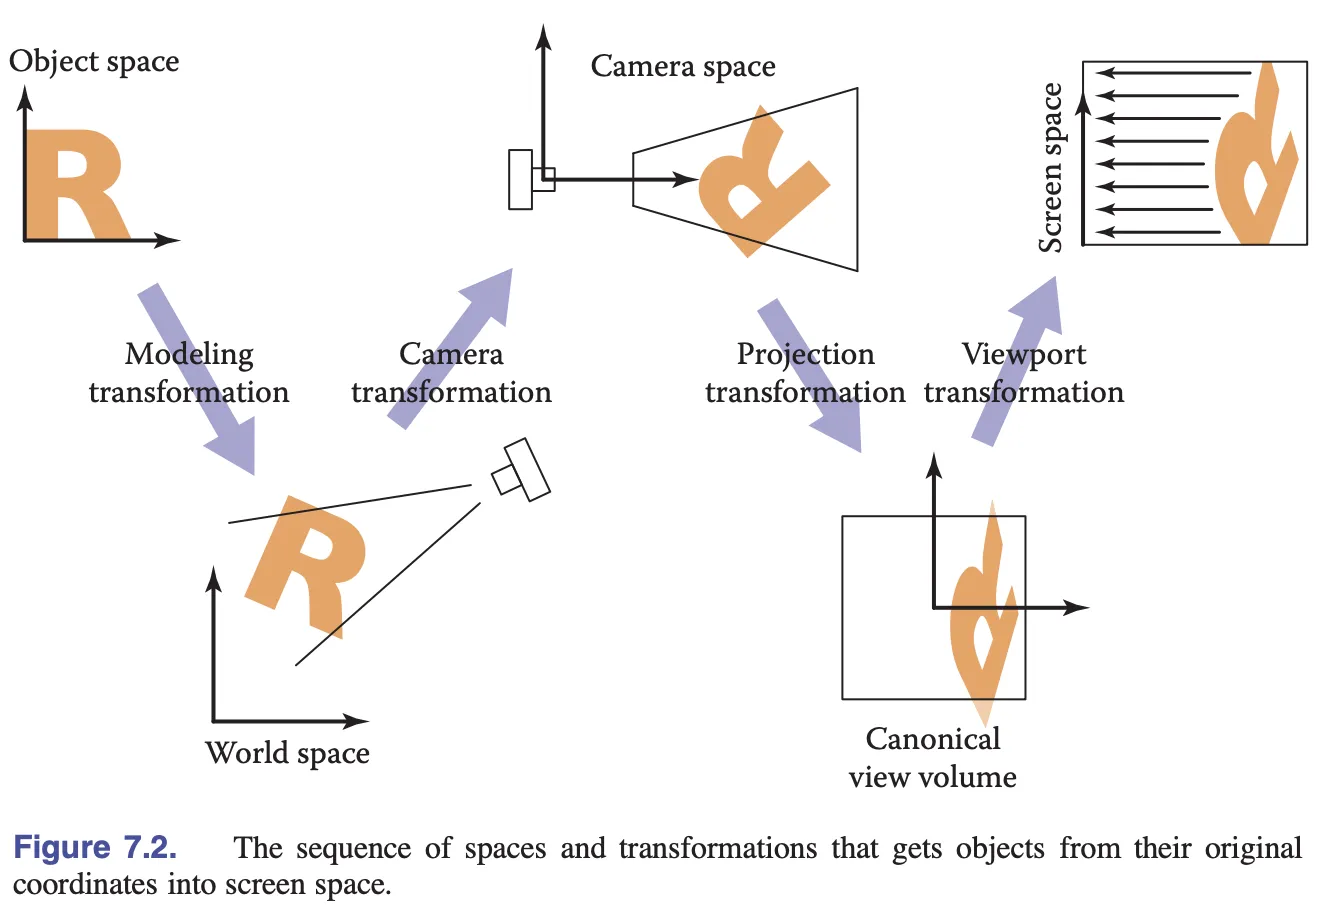
객체가 모델 공간에서 스크린 공간으로 변환되는 여러 단계를 복습해 봅시다. 지난 강의에서 모델 변환을 배웠고, 이번에는 투영 변환과 카메라 변환을 배웁니다.
투영 변환 (Projection transformation)
먼저 이전에 다룬 픽셀 공간에서 클립 공간으로의 변환을 복습해 봅시다.
// 픽셀 공간을 [0, 1]로 변환 (스크린 공간)
vec2 zeroToOne = position / u_Resolution;

// [0, 1]을 [0, 2]로 변환
vec2 zeroToTwo = zeroToOne * 2.0;

// [0, 2]를 [-1, 1]로 변환 (NDC/클립 공간)
vec2 clipSpace = zeroToTwo - 1.0;

// Y축 뒤집기
gl_Position = vec4(clipSpace * vec2(1, -1), 0.0, 1.0);
하나의 투영 변환으로 만들면 코드가 훨씬 깔끔해집니다. 모델 변환 행렬과 바로 곱할 수 있으니까요.
layout(std140) uniform SceneUniforms {
  mat3 u_ProjectionMatrix;
};

gl_Position = vec4((u_ProjectionMatrix
    * u_ModelMatrix
    * vec3(position, 1)).xy, 0, 1);
2D 투영 변환은 아주 간단합니다. width와 height만 있으면 됩니다. 셰이더에서 u_Resolution으로 나누던 것이 여기서는 / width, / height가 됩니다.
[2 / width, 0, 0, 0, -2 / height, 0, -1, 1, 1];gl-matrix의 projection 메서드를 바로 사용합니다. 궁금하면 소스 코드를 확인해 보세요. 구현이 똑같습니다. 캔버스 크기가 바뀔 때마다 이 메서드를 다시 호출해서 재계산해야 합니다.
export class Camera {
    #projectionMatrix = mat3.create();

    get projectionMatrix() {
        return this.#projectionMatrix;
    }

    projection(width: number, height: number) {
        mat3.projection(this.#projectionMatrix, width, height);
    }
}
하지만 지난 강의에서 배운 정렬 문제 때문에 projectionMatrix를 바로 전달하면 안 됩니다. 셰이더로 보내기 전에 mat3에 패딩을 넣어야 합니다.
export function paddingMat3(matrix: mat3) {
    return [
        matrix[0],
        matrix[1],
        matrix[2],
        0,
        matrix[3],
        matrix[4],
        matrix[5],
        0,
        matrix[6],
        matrix[7],
        matrix[8],
        0,
    ];
}
마지막으로 캔버스를 초기화할 때 카메라도 함께 만듭니다. 그러면 나중에 canvas.camera로 접근할 수 있습니다.
export class Canvas {
    #camera: Camera;
    get camera() {
        return this.#camera;
    }

    constructor() {
        const camera = new Camera(width / dpr, height / dpr);
        this.#camera = camera;
    }
}
이제 카메라 변환을 다뤄봅시다. 이동 같은 것 말이죠.
카메라 변환 (Camera transformation)
카메라 변환도 행렬로 표현합니다. 셰이더에서는 다음처럼 쓰면 됩니다. 각 도형마다 모델 변환 행렬 u_ModelMatrix를 계산하고 업데이트하는 것보다, 카메라 변환 행렬을 전역으로 한 번만 업데이트하는 게 훨씬 효율적입니다.
layout(std140) uniform SceneUniforms {
  mat3 u_ProjectionMatrix;
  mat3 u_ViewMatrix;
};

gl_Position = vec4((u_ProjectionMatrix
    * u_ViewMatrix
    * u_ModelMatrix
    * vec3(position, 1)).xy, 0, 1);
카메라 변환 행렬은 월드 좌표계에서 카메라 변환의 역행렬입니다. 앞에서 봤듯이, 카메라가 오른쪽으로 이동하면 씬은 왼쪽으로 이동합니다. gl-matrix의 invert 메서드로 역행렬을 계산합니다. 나중에 쓸 projectionMatrix * viewMatrix 같은 getter도 함께 추가합니다.
export class Camera {
  #matrix = mat3.create();
  private updateMatrix() {
    mat3.invert(this.#viewMatrix, this.#matrix);
    this.updateViewProjectionMatrix();
  }

  get viewMatrix() {
    return this.#viewMatrix;
  }

  get viewProjectionMatrix() {
    return this.#viewProjectionMatrix;
  }

  get viewProjectionMatrixInv() {
    return this.#viewProjectionMatrixInv;
  }
}
이동 (Translation)
infinitecanvas에서 말하는 무한 캔버스의 "확장성"은 캔버스를 마음껏 이동할 수 있다는 뜻입니다.

이제 기본적인 카메라 기능을 구현해 봅시다. 3D 카메라에 비해 훨씬 간단하며, 이동 x/y, 회전 rotation, 확대/축소 zoom을 지원합니다. scaling 대신 zoom이라는 이름을 사용하는 이유는 zoom이 더 일반적으로 사용되기 때문입니다(예: Three.js의 OrthographicCamera.zoom).
export class Camera {
    #zoom = 1;
    #x = 0;
    #y = 0;
    #rotation = 0;

    private updateMatrix() {
        const zoomScale = 1 / this.#zoom;
        mat3.identity(this.#matrix);
        mat3.translate(this.#matrix, this.#matrix, [this.#x, this.#y]);
        mat3.rotate(this.#matrix, this.#matrix, this.#rotation);
        mat3.scale(this.#matrix, this.#matrix, [zoomScale, zoomScale]);
        mat3.invert(this.#viewMatrix, this.#matrix);
        this.updateViewProjectionMatrix();
    }
}
camera.x += 100;을 사용하여 카메라를 이동하면 카메라 행렬을 다시 계산해야 합니다.
export class Camera {
    set x(x: number) {
        if (this.#x !== x) {
            this.#x = x;
            this.updateMatrix();
        }
    }
}
슬라이더를 드래그하여 카메라를 이동해 보세요.
canvas = call(() => {
    const { Canvas } = Lesson4;
    return Utils.createCanvas(Canvas, 400, 400);
});positionX = Inputs.range([0, 100], { label: 'camera.x', value: 0, step: 1 });positionY = Inputs.range([0, 100], { label: 'camera.y', value: 0, step: 1 });call(() => {
const camera = canvas.camera;
camera.x = positionX;
camera.y = positionY;
});(async () => {
const { Circle, Group } = Lesson4;
canvas.getDOM().style.pointerEvents = 'none';
const solarSystem = new Group();
const earthOrbit = new Group();
const moonOrbit = new Group();
const sun = new Circle({
cx: 0,
cy: 0,
r: 100,
fill: 'red',
});
const earth = new Circle({
cx: 0,
cy: 0,
r: 50,
fill: 'blue',
});
const moon = new Circle({
cx: 0,
cy: 0,
r: 25,
fill: 'yellow',
});
solarSystem.appendChild(sun);
solarSystem.appendChild(earthOrbit);
earthOrbit.appendChild(earth);
earthOrbit.appendChild(moonOrbit);
moonOrbit.appendChild(moon);
solarSystem.position.x = 200;
solarSystem.position.y = 200;
earthOrbit.position.x = 100;
moonOrbit.position.x = 100;
canvas.appendChild(solarSystem);
let id;
const animate = () => {
solarSystem.rotation += 0.01;
earthOrbit.rotation += 0.02;
canvas.render();
id = requestAnimationFrame(animate);
};
animate();
unsubscribe(() => {
cancelAnimationFrame(id);
canvas.destroy();
});
return canvas.getDOM();
})();마우스로 드래그하여 인터랙션할 수 있다면 더욱 직관적일 것입니다.
플러그인 구현
이 기능을 플러그인으로 구현합니다.
export class CameraControl implements Plugin {}

[new CameraControl(), new Renderer()].forEach((plugin) => {
  plugin.apply(this.#pluginContext);
});
How to implement zoom from mouse in 2D WebGL을 참고하여, 마우스 이벤트 객체에 포함된 좌표를 캔버스 좌표에서 클립 공간 좌표로 변환합니다.
function getClipSpaceMousePosition(e: MouseEvent): vec2 {
    // CSS 공간
    const rect = canvas.getBoundingClientRect();
    const cssX = e.clientX - rect.left;
    const cssY = e.clientY - rect.top;

    // [0, 1]로 정규화
    const normalizedX = cssX / canvas.clientWidth;
    const normalizedY = cssY / canvas.clientHeight;

    // 클립 공간으로 변환
    const clipX = normalizedX * 2 - 1;
    const clipY = normalizedY * -2 + 1;

    return [clipX, clipY];
}
다음으로 mousedown 이벤트를 수신하고 후속 mousemove 및 mouseup 이벤트를 처리합니다.
canvas.addEventListener('mousedown', (e) => {
    e.preventDefault();
    window.addEventListener('mousemove', handleMouseMove);
    window.addEventListener('mouseup', handleMouseUp);

    // 뷰 프로젝션 행렬의 역행렬
    mat3.copy(startInvertViewProjectionMatrix, camera.viewProjectionMatrixInv);
    // 월드 공간에서의 카메라 위치
    startCameraX = camera.x;
    startCameraY = camera.y;
    // 마우스 위치를 월드 공간으로 변환
    startPos = vec2.transformMat3(
        startPos,
        getClipSpaceMousePosition(e),
        startInvViewProjMatrix,
    );
});
다음 변수들을 기록합니다.
startInvViewProjMatrix- 카메라 투영 행렬의 역행렬startCameraX- 월드 공간에서 카메라의 X 좌표startCameraY- 월드 공간에서 카메라의 Y 좌표startPos- 현재 마우스 위치(월드 공간). NDC(Normalized Device Coordinates) 공간의 좌표를 카메라 투영 행렬의 역행렬로 변환하여 얻습니다.
마우스를 놓으면 이벤트 리스너를 해제하여 드래그 인터랙션을 종료합니다.
function handleMouseUp(e) {
    window.removeEventListener('mousemove', handleMouseMove);
    window.removeEventListener('mouseup', handleMouseUp);
}
마우스가 이동하면 카메라도 함께 이동합니다. 마찬가지로 월드 공간 좌표로 변환합니다. 그런 다음 이전 mousedown 시 저장한 마우스 위치에서 현재 마우스 위치를 빼서 이동 거리를 구합니다.
function handleMouseMove(e: MouseEvent) {
    moveCamera(e);
}

function moveCamera(e: MouseEvent) {
    const pos = vec2.transformMat3(
        vec2.create(),
        getClipSpaceMousePosition(e),
        startInvertViewProjectionMatrix,
    );

    camera.x = startCameraX + startPos[0] - pos[0];
    camera.y = startCameraY + startPos[1] - pos[1];
}
페이지 상단의 예제에서 캔버스를 드래그해 보세요.
회전 (Rotation)
회전은 캔버스의 필수 기능은 아니지만, FigJam 사용자가 포럼에서 지원 여부를 문의한 적이 있습니다(Rotate canvas). 캔버스를 약간 회전하는 것이 일반적인 사용 습관에 더 부합하기 때문입니다.
Shift 키를 누른 채 마우스를 드래그하면 캔버스가 회전하도록 만들겠습니다. mousedown 이벤트 리스너에서 KeyboardEvent: shiftKey를 확인하여 회전 모드로 진입할지 결정합니다.
canvas.addEventListener('mousedown', (e) => {
  rotate = e.shiftKey;
});

function handleMouseMove(e: MouseEvent) {
  if (rotate) {
    rotateCamera(e);
  } else {
    moveCamera(e);
  }
}
카메라 회전 모드에서는 마우스 이동 거리를 회전 각도로 사용합니다. 다음으로 월드 좌표계에서 지정된 지점을 중심으로 회전하는 변환 행렬을 구성합니다. 이는 transform-origin을 참고하세요. 그런 다음 이 변환을 카메라 행렬에 적용하고, 마지막으로 행렬에서 각 파라미터를 추출합니다.
function rotateCamera(e: MouseEvent) {
    // 이동 거리를 회전 각도로 변환
    const delta = (e.clientX - startMousePos[0]) / 100;

    // 피벗을 사용하여 행렬 생성
    const camMat = mat3.create();
    mat3.translate(camMat, camMat, [startPos[0], startPos[1]]);
    mat3.rotate(camMat, camMat, delta);
    mat3.translate(camMat, camMat, [-startPos[0], -startPos[1]]);

    // 변환 적용
    camera.x = startCameraX;
    camera.y = startCameraY;
    camera.rotation = startCameraRotation;
    mat3.multiply(camMat, camMat, camera.matrix);

    // 카메라 파라미터 재설정
    camera.x = camMat[6];
    camera.y = camMat[7];
    camera.rotation = startCameraRotation + delta;
}
페이지 상단의 예제로 돌아가서 Shift를 누른 채 캔버스를 드래그해 보세요.
피벗 중심으로 줌
무한 캔버스에서 팬 외에 줌도 매우 일반적인 작업입니다. 특히 특정 지점을 중심으로 확대/축소하는 기능이 중요합니다.

wheel 이벤트를 수신하고, 먼저 줌 전 마우스 위치를 기록합니다. 줌하고 카메라 행렬을 업데이트한 후 위치의 차이를 계산합니다. 이 차이가 카메라의 이동 거리입니다.
canvas.addEventListener('wheel', (e) => {
    e.preventDefault();
    const position = getClipSpaceMousePosition(e);

    // 줌 전 월드 공간의 마우스 위치
    const [preZoomX, preZoomY] = vec2.transformMat3(
        vec2.create(),
        position,
        camera.viewProjectionMatrixInv,
    );

    // 줌 배율 계산
    const newZoom = camera.zoom * Math.pow(2, e.deltaY * -0.01);
    camera.zoom = Math.max(MIN_ZOOM, Math.min(MAX_ZOOM, newZoom));

    // 줌 후 월드 공간의 마우스 위치
    const [postZoomX, postZoomY] = vec2.transformMat3(
        vec2.create(),
        position,
        camera.viewProjectionMatrixInv,
    );

    // 카메라 이동
    camera.x += preZoomX - postZoomX;
    camera.y += preZoomY - postZoomY;
});
PointerEvent
지금까지 MouseEvent를 수신했습니다. 나중에 이벤트 시스템을 구현할 때 PointerEvent를 소개하겠습니다. 그때 CameraControl 플러그인의 이벤트 리스너 부분을 수정하여 터치스크린 같은 입력 장치도 지원하도록 만들겠습니다.

이제 다음 주제로 넘어가겠습니다. 카메라의 움직임을 더 자연스럽게 만드는 방법입니다.
카메라 애니메이션
Mapbox는 서로 다른 위치 간에 부드럽게 이동하는 flyTo - Mapbox 메서드를 제공합니다. WebGL Insights - 23.Designing Cameras for WebGL Applications를 참고하여 카메라 애니메이션을 구현하고, 임의의 카메라 상태 간에 부드러운 전환을 만들겠습니다.
관련 API의 예상 사용법은 다음과 같습니다.
Landmark를 생성합니다. 카메라의 현재 상태를 나타낼 수 있으며, 위치, 회전 각도, 스케일 같은 파라미터를 설정할 수도 있습니다.- 카메라가 현재 상태에서 지정된
Landmark로 전환되도록 하며, 전환 과정에서 부드러운 효과가 적용됩니다.
const landmark = camera.createLandmark({ zoom: 2 });
camera.gotoLandmark(landmark, { duration: 300 });
랜드마크 생성
Landmark는 카메라 상태를 저장합니다.
export interface Landmark {
    zoom: number;
    x: number;
    y: number;
    rotation: number;
}Landmark를 생성하는 것은 본질적으로 카메라 파라미터를 저장하는 것이며, 사용자가 제공하면 덮어씁니다.
export class Camera {
    createLandmark(params: Partial<Landmark>): Landmark {
        return {
            zoom: this.#zoom,
            x: this.#x,
            y: this.#y,
            rotation: this.#rotation,
            ...params,
        };
    }
}
애니메이션 효과
bezier-easing을 사용하여 Cubic Bézier easing functions을 구현합니다.
import BezierEasing from 'bezier-easing';
export const EASING_FUNCTION = {
    linear: BezierEasing(0, 0, 1, 1),
    ease: BezierEasing(0.25, 0.1, 0.25, 1),
    'ease-in': BezierEasing(0.42, 0, 1, 1),
    'ease-out': BezierEasing(0, 0, 0.58, 1),
    'ease-in-out': BezierEasing(0.42, 0, 0.58, 1),
};
이제 Landmark로 전환하는 API를 설계합니다. Web Animations API를 참고하여 다음 파라미터를 지원합니다.
easingCSS와 동일하게ease,linear등을 지원duration0을 전달하면 애니메이션을 건너뜁니다.onframe애니메이션 프레임 중 호출되는 콜백onfinish애니메이션 종료 시 호출되는 콜백
export class Camera {
    gotoLandmark(
        landmark: Landmark,
        options: Partial<{
            easing: string;
            duration: number;
            onframe: (t: number) => void;
            onfinish: () => void;
        }> = {},
    ) {}
}duration을 0으로 전달하면 애니메이션 효과가 없으며, Landmark에 포함된 카메라 파라미터를 사용하여 바로 업데이트하고 종료 콜백을 트리거합니다.
const { zoom, x, y, rotation } = landmark;

const endAnimation = () => {
  this.#zoom = zoom;
  this.#x = x;
  this.#y = y;
  this.#rotation = rotation;
  this.updateMatrix();
  if (onfinish) {
    onfinish();
  }
};

if (duration === 0) {
  endAnimation();
  return;
}
새 애니메이션을 시작하기 전에 진행 중인 애니메이션이 있다면 중지합니다. 다음으로 애니메이션 각 프레임에 대한 로직을 구현합니다. duration을 초과하면 애니메이션을 즉시 종료합니다.
this.cancelLandmarkAnimation();

let timeStart: number | undefined;
const destPosition: vec2 = [x, y];
const destZoomRotation: vec2 = [zoom, rotation];
const animate = (timestamp: number) => {
  if (timeStart === undefined) {
    timeStart = timestamp;
  }
  const elapsed = timestamp - timeStart;
  if (elapsed > duration) {
    endAnimation();
    return;
  }

  // 지금은 계산 생략

  if (elapsed < duration) {
    if (onframe) {
      onframe(t);
    }
    this.#landmarkAnimationID = requestAnimationFrame(animate);
  }
};
requestAnimationFrame(animate);
이전에 정의한 이징 함수로 시간 값을 구한 다음, vec2.lerp를 사용하여 보간하여 현재 카메라 파라미터를 도출합니다. 이를 적용하여 카메라 행렬을 업데이트합니다.
// 애니메이션 시스템과 동일한 이징 함수 사용
const t = EASING_FUNCTION[easing](elapsed / duration);

const interPosition = vec2.create();
const interZoomRotation = vec2.fromValues(1, 0);

vec2.lerp(interPosition, [this.#x, this.#y], destPosition, t);
vec2.lerp(interZoomRotation, [this.zoom, this.#rotation], destZoomRotation, t);

this.#x = interPosition[0];
this.#y = interPosition[1];
this.#zoom = interZoomRotation[0];
this.#rotation = interZoomRotation[1];
this.updateMatrix();
여기서 작은 최적화를 할 수 있습니다. 카메라 위치의 변위를 계산하여, 거리가 특정 임계값보다 작으면 후속 애니메이션을 수행하지 않고 바로 종료합니다.
const dist = vec2.dist(interPosition, destPosition);
if (dist <= EPSILON) {
    endAnimation();
    return;
}
페이지 상단의 예제로 돌아가서 시도해 보세요. 버튼을 클릭하면 카메라가 초기 상태로 돌아갑니다.