3강 - 씬 그래프와 변환
지난 강의에서 원을 그렸습니다. 이번 강의에서는 다음 내용을 중점적으로 다룹니다.
- 변환(Transformations). 도형에 이동, 확대/축소, 회전, 기울이기 변환을 적용합니다.
- 씬 그래프(Scene graph).
구현을 마치면 이러한 기능들을 활용해 간단한 태양계 모델을 만들 수 있습니다.
(async () => {
    const { Canvas, Circle, Group } = Lesson3;
    const canvas = await Utils.createCanvas(Canvas, 400, 400);

    const solarSystem = new Group();
    const earthOrbit = new Group();
    const moonOrbit = new Group();

    const sun = new Circle({
        cx: 0,
        cy: 0,
        r: 100,
        fill: 'red',
    });
    const earth = new Circle({
        cx: 0,
        cy: 0,
        r: 50,
        fill: 'blue',
    });
    const moon = new Circle({
        cx: 0,
        cy: 0,
        r: 25,
        fill: 'yellow',
    });
    solarSystem.appendChild(sun);
    solarSystem.appendChild(earthOrbit);
    earthOrbit.appendChild(earth);
    earthOrbit.appendChild(moonOrbit);
    moonOrbit.appendChild(moon);

    solarSystem.position.x = 200;
    solarSystem.position.y = 200;
    earthOrbit.position.x = 100;
    moonOrbit.position.x = 100;

    canvas.appendChild(solarSystem);

    let id;
    const animate = () => {
        solarSystem.rotation += 0.01;
        earthOrbit.rotation += 0.02;
        canvas.render();
        id = requestAnimationFrame(animate);
    };
    animate();

    unsubscribe(() => {
        cancelAnimationFrame(id);
        canvas.destroy();
    });
    return canvas.getDOM();
})();
변환 (Transform)
CSS Transform은 translate, scale, rotate, skew 같은 변환 기능을 제공합니다. 이러한 변환의 내부 구현은 행렬 연산을 기반으로 하며, 자세한 내용은 Transformations - LearnOpenGL에서 확인할 수 있습니다. 우리의 씬은 2D 그래픽만 포함하므로 3x3 행렬만 필요하며, 마지막 행 [0, 0, 1]은 고정되어 있어 실제로는 행렬의 6개 요소만 저장하면 됩니다.
| a | c | tx|
| b | d | ty|
| 0 | 0 | 1 |
도형 기반 클래스에 transform 속성을 추가할 때 @pixi/math를 사용하거나, 물론 gl-matrix를 사용해도 됩니다.
import { Transform } from '@pixi/math';

export abstract class Shape {
    transform = new Transform();
}
메서드를 더 추가하기 전에 중요한 개념을 먼저 소개하겠습니다.
로컬 좌표계와 월드 좌표계
좌표계는 씬 내 객체의 위치, 회전, 크기를 표현하는 데 사용됩니다. 가장 잘 알려진 좌표계는 유클리드 좌표계입니다. 그래픽스에서는 무게중심 좌표계도 자주 사용됩니다. 유클리드 공간은 N차원까지 포함할 수 있지만, 여기서는 2차원만 다룹니다.
"달은 지구 주위를 공전한다"고 말할 때, 우리는 사실 지구 이외의 다른 천체들을 무시하고 있습니다. 달의 로컬 좌표계에서 달은 단순히 한 점을 중심으로 회전합니다. 하지만 전체 태양계의 월드 좌표계에서 보면 지구는 태양 주위를 공전하고, 달은 결국 위에서 설명한 것보다 훨씬 복잡한 궤적을 그립니다.
로컬 좌표계와 월드 좌표계 개념은 2D와 3D 세계 모두에서 사용됩니다. playcanvas의 다음 이미지를 보면, 왼쪽은 월드 좌표계로 축이 항상 동일합니다. 오른쪽은 큐브의 로컬 좌표계로, 객체가 변환(여기서는 회전)됨에 따라 축도 함께 변합니다. 따라서 이 회전된 객체가 X축(빨간색) 양의 방향으로 평행 이동하면 바닥에서 벗어날 수 있습니다.

월드 좌표계는 씬 그래프의 모든 노드가 공유하므로 고정된 원점 (0, 0)과 고정된 XYZ축(2D 씬에서는 XY축) 방향을 가집니다. 씬 내 상자가 회전하더라도 월드 좌표계는 변하지 않습니다. 하지만 객체 자신의 로컬 좌표계에서는 원점이 더 이상 (0, 0)이 아니라 객체 자신의 위치이며, 축도 자연스럽게 변합니다. 이름에서 알 수 있듯이 로컬 좌표계는 객체 자체와 연결되어 있습니다.
상자를 "X축(빨간색)을 따라 10단위 이동"시키는 것은 어떤 좌표계를 사용하느냐에 따라 완전히 다른 의미를 가집니다. 따라서 객체를 변환하려면 먼저 어떤 좌표계에서 작업하는지 명확히 해야 합니다.
또한 로컬 좌표계는 **모델 좌표계(Model Coordinate System)**라고도 불리며, 모델 자체의 변환을 설명할 때 더 편리합니다. 각 병사의 머리를 돌리고 싶다면, 로컬 좌표계에서 작업하는 것이 훨씬 쉽습니다. "돌아라"라는 변환은 각 모델의 머리를 기준으로 한 상대적 작업이기 때문입니다.

도형 기반 클래스에 로컬 및 월드 좌표계의 변환 메서드를 추가합니다. @pixi/math에서 제공합니다.
export abstract class Shape {
get localTransform(): Matrix {
return this.transform.localTransform;
}
get worldTransform(): Matrix {
return this.transform.worldTransform;
}
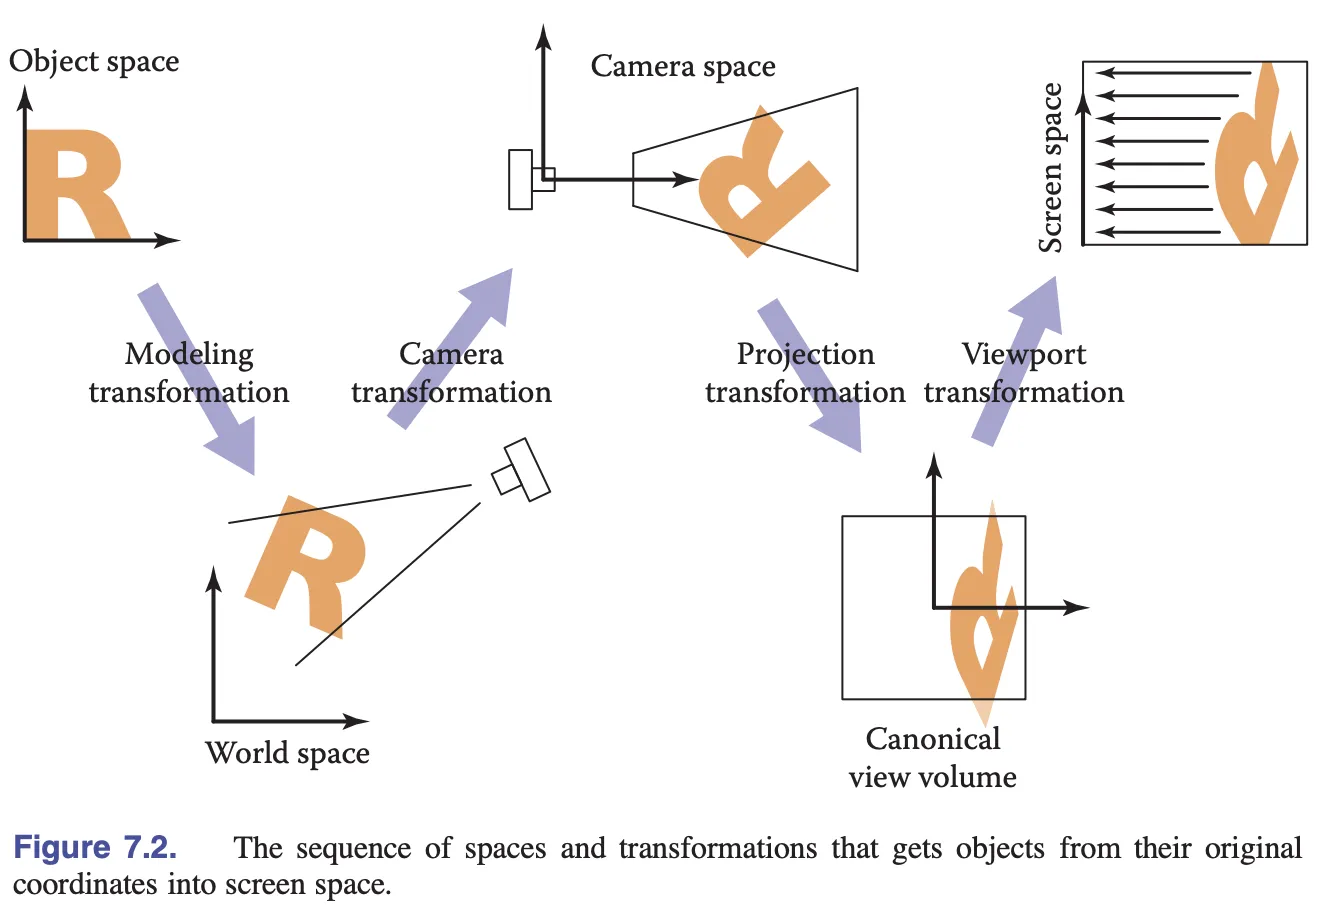
}Fundamentals of Computer Graphics 4th Edition의 다음 그림은 로컬(객체) 좌표계가 모델 변환을 통해 월드 좌표계로, 카메라 변환을 통해 카메라 좌표계로, 투영 변환을 통해 클리핑 좌표계(clip space/NDC)로, 마지막으로 뷰포트 변환을 통해 스크린 좌표계(screen/pixel space)로 변환되는 과정을 보여줍니다. 카메라는 나중에 소개하겠으며, 지금은 모델 변환에만 집중하겠습니다.
이제 모델 변환 행렬을 셰이더에 전달하여 정점 위치를 변환해야 합니다.
정렬 (Alignment)
버텍스 셰이더에서 모델 변환 행렬은 Uniform을 통해 전달되며, 위치 벡터와 왼쪽 곱셈됩니다.
layout(std140) uniform ShapeUniforms {
  mat3 u_ModelMatrix;
};

vec2 position = (u_ModelMatrix * vec3(a_Position + a_Size * a_FragCoord, 1)).xy;
자연스럽게 길이 9(3 * 3 행렬)의 Float32Array를 직접 생성합니다.
this.#uniformBuffer = device.createBuffer({
    viewOrSize: Float32Array.BYTES_PER_ELEMENT * 9, // mat3
    usage: BufferUsage.UNIFORM,
    hint: BufferFrequencyHint.DYNAMIC,
});
하지만 콘솔에서 생성한 Uniform Buffer가 충분히 크지 않다는 오류가 발생합니다. 무슨 일일까요?
[.WebGL-0x10800c78f00] GL_INVALID_OPERATION: It is undefined behaviour to use a uniform buffer that is too small.여기서 Memory layout 개념을 소개해야 합니다. Uniform Block은 packed, shared, std140, std430 레이아웃 규칙을 지원합니다. 레이아웃 규칙이 다르면 버퍼에 데이터를 저장하고 읽는 방식도 달라집니다. std140을 선택하는 장점은 프로그램 간 레이아웃 차이가 없고(packed와 비교), OpenGL 구현 간 차이도 없다는 것입니다(shared와 비교). 하지만 단점은 정렬을 수동으로 처리해야 한다는 것입니다. 공식 문서에서는 정렬 문제를 피하기 위해 vec3 사용을 가능한 한 피하라고 경고합니다.
Warning: Implementations sometimes get the std140 layout wrong for vec3 components. You are advised to manually pad your structures/arrays out and avoid using vec3 at all.
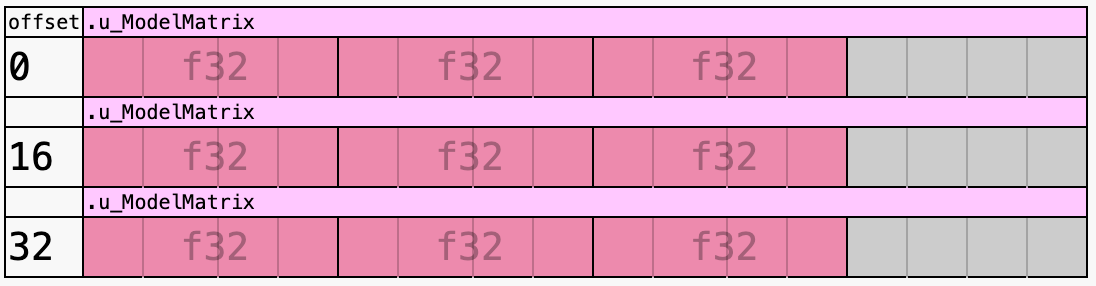
그렇다면 정렬이란 무엇일까요? vec3를 예로 들면, 길이는 4 * 3 Bytes이지만 실제로는 16 Bytes를 차지합니다. 실제로 정렬 규칙은 매우 복잡하며, 여기서 mat3는 실제로 4 * 12 Bytes의 저장 공간을 차지합니다.
this.#uniformBuffer = device.createBuffer({
    viewOrSize: Float32Array.BYTES_PER_ELEMENT * 12, // mat3
    usage: BufferUsage.UNIFORM,
});wgsl-offset-computer는 시각화를 통해 정렬 규칙을 이해하는 데 도움이 되는 훌륭한 온라인 도구입니다.
데이터를 쓸 때 수동으로 패딩을 추가해야 합니다.
| a | c | tx|
| b | d | ty|
| 0 | 0 | 1 |
| padding | padding | padding |const PADDING = 0;
const { a, b, c, d, tx, ty } = this.worldTransform;
this.#uniformBuffer.setSubData(
0,
new Uint8Array(
new Float32Array([
a,
b,
0,
PADDING,
c,
d,
0,
PADDING,
tx,
ty,
1,
PADDING,
]).buffer,
),
);WGSL에도 동일한 Alignment of Uniform and Storage buffers가 있으며, Rust 생태계에는 정렬을 자동화하는 데 도움이 되는 bytemuck이 있습니다. 다음 예제는 bevy에서 가져온 것입니다.
use bytemuck::{Pod, Zeroable};

#[repr(C)]
#[derive(Copy, Clone, Pod, Zeroable)]
pub struct UiMaterialVertex {
    pub position: [f32; 3],
    pub uv: [f32; 2],
    pub border_widths: [f32; 4],
}
이제 도형에 이동, 회전, 확대/축소 같은 변환 API를 추가해 봅시다.
이동 (Translation)
export abstract class Shape {
    get position(): ObservablePoint {
        return this.transform.position;
    }
    set position(value: IPointData) {
        this.transform.position.copyFrom(value);
    }

    get x(): number {
        return this.position.x;
    }
    set x(value: number) {
        this.transform.position.x = value;
    }

    get y(): number {
        return this.position.y;
    }
    set y(value: number) {
        this.transform.position.y = value;
    }
}
사용법은 PIXI.js와 동일합니다.
circle = call(() => {
    const { Circle } = Lesson3;
    return new Circle({
        cx: 100,
        cy: 100,
        r: 50,
        fill: 'red',
    });
});positionX = Inputs.range([0, 100], { label: 'position.x', value: 0, step: 1 });positionY = Inputs.range([0, 100], { label: 'position.y', value: 0, step: 1 });call(() => {
circle.position.x = positionX;
circle.position.y = positionY;
});(async () => {
const { Canvas } = Lesson3;
const canvas = await Utils.createCanvas(Canvas, 200, 200);
canvas.appendChild(circle);
let id;
const animate = () => {
canvas.render();
id = requestAnimationFrame(animate);
};
animate();
unsubscribe(() => {
cancelAnimationFrame(id);
canvas.destroy();
});
return canvas.getDOM();
})();피벗 (Pivot)
회전, 확대/축소, 기울이기는 변환 중심점을 지정해야 합니다. Pixi.js에서는 이를 pivot이라고 부릅니다. CSS의 transform-origin과는 다르며, 자세한 내용은 PixiJS Positioning을 참고하세요.

pivot은 객체 위치의 오프셋에도 영향을 줍니다.

export abstract class Shape {
    get pivot(): ObservablePoint {
        return this.transform.pivot;
    }
    set pivot(value: IPointData) {
        this.transform.pivot.copyFrom(value);
    }
}
회전 (Rotation)
export abstract class Shape {
    get rotation(): number {
        return this.transform.rotation;
    }
    set rotation(value: number) {
        this.transform.rotation = value;
    }
}circle2 = call(() => {
const { Circle } = Lesson3;
const circle = new Circle({
cx: 0,
cy: 0,
r: 50,
fill: 'red',
});
circle.position = { x: 100, y: 100 };
return circle;
});pivotX = Inputs.range([0, 100], { label: 'pivot.x', value: 0, step: 1 });pivotY = Inputs.range([0, 100], { label: 'pivot.y', value: 0, step: 1 });call(() => {
circle2.pivot.x = pivotX;
circle2.pivot.y = pivotY;
});(async () => {
const { Canvas } = Lesson3;
const canvas = await Utils.createCanvas(Canvas, 200, 200);
canvas.appendChild(circle2);
let id;
const animate = () => {
circle2.rotation += 0.01;
canvas.render();
id = requestAnimationFrame(animate);
};
animate();
unsubscribe(() => {
cancelAnimationFrame(id);
canvas.destroy();
});
return canvas.getDOM();
})();확대/축소 (Scaling)
export abstract class Shape {
    get scale(): ObservablePoint {
        return this.transform.scale;
    }
    set scale(value: IPointData) {
        this.transform.scale.copyFrom(value);
    }
}circle3 = call(() => {
const { Circle } = Lesson3;
return new Circle({
cx: 0,
cy: 0,
r: 50,
fill: 'red',
});
});pivotX2 = Inputs.range([0, 100], { label: 'pivot.x', value: 0, step: 1 });pivotY2 = Inputs.range([0, 100], { label: 'pivot.y', value: 0, step: 1 });scaleX = Inputs.range([0, 5], { label: 'scale.x', value: 1, step: 0.1 });scaleY = Inputs.range([0, 5], { label: 'scale.y', value: 1, step: 0.1 });call(() => {
circle3.pivot.x = pivotX2;
circle3.pivot.y = pivotY2;
circle3.scale.x = scaleX;
circle3.scale.y = scaleY;
circle3.position.x = 100;
circle3.position.y = 100;
});(async () => {
const { Canvas } = Lesson3;
const canvas = await Utils.createCanvas(Canvas, 200, 200);
canvas.appendChild(circle3);
let id;
const animate = () => {
canvas.render();
id = requestAnimationFrame(animate);
};
animate();
unsubscribe(() => {
cancelAnimationFrame(id);
canvas.destroy();
});
return canvas.getDOM();
})();기울이기 (Skew)
export abstract class Shape {
    get skew(): ObservablePoint {
        return this.transform.skew;
    }
    set skew(value: IPointData) {
        this.transform.skew.copyFrom(value);
    }
}
씬 그래프 (SceneGraph)
SceneGraph는 2D/3D 가상 씬을 구성하고 관리하는 데이터 구조로, 방향성 비순환 그래프(Directed Acyclic Graph)입니다. 씬 그래프는 두 가지 주요 기능을 제공합니다.
- 부모-자식 관계 표현
- 부모-자식 관계를 기반으로 한 복잡한 계층적 계산의 자동화
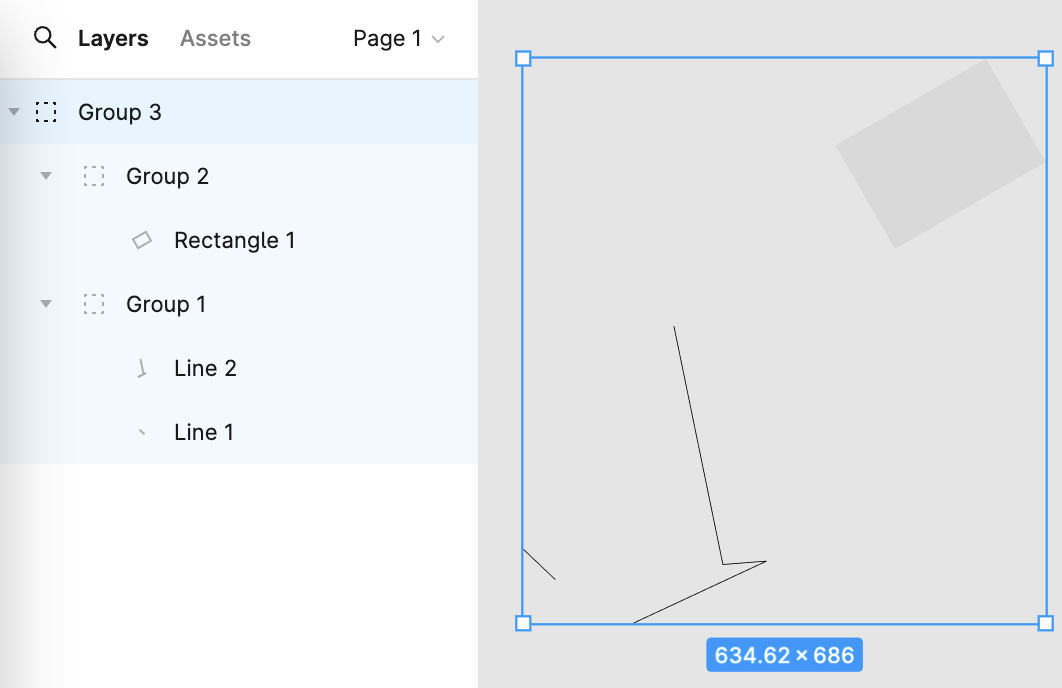
Figma의 왼쪽 패널은 씬 그래프를 보여줍니다.
간단한 태양계 시나리오를 구축해야 한다고 가정해 봅시다. 다음과 같은 계층 구조를 가집니다.
solarSystem
   |    |
   |   sun
   |
 earthOrbit
   |    |
   |  earth
   |
 moonOrbit
      |
     moon
다음과 같은 API로 표현할 수 있습니다. 여기서 Group은 단순히 도형 기반 클래스를 상속하며 렌더링 메서드를 재정의할 필요가 없습니다.
const solarSystem = new Group();
const earthOrbit = new Group();
const moonOrbit = new Group();

const sun = new Circle({
    cx: 0,
    cy: 0,
    r: 100,
    fill: 'red',
});
const earth = new Circle({
    cx: 0,
    cy: 0,
    r: 50,
    fill: 'blue',
});
const moon = new Circle({
    cx: 0,
    cy: 0,
    r: 25,
    fill: 'yellow',
});
solarSystem.appendChild(sun);
solarSystem.appendChild(earthOrbit);
earthOrbit.appendChild(earth);
earthOrbit.appendChild(moonOrbit);
moonOrbit.appendChild(moon);
부모-자식 관계
도형에 parent와 children 속성을 추가합니다.
export abstract class Shape {
    parent: Shape;
    readonly children: Shape[] = [];
}
그런 다음 append/removeChild 노드 메서드를 추가합니다. 자식 노드에 이미 부모 노드가 있는 경우 먼저 제거합니다. 여기서 _parentID 설정은 @pixi/math의 구현과 관련이 있으며, 마지막 섹션에서 다룹니다.
export abstract class Shape {
  appendChild(child: Shape) {
    if (child.parent) {
      child.parent.removeChild(child);
    }
    child.parent = this;
    child.transform._parentID = -1;
    this.children.push(child);

    return child;
  }
}
씬 그래프 순회
계층 구조가 준비되면 재귀를 사용하여 전체 씬 그래프를 순회할 수 있습니다. 여기에 유틸리티 메서드를 추가합니다.
export function traverse(shape: Shape, callback: (shape: Shape) => void) {
    callback(shape);
    shape.children.forEach((child) => {
        traverse(child, callback);
    });
}
캔버스 렌더링 시 위의 유틸리티 메서드를 사용하여 각 도형을 차례로 렌더링합니다.
export class Canvas {
  render() {
    const { hooks } = this.#pluginContext;
    hooks.beginFrame.call();
    this.#shapes.forEach((shape) => {
      traverse(shape, (s) => {
        hooks.render.call(s);
      });
    });
    hooks.endFrame.call();
  }
}
변환 업데이트
씬 그래프에서 자식 노드의 월드 좌표계 변환 행렬은 다음과 같이 계산됩니다.
child's WorldTransform = parent's WorldTransform
    * child's LocalTransform
각 프레임을 렌더링하기 전에 변환 행렬 업데이트를 완료합니다.
hooks.render.tap((shape) => {
  shape.transform.updateTransform(
    shape.parent ? shape.parent.transform : IDENTITY_TRANSFORM,
  );
  shape.render(this.#device, this.#renderPass, this.#uniformBuffer);
});
도형이 변환되지 않은 경우에도 매 프레임마다 업데이트해야 하는지 걱정할 수 있습니다. 결국 전체 씬 그래프의 모든 도형에 대해 작업을 수행하는 것은 상당한 오버헤드입니다. 2강 - Dirty flag에서 이 디자인 패턴을 소개했지만, 이제 @pixi/math의 구현을 분석해 보겠습니다.
변환이 발생할 때마다(예: 평행 이동) 버전 번호 _localID만 증가시킵니다.
this.position = new ObservablePoint(this.onChange, this, 0, 0);

protected onChange(): void {
    this._localID++;
}
로컬 변환 행렬을 업데이트할 때 버전 번호를 사용하여 마지막 업데이트 이후 변환이 발생하지 않았는지 판단합니다. 그렇지 않으면 실제 행렬 연산을 수행합니다. 완료되면 버전 번호를 업데이트하고 _parentID를 재설정하여 월드 변환 행렬을 강제로 업데이트합니다.
updateTransform(parentTransform: Transform): void {
    const lt = this.localTransform;
    if (this._localID !== this._currentLocalID) {
        // 실제 행렬 연산 수행
        lt.a = this._cx * this.scale.x;
        // ...
        this._currentLocalID = this._localID;
        this._parentID = -1;
    }
    if (this._parentID !== parentTransform._worldID) {
        this._parentID = parentTransform._worldID;
        this._worldID++;
    }
}
앞서 추가한 appendChild 메서드를 기억하시나요? 부모가 변경되었으므로 다음 업데이트 시 월드 좌표계의 행렬이 다시 계산되도록 _parentID를 재설정해야 합니다.
appendChild(child: Shape) {
    child.transform._parentID = -1;
}
이 패턴은 PIXI.js에서 바운딩 박스 계산 같은 높은 오버헤드 작업에도 사용됩니다.